Securing NXP i.MX93 with spsdk and Keyfactor
1. Introduction
1.1. Scope of this document
This guide demonstrates how to implement AHAB secure boot with SignServer and spsdk. It prioritizes clarity and hands-on learning. While sections talk about production considerations, organizations deploying to production should conduct a thorough security review and adapt these procedures to meet their specific security requirements, compliance needs, and operational constraints. This document is not meant to replace these reviews as each companies risk assessment is different.
1.2. What You'll Learn
- Understanding AHAB boot architecture (~10 min read)
- Setting up PKI for secure boot (~20 min)
- Configuring SignServer (~45 min)
- Installing and using spsdk (~30 min)
- Signing images and programming fuses (~15 min)
Total time: ~2 hours
Prerequisites: Linux familiarity, basic PKI knowledge, access to i.MX93 board
1.3. Conventions used in this document
1.3.1. Code blocks
Code blocks designate commands to run (or output from commands). They look like this:
Code Block To RunInside of code blocks, you must replace anything in < and > brackets with your specific data. For example:
cat <filename_to_dump>means that we replace <filename_to_dump> with the actual file we want to view the output of. If we want to see the contents of the file ~/.bashrc then the above command would become cat ~/.bashrc instead.
1.3.2. Bold text
Text in bold indicates a screen title, menu selection, or button text expected to be clicked on the screen during configuration. For example:
In the Workers tab we add a worker by clicking Workers > Add…
or
Navigate to Add… under the Workers tab
2. Understanding AHAB Boot Architecture
2.1. “Before/After” AHAB Boot Comparison

2.2. i.MX93 AHAB Boot Sequence
The diagram below shows the i.MX93 boot sequence. Before diving in, here are three key concepts:
1. Boot ROM verifies the bootloader chain
Containers 1-3 are verified before any code runs
Linux Kernel/DTB is verified separately (Container 4)
2. Why separate OS verification?
✅ Update Linux without touching bootloader
✅ Deploy different OS images to same bootloader
✅ Separate bootloader keys from OS keys (if desired)
3. ELE does the heavy lifting
Dedicated security co-processor
Performs all cryptographic operations
Protects SRK hash from software access
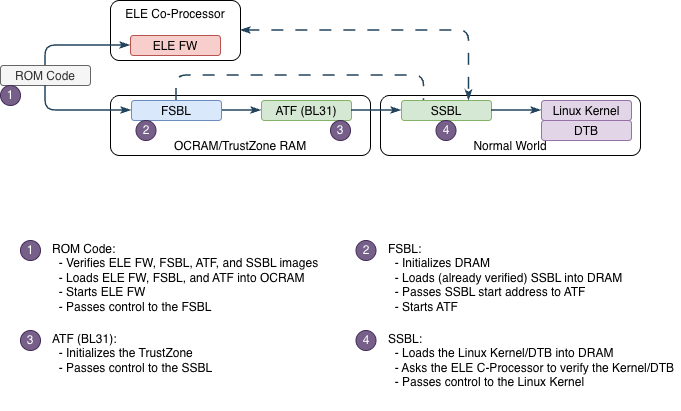
For detailed component definitions, see the eMMC/SD Configuration section below.
2.3. i.MX93 eMMC/SD configuration
The following figure represents the storage configuration that the OEM provisions. This could be eMMC, an SD card, etc.
Note: These are ordinal container numbers. Some tools use 0-based indexing (Container 0 = first container).

This table describes the components used in AHAB boot in the diagram above.
💡 Important scope note
AHAB Boot uses boot image containers to implement secure boot from RomBOOT up to the Linux Kernel (in this example). It does not verify the rootfs. Therefore, the applications running in Linux are not verified.
That is /bin, /sbin, /lib, /etc, /usr, /home, /var, etc. and its contents are not verified. That verification is typically done by other tools such as dm-verity (for integrity), dm-crypt (for encryption), or IMA/EVM.
Item | Description | Comments |
|---|---|---|
imx-boot*.bin-flash_singleboot |
| Created by Yocto build. Contains bootloader chain from ELE firmware through U-Boot. |
flash_os.bin |
| Created by a Yocto build, typically |
container 1 |
| NXP proprietary, signed with NXP private keys. |
container 2 |
| Signed by OEM SRK keys. Built from u-boot-imx source in Yocto. |
container 3 |
|
|
|
| |
container 4 |
| Signed by OEM SRK keys. Created using |
rootfs |
| Not verified by AHAB. Optional verification via |
2.4. Configuring Yocto NXP i.MX93 build for AHAB boot
- Establish standard Yocto build environment using NXP's manifest-based BSP distribution
(imx-linux-scarthgapbranch) - Integrate the
meta-imx-frdmlayer into the build environment - Build the base image to create a populated
u-bootsource code segment under the appropriatetmp/workdirectory. Example: For the imx91 the file isimx91_11x11_frdm_defconfig
💡 Note: This step downloads the defconfig files for the target board.
- Create a custom meta layer to extend the default image recipe
- Create U-Boot bbappend file in custom layer (
u-boot-imx_2024.04.bbappend) - Generate patch file that modifies board-specific defconfig to add
CONFIG_AHAB_BOOT=y - Configure custom layer to inject the patch into U-Boot build process via
FILESEXTRAPATHSandSRC_URI - Set appropriate layer priority to ensure custom modifications take precedence (10 should work).
- Rebuild U-Boot and image with AHAB boot support enabled
- Verify
CONFIG_AHAB_BOOTis active in compiled U-Boot (ahab_status command available in U-Boot console) - Change directories to the
deploy/images/<board_model>and use themkimage_imx8tool with proper offsets for the board to create theflash_os.binfile. - Copy the
flash_os.binandimx-boot-imx93frdm-sd.bin-flash_singlebootfile off the build machine. These are the files used below in the signing operations.
💡 IMPORTANT: The CONFIG_AHAB_BOOT flag activates AHAB verification APIs in the bootloader, enabling authentication of signed boot containers and verification of the chain of trust during boot.
The approach outlined above follows standard Yocto Project practices for customizing BSP components without modifying upstream source repositories.
✅ Checkpoint: You should now have two files ready for signing:
imx-boot-imx93frdm-sd.bin-flash_singlebootflash_os.bin
3. Setting up PKI for secure boot
3.1. PKI Configuration - Considerations
The actual on-chip configuration does not require a PKI. However, SignServer does require one to verify that the worker is within its active/authorized time period. The ultimate configuration for the PKI behind SignServer must follow the Certificate Policy (CP) and Certificate Practice Statement (CPS) for the organization.
💡 Keyfactor recommends having a specific CP/CPS PKI policy for Secure Boot use cases.
Items to consider:
The worker keys are used to create the hash (SRKH) burnt onto the devices (efuses).
The PKI keys are only used by SignServer
The worker keys form the Root of Trust for secure boot; these keys are the only ones the device trusts in the boot process.
SRKH is immutable on devices in the field.
The worker keys cannot change over time.
SRKH holds four (4) public keys
All four (4) keys must be of the same algorithm and size.
The implications here are:
Device trust is based on SRKH (eFuse-burned hash), not certificates.
Operational security is enforced via SignServer access controls.
Compromised keys are addressed via worker deletion and hardware revocation fuses on devices, not certificate expiration.
Keys cannot be rotated or changed once devices are fielded
Therefore, the use case is outside of standard PKI practices & organizations should treat this as such. Also, there is precedent in the industry via IEEE 802.1AR for hardware-bound device identity certificates lasting for the life of the device (IDevID).
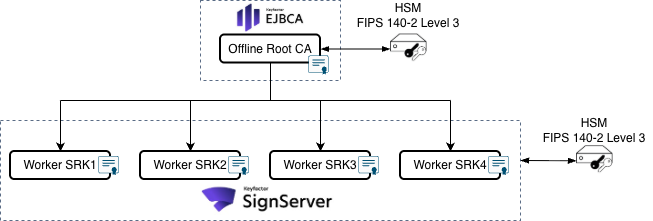
3.2. Example PKI structure
Here is an example PKI structure for this signing use case. HSMs should be FIPS 140 certified and (preferably) Level 3.
3.3. Focus Security Where It Actually Matters
Real security controls:
HSM protection of private keys and signing operations
Offline Root CA with ceremony-based access (to create and sign workers)
Multi-person authorization for production signing operations
One person can enable the worker
Another must sign
Comprehensive audit logging and reviews
Geographic separation of key backups
Revocation happens in the revocation fuses on the i.MX93
Security exceptions:
Certificate expirationCertificate renewal with same keysIntermediate Issuing CA
The best practices of certificate expiration assumes the keys are rotatable. The assumption does not hold here, so these PKI best practices don’t apply.
4. Configuring SignServer
4.1. Setup Overview
- Create key pairs (~10 minutes)
- Create signing workers (~15 minutes)
- Create CSRs (~5 minutes)
- Import signed certificates (~10 minutes)
- Extract public keys (~5 minutes)
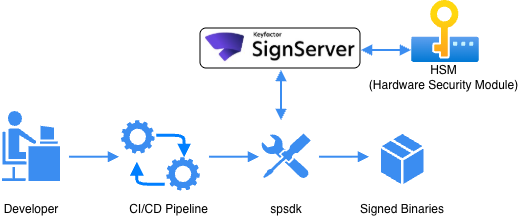
4.2. Signing workflow diagram
4.3. Overview of SignServer
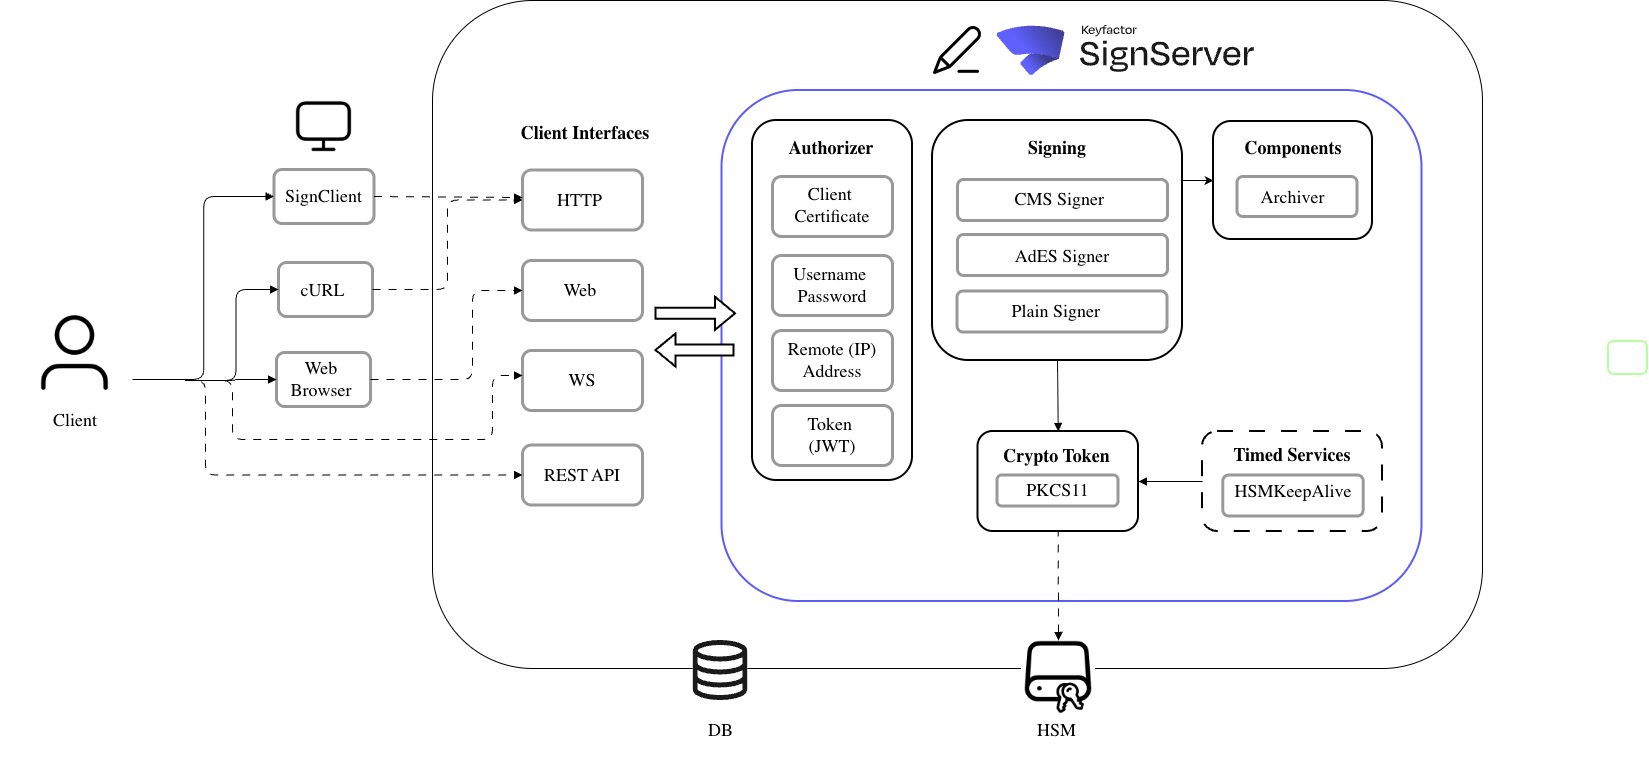
SignServer Logical Diagram
Refer to the above diagram elements:
Item | Description |
|---|---|
Client | The individual or CI/CD pipeline initiating the flow |
spsdk | [Not shown]. spsdk replaces the SignClient box above. It speaks to SignServer through HTTP calls. |
Authorizer | The mechanism that verifies signing requests. This is typically an mTLS (client) certificate or a JWT. |
Signing | Signers (also named Workers) inside of SignServer define how the signing operation occurs. |
Crypto Token | The interface into the HSM module. The HSM performs the signing operations at the request of the Workers. |
4.4. Create key pairs
The first step in configuring Keyfactor’s SignServer is to create the cryptographic keys associated with the signing operation (worker).
Log into SignServer as an administrator.
Access the SignServer Administration Web.
On the Workers page, click the CryptoTokenXXX worker. Where XXX is the name of the interface type configured by Keyfactor and attached to your HSM or KeyVault.
Click the Crypto Token tab, select Generate Key…
Specify the following.
New Key Alias: <friendly name for the token>
Key Algorithm: <pulldown for the key type>
Key Specification: <key length or curve to use>
Click Generate.
Repeat steps 4 through 6 for the remaining keys.
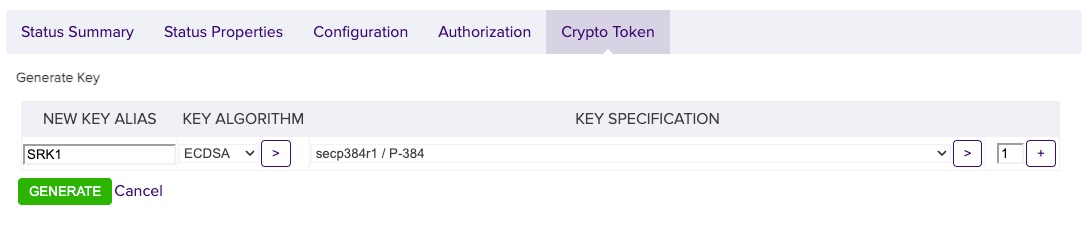
Example Keypair Generation Screen
✅ Checkpoint: You should now have 4 key pairs visible in the Crypto Token tab
4.5. Create signing workers
Workers are the unit that performs certain activities like signing files or hashes. Each worker has its own configuration (properties), a unique ID, and optionally a human-readable name.
For AHAB Secure Boot, we use a PlainSigner type of worker. This worker will take a HASH and then sign it with an appropriate private key. To do this:
Log into SignServer as an administrator.
Access the SignServer Administration Web.
On the Workers page, click the Add… button and select FROM FILE on the next page
Paste a configuration into the box [see below] and select APPLY
Repeat steps 3 and 4 for the remaining keys
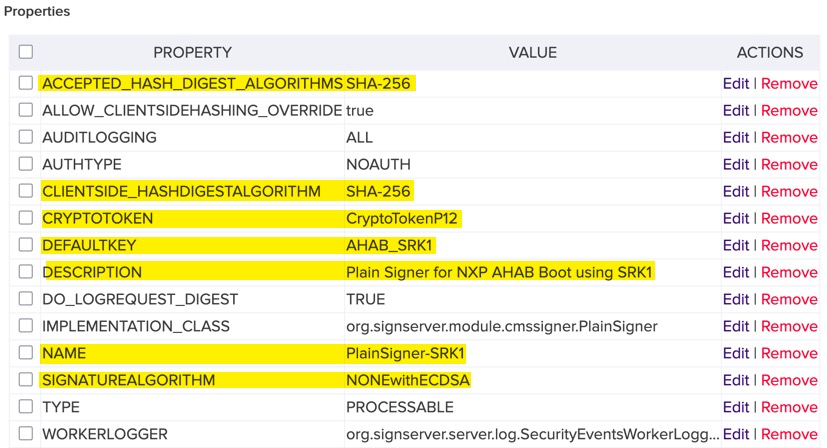
Example Configuration Highlighting Modifiable Fields
![]() WARNING
WARNING
The configuration above has no authorization on the signer. This should be changed or backed up with other means to protect the signing operation. There are many possible ways to protect the worker both inside and outside of SignServer. This discussion should be a part of your security review.
Here is the configuration that created the worker
# Configure a PlainSigner Worker for AHAB Boot
# WORKERGENID1 tells SignServer to automatically assign the next worker number
WORKERGENID1.NAME=PlainSigner-SRK1
WORKERGENID1.DESCRIPTION=Plain Signer for NXP AHAB Boot using SRK1
WORKERGENID1.TYPE=PROCESSABLE
WORKERGENID1.IMPLEMENTATION_CLASS=org.signserver.module.cmssigner.PlainSigner

# Crypto Token and Key used for signing operations - Replace with yours
WORKERGENID1.CRYPTOTOKEN=CryptoTokenP12
WORKERGENID1.DEFAULTKEY=AHAB_SRK1

# Signing configuration
# NOTE: AHAB Requires NONEwithRSAandMGF1 for RSA Signing
#       as PSS padding is a requirement for RSA
WORKERGENID1.ALLOW_CLIENTSIDEHASHING_OVERRIDE=true
WORKERGENID1.ACCEPTED_HASH_DIGEST_ALGORITHMS=SHA-256
WORKERGENID1.CLIENTSIDE_HASHDIGESTALGORITHM=SHA-256
WORKERGENID1.SIGNATUREALGORITHM=NONEwithECDSA

# Authorization of who can sign
WORKERGENID1.AUTHTYPE=NOAUTH

# Auditing and Logging
WORKERGENID1.AUDITLOGGING=ALL
WORKERGENID1.DO_LOGREQUEST_DIGEST=TRUE
WORKERGENID1.WORKERLOGGER=org.signserver.server.log.SecurityEventsWorkerLogger
✅ Checkpoint: You should now have 4 signing workers visible in the Workers tab
4.6. Create CSRs
The next step is to have the workers create a CSR (certificate signing request) that your PKI can sign & eventually upload the signed certificate into the worker.
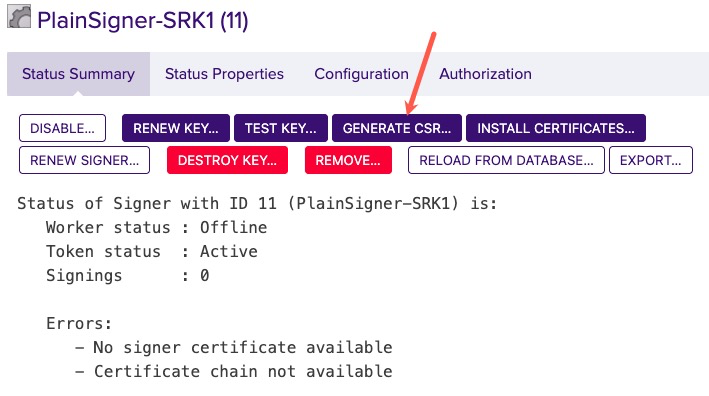
Back on the Workers page, click the name of the worker you just created.
Click the GENERATE CSR… button along the top of the Status Summary page.
WORKER: is already populated
KEY: is already populated
SIGNATURE ALGORITHM: Choose an appropriate signature algorithm like SHA256withRSA or SHA256withECDSA that corresponds to your key.
DN: is the Distinguished Name for the new certificate such as CN=Plain Signer Test,O=My Company, C=SE
Click Generate.
Click the DOWNLOAD button and save the CSR file.

Bring the CSR file to your Certification Authority to get the entire CHAIN of PEM certificates [leaf to root].
Repeat for the remaining workers.
✅ Checkpoint: You should now have 4 signed PEM Chains ready to upload to the signers
4.7. Import signed certificates
Click the Workers tab at the top of the page.
Click the name of the worker you just created.
Click Install certificates and browse for the certificate chain file.
Click Add to have the certificates listed in the chain.
Click Install.
Once the certificates have been installed, the signer should be in state ACTIVE. If not, check the top of its Status Summary page for any errors.
Repeat for the remaining workers.
✅ Checkpoint: Your 4 workers should now be in the ACTIVE state
4.8. Extract public keys
You downloaded the certificate chains above, take these files and copy the PEM for the leaf certificate into a file. [The leaf should be the first certificate in the chain.]
Paste the leaf certificate into a file.
Run the following openssl command on the file to extract the key into a file:
CODEopenssl x509 -noout -pubkey -in <your_x509_cert_file> > <file_file_to_store_key>Repeat for all keys
✅ Checkpoint: You should now have 4 public key files ready
5. Installing and using spsdk
5.1. Create a virtual machine
In this example, we use Ubuntu 24.04 LTS as the server (headless) VM. After the VM is installed proceed to the next steps.
Install prerequisites
sudo apt update && sudo apt upgrade -y
sudo apt install -y python3-venv
Create a virtual environment
python3 -m venv venv
source venv/bin/activate
python -m pip install --upgrade pip
Install spsdk and the Keyfactor integration for spsdk:
pip install --upgrade setuptools
pip install spsdk
pip install spsdk-keyfactor
5.2. Create a directory structure & populate it with the right files
Make the directory
mkdir ~/imx93_demoMove the binaries to sign into it
cp -v imx-boot-imx93frdm-sd.bin-flash_singleboot ~/imx93_demo
cp -v flash_os.bin ~/imx93_demo
Move the root of trust
You need to trust SignServer’s https interface, so download and install the https Root for signserver’s web interface:
cp -v <root_ca_cert_for_signserver_http.pem> ~/imx93_demo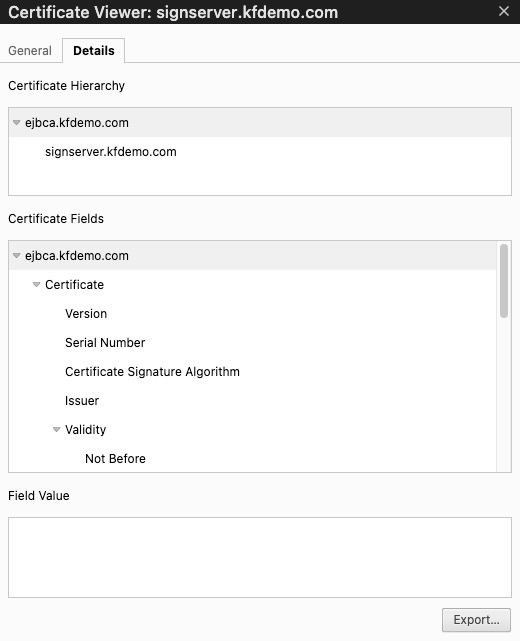
Example of Root Certificate for SignServer HTTP (from Chrome)
Move your mTLS certificate and key
To authenticate to SignServer, we will use mTLS.
Create a p12 from a PKI that SignServer trusts, and copy that into the directory as well:
cp -v auth_creds.p12 ~/imx93_demoCreate a password file with the password of the P12 to pass to spsdk
echo "my_password" > ~/imx93_demo/auth_creds.pwMove the public keys to the directory
cp -v keyfactor_srk_public_key?.pub ~/imx93_demoCreate an environment variable file
vi ~/imx91_demo/.keyfactor.envpaste the values for your signing instance into it:
KEYFACTOR_HOST="https://<your_signserver_instance> "
KEYFACTOR_HOST_VERIFY="~/imx93_demo/<root_ca_cert_for_signserver_http.pem>"
KEYFACTOR_AUTH_TYPE=client_certificate_pkcs12
KEYFACTOR_AUTH_VALUE="~/imx93_demo/auth_creds.p12,~/imx93_demo/auth_creds.pw"
KEYFACTOR_WORKER="<name_of_the_worker_to_sign_your_binary>"
KEYFACTOR_PREHASH="SHA-256"
KEYFACTOR_SIGNATURE_LENGTH=512
Create & modify a template file for the signing operation
Generate the template for the i.MX93
cd ~/imx93_demo
nxpimage ahab get-template -f mimx9352 -o keyfactor-signer.yaml -s
To see the other possible processor families possible to program with spsdk:
nxpimage ahab get-families -c get-template
Modify the template
Change the following:
Change the srk_set to OEM:
srk_set: oemChange the signature_provider line to point to the Keyfactor plugin and your Worker:
signature_provider: type=keyfactor[;worker=<name_of_Worker_to_use>]Change the hash_algorithm to sha256:
hash_algorithm: sha256Change the srk_array to point to the public keys you moved above:
CODEsrk_array: - <key_name_to_use_0> - <key_name_to_use_1> - <key_name_to_use_2> - <key_name_to_use_3>
✅ Checkpoint: You now have a configured environment with all required files in ~/imx93_demo
6. Signing images and programming fuses
6.1. Recommended Testing Workflow
✅ Generate keys
✅ Sign bootloader binary (
signed-imx-boot.bin)✅ Boot on dev board WITHOUT programming fuses
- Expected: Boot fails with AHAB event0x0087FA00(wrong key)
- This proves verification is working (NOTE: The board still boots, so you must look for this AHAB event)✅ Program fuses on dev board
✅ Boot again - should succeed on FIRST AHAB check (may fail on second, since kernel not signed yet).
✅ Only then proceed to production boards
Common Mistakes
Mistake | Impact | Prevention |
|---|---|---|
Programming wrong SRKH | Permanently bricked device | Copy-paste from script output |
Programming production first | Mass bricking | ALWAYS test on dev board |
Not keeping backups | No recovery path | Keep 2-3 spare dev boards |
Typo in fused values | Permanently bricked device | Copy-paste from script output |
6.2. Sign the bootloader containers and get the fuse programming
We can do this by both signing the singleboot image & writing the scripts out:
nxpimage -v ahab sign \
  -c keyfactor-signer.yaml \
  -b imx-boot-imx93frdm-sd.bin-flash_singleboot \
  -o signed-imx-boot.bin \
  -fs script \
  --force
This command outputs a signed binary file named signed-imx-boot.bin.
CRITICAL: FUSE PROGRAMMING IS PERMANENT
❌ Cannot be undone
❌ Wrong values = bricked device
❌ NO recovery possible
✅ ALWAYS test on development boards first
✅ Triple-check SRKH values
✅ Keep backup boards for testing
The output of this command also tells you how to program the fuses on the device (based on the srk_array defined in the yaml file). The output will contain something like this:
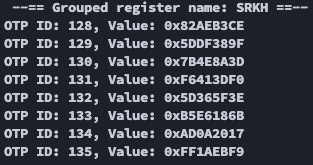
Sample Output Showing Fuse Values
In addition, a scripts directory is created containing the actual script to run. The scripts directory will contain a file named ahab_oem0_srk0_hash_nxpele.bcf showing the commands to run to burn the e-fuses:
# nxpele AHAB SRK fuses programming script
# Generated by SPSDK 3.3.0
# Family: mimx9352, Revision: latest

# Value: 0xCEB3AE829F38DF5D3D8A4E7BF03D41F63E5F365D6B18E6B517200AADF9EB1AFF
# Description: SHA256 hash digest of OEM SRK public keys stored in Container
# Grouped register name: SRKH

# OTP ID: OEM_SRKH0, Value: 0x82AEB3CE
write-fuse --index 128 --data 0x82AEB3CE
# OTP ID: OEM_SRKH1, Value: 0x5DDF389F
write-fuse --index 129 --data 0x5DDF389F
# OTP ID: OEM_SRKH2, Value: 0x7B4E8A3D
write-fuse --index 130 --data 0x7B4E8A3D
# OTP ID: OEM_SRKH3, Value: 0xF6413DF0
write-fuse --index 131 --data 0xF6413DF0
# OTP ID: OEM_SRKH4, Value: 0x5D365F3E
write-fuse --index 132 --data 0x5D365F3E
# OTP ID: OEM_SRKH5, Value: 0xB5E6186B
write-fuse --index 133 --data 0xB5E6186B
# OTP ID: OEM_SRKH6, Value: 0xAD0A2017
write-fuse --index 134 --data 0xAD0A2017
# OTP ID: OEM_SRKH7, Value: 0xFF1AEBF9
write-fuse --index 135 --data 0xFF1AEBF9
💡 The write-fuse command is a part of the UUU (universal update utility) tool. This is a manufacturing tool for NXP chips. The instructions for installing and running this utility are located in github.
6.3. Sign the kernel/DTB container
nxpimage -v ahab sign -c keyfactor-signer.yaml -b flash_os.bin -o os_cntr_signed.bin💡 (the name os_cntr_signed.bin is necessary so that u-boot can identify it as per https://github.com/nxp-imx/uboot-imx/blob/lf_v2024.04/include/configs/imx93_evk.h#L77))
✅ Checkpoint: You now have two signed files ready to place on an eMMC/SD or other devicesigned-imx-boot.bin => The bootloaders (ELE FW, FSBL, ATF(BL31), and SSBL)os_cntr_signed.bin => The Linux kernel and the board’s DTB
7. Summary and next steps
You’ve now completed the full secure boot workflow for the NXP i.MX93 AHAB boot.
7.1. What you’ve accomplished
✅ Understood AHAB boot architecture and container verification
✅ Configured a production-grade PKI for secure boot
✅ Set up SignServer with signing workers (HSM-backed if a production instance was purchased)
✅ Generated fuse programming scripts for device provisioning
7.2. Your final deliverables
✅
signed-imx-boot.bin- Signed bootloader (ready to flash at0x8000)✅
os_cntr_signed.bin- Signed kernel/DTB container✅
ahab_oem-_srk-_hash_nxpele.bcf- Fuse programming script✅ Four active SignServer workers [backed by HSM keys if in a production instance]
7.3. Critical production points to consider
![]() Production deployment note
Production deployment note
This document provides a functional implementation suitable for development and testing. Production deployments require additional hardening, security reviews, and adaptation to your organization's specific security policies and compliance requirements. The points below highlight critical considerations for production use.
Test fuse programming on development boards first - it’s permanent!
Create separate production and development workers with their own keys.
Separating production keys from development keys allows developers to sign and develop without a complex process.
This separation prevents rogue firmware from being executed on production devices & secures against insider attacks
Backup HSM keys and store the backups in geographically separate secure locations
Keyfactor offers cloud HSMs with a BYoK (Bring Your own Key) option
This enables companies to create the keys on their own HSM, back them up, and then wrap & import them into cloud HSMs for signing
Enable comprehensive audit logging for all signing operations
Turn off production workers when signing is not required
Separation of duties with RBAC:
Managers can turn off and on production workers
CI/CD pipeline is initiated by developers/QA
Document the process
Audit the process
7.4. Next steps
Conduct a review of cybersecurity standards to identify cybersecurity requirements.
Establish a set of cybersecurity policies for products in your portfolio
Integrate signing workflow into your CI/CD pipeline
Establish multi-person authorization for production signing
Document your certificate policy (CP/CPS) for secure boot keys
Consider implementing rootfs verification (
dm-verity,IMA/EVM)
Appendix A: Quick Reference
A.1. Common Commands
Task | Command |
|---|---|
List supported SoCs |
|
Generate template |
|
Sign bootloader |
|
Sign OS container |
|
Parse container |
|
A.2. Key Files
File | Purpose | Created By |
|---|---|---|
imx-boot-*.bin-flash_singleboot | Bootloader (containers 1-3) | Yocto |
flash_os.bin | OS container (kernel+DTB) | mkimage_imx8 |
signed-imx-boot.bin | Signed bootloader | nxpimage sign |
os_cntr_signed.bin | Signed OS | nxpimage sign |
keyfactor-signer.yaml | Signing config | nxpimage template |
A.3. Troubleshooting
Symptom | Likely Cause | Solution |
|---|---|---|
Worker status: Offline | Certificate not installed | Install full chain (leaf to root) |
AHAB event: 0x0087FA00 | Wrong key or unfused SRKH | Verify key matches SRKH, or fuses not programmed yet |
AHAB event: 0x0087EE00 | Container not signed | Run nxpimage sign command |
"Family not recognized" | Typo in SoC name | Check: nxpimage ahab get-families |
Appendix B: Glossary
AHAB - Advanced High Assurance Boot (NXP secure boot for i.MX8/9)
ATF - ARM Trusted Firmware (BL31)
Container - Signed structure containing one or more boot images
ELE - EdgeLock Enclave (security co-processor in i.MX93)
FSBL - First Stage Boot Loader (also called SPL)
OCRAM - On-Chip RAM (SRAM for early boot)
SPL - Secondary Program Loader (also called FSBL)
SRKH - Super Root Key Hash (SHA-256 of 4 SRK public keys)
SSBL - Second Stage Boot Loader (full U-Boot)
Appendix C: References
NXP - AN12312 - Secure Boot on AHAB Supported Devices
https://www.nxp.com/docs/en/application-note/AN12312.pdfNXP - i.MX93 Datasheet
https://www.nxp.com/products/processors-and-microcontrollers/arm-processors/i-mx-applications-processors/i-mx-9-processors/i-mx-93-applications-processor-familyNXP - i.MX93 Applications Processor Reference Manual https://www.nxp.com/docs/en/reference-manual/IMX93RM.pdf
Keyfactor - SignServer Documentation
https://www.keyfactor.com/products/signserver-enterprise/NXP SPSDK Documentation
https://spsdk.readthedocs.io/NXP UUU (Universal Update Utility)
https://github.com/nxp-imx/mfgtools