Reference Architecture - Secure Contract Manufacturing
Original Equipment Manufacturers (OEMs) often face the challenge of creating and injecting Initial Device Certificates into devices during production. This process can be complicated by factors such as the location of the Public Key Infrastructure (PKI), which may be either on-premise or remote, the trustworthiness of the manufacturing facility, and the varying capabilities of the devices being manufactured. With the expansion of large fleets of connected devices, securing the identity of IoT devices is becoming an increasingly important requirement.
Keyfactor PKI with Trusted Objects (Trusted Objects Programming Services) plug&go provides a secure and streamlined process for provisioning and managing digital identities for IoT devices at the time of manufacture, transport, and production.
Purpose
This document outlines a technical reference architecture to guide the implementation and management of a Trusted Objects plug&go solution that issues certificates using Keyfactor EJBCA PKI.
Scope
This reference architecture covers the architectural components, security mechanisms, and how to configure EJBCA for a common use case: issuing birthing certificates to devices in the factory using a Trusted Objects plug&go appliance with Keyfactor EJBCA.
Audience
This document's intended audience includes system architects, developers, security professionals, and other stakeholders engaged in evaluating, implementing, and managing Trusted Objects plug&go solutions with Keyfactor EJBCA PKI purposes.
Manufacturing Security Challenges
With the expansion of large fleets of connected devices, the identity of IoT devices is becoming an increasingly important requirement. Device identity is the cornerstone of any end-to-end security scheme, including mutual authentication device-server, secure communication, secure firmware update, etc.
Using digital certificates, the most popular standard being the X.509 certificate, creates a unique and strong digital identity per device.
Device manufacturers face several challenges when working with digital certificates:
Getting a unique device identity in a 3rd party contract manufacturing (CM) environment.
Preventing the interception of key material during the manufacturing process.
Protecting company PKI-issuing certificate authorities from exposure to an untrusted CM.
Ensuring sufficient entropy (randomness) on devices, which may be poor.
Preventing the CM from overproducing and creating counterfeit parts.
Complying with regulatory requirements, such as restrictions on CMs in China connecting to PKIs in EMEA or the US.
Preventing the continued generation of devices if the contract with the CM expires.
Keyfactor's best-in-class PKI provides the foundation for secure device identity provisioning at the factory, a critical requirement when issuing machine identity and production certificates.
Trusted Objects services are available in two variants:
tops plug&go
tops server
When creating device identities on-site, it is crucial to ensure that an untrusted CM or a malicious insider does not leak or copy sensitive information within the CM. This trust is achieved by implementing Keyfactor EJBCA to ensure device integrity and identity.
Solving the Manufacturing Security Problem
By leveraging Keyfactor PKI, manufacturers can ensure operational certificates and other security elements are generated, managed, and injected into devices in a trusted and secure manner, regardless of the factory's existing security infrastructure or the device's technical capabilities.
Mitigation Strategies:
Use X.509 certificates from a private PKI to attest to a unique device identity.
Adhere to standards like WiSUN, IEEE 802.1AR, and Matter, which require a robust PKI from Keyfactor.
Generate key pairs on devices and request certificates using a certificate signing request (CSR).
Ensure access to a good entropy source for constrained devices.
Utilize EJBCA PKI to track the number of certificates issued or revoked.
Keyfactor EJBCA gives the operator the flexibility to deploy the PKI in the cloud (SaaS) or on-site with either a dedicated Hardware Appliance or the flexibility of EJBCA Software Appliances running on a VM or Container.
Enable remote deactivation of the issuing authority in the CM.
Limit the exposure footprint of the PKI to the CM.
Architecture Components
A best-in-class PKI such as EJBCA is the foundation for trusting contract manufacturers. Keyfactor and Trusted Objects have worked together to solve various security challenges. The Keyfactor and Trusted Objects solution components include PKI, Trusted Objects plug&go appliance, and secure communication channels using REST and (m)TLS.
Common Use Cases
Keyfactor PKI secures various use cases, including:
Factory Device Certificate Provisioning: Automates certificate issuance and management for secure device communication.
MCU Programming Center: Protects firmware integrity with code-signing certificates, preventing unauthorized code execution.
Module Secure Provisioning: Encrypts sensitive module data, ensuring only authorized access.
Matter for Smart Home: Provides device attestation certificates for secure onboarding and communication within Matter networks.
This document will cover an example of the Factory Device Certificate Provisioning use case for injecting Matter for Smart Home-compliant certificates onto devices.
Factory Device Certificate Provisioning using Matter
Secure device identity is fundamental for seamless and protected operation within a Matter Smart Home ecosystem. At the manufacturing stage, OEMs can leverage Trusted Objects plug&go and Keyfactor PKI to issue and inject necessary birthing and operational certificates into their Matter-compliant devices.
Key Considerations:
PKI Infrastructure: The choice between on-premises (Docker, hardware, or software appliance) or cloud-based PKI deployment hinges on the OEM's security requirements and operational constraints.
Factory Trust Level: Supplementary security measures may be necessary if the manufacturing facility's trust level is not absolute.
Device Cryptographic Capabilities: Where devices possess sufficient computational resources, they can potentially generate key pairs, create Certificate Signing Requests (CSRs), and directly interact with the EJBCA.
Alternative Provisioning: For devices with limited cryptographic capabilities, alternative provisioning methods might involve utilizing existing programming infrastructure to ensure secure certificate delivery.
The subsequent sections will detail the configuration and testing for the device’s operational certificated use case.
Please note the specifics of Matter certificate provisioning (e.g., Device Attestation Certificates or Product Attestation Intermediate Certificates) may require further tailoring based on your exact use case and the Matter specification.
Configure EJBCA to issue Device Certificates via Trusted Objects plug&go
Figure 1 below shows a typical setup used in the factory to inject device and/or Matter-compliant certificates into a programming machine on the factory floor.
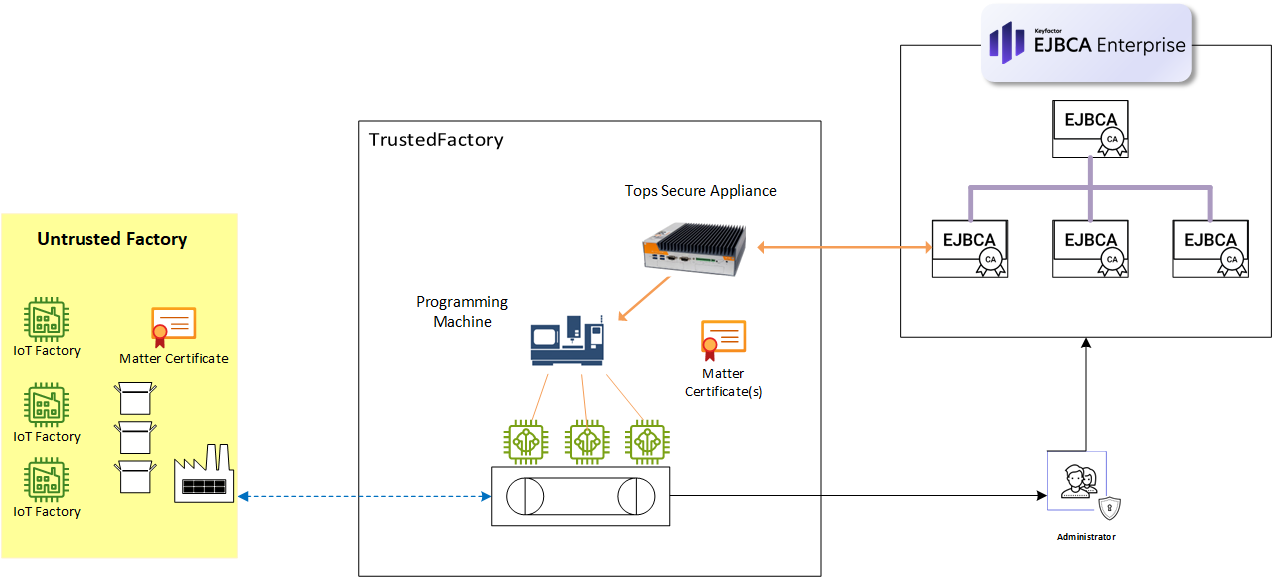
Figure 1. Factory PKI Provisioning for injecting operational certificates
The CSR signing and certificate provisioning flow:
Trusted Objects plug&go, acting as the Registration Authority (RA), securely connects to the Keyfactor EJBCA PKI using TLS.
Trusted Objects plug&go generates keys and sends the CSR to the Keyfactor EJBCA CA for signing via the REST API.
Trusted Objects plug&go retrieves the signed certificates and aggregates all data to be programmed (firmware, input files, data generated by Trusted Objects plug&go, etc.).
Trusted Objects plug&go, manages production batches, and controls the production run.
Prerequisites
This Reference Architecture will use Keyfactor’s PQC Lab, a free SaaS-based PKI sandbox running on Azure. It is a full version of EJBCA Enterprise and will work for issuing certificates used on this Ref. Architecture.
Go to Keyfactor PQC Lab
Click the “Get It Now” button and follow the steps to spin up the instance.
Follow the PQC Lab Quick Start Guide to import the Superadmin certificate into Firefox in order to access the EJBCA Admin page. Important Note
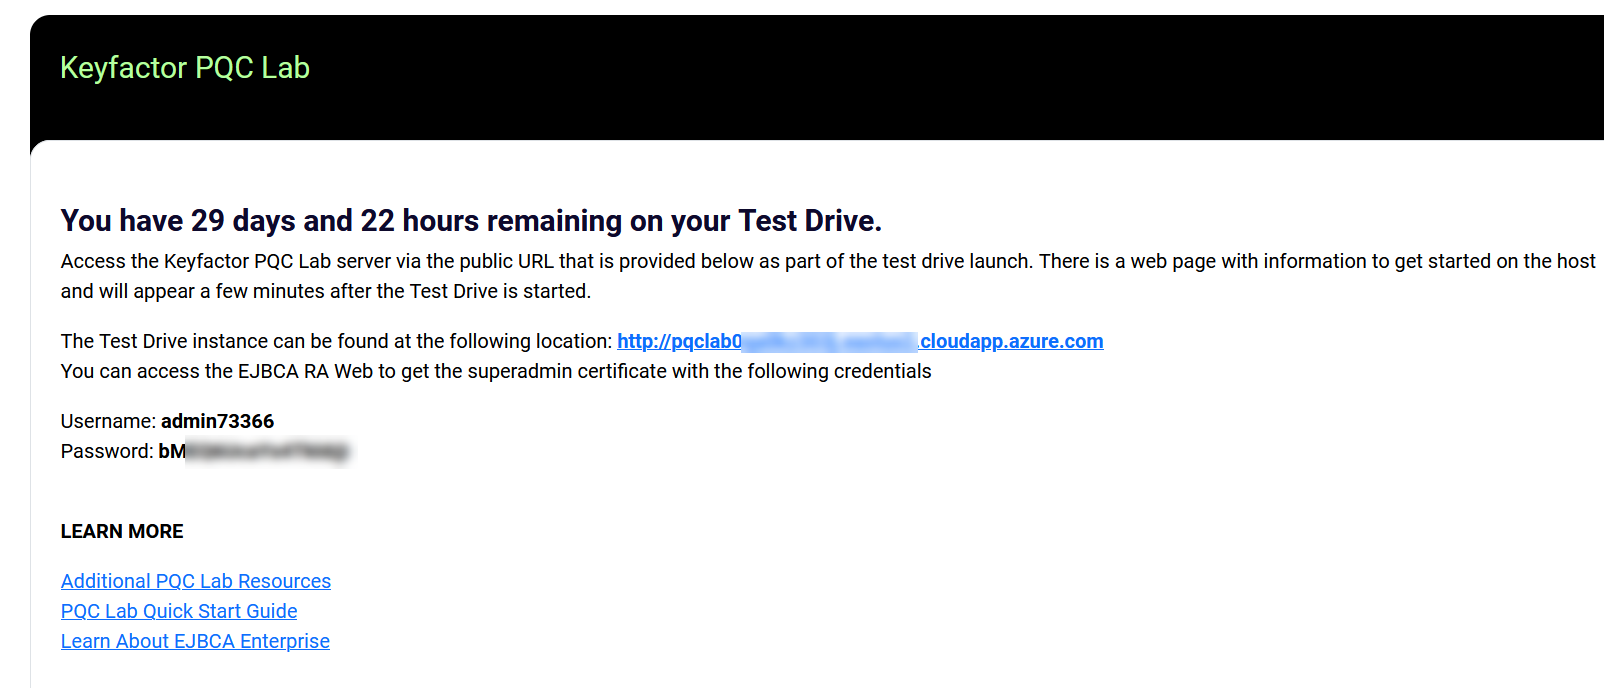
Figure 2. Test Drive URL and Admin Info
Important Note. Keep the Username and Password safe. They will be needed to import the admin certificate to access the EJBCA Administration page and connect to the TOPS instance.
Next, the EJBCA environment will be configured to establish a connection with a tops plug&go instance. This connection will facilitate the issuance of a Matter certificate, leveraging the capabilities of the tops SDK.
Since we don’t have a programming machine, we will simulate one with a Python script. This script is designed to simulate the behavior of a programming device establishing a connection with tops plug&go to acquire a Matter certificate.
Step 1 - Create Root and Issuing CA Crypto Tokens
The first step is creating a crypto token using ECDSA. This token will be shared between the Root and the Issuing CA for this demo. However, a best practice is to have separate crypto tokens for the Root CA and Issuings CAs named PAA and PAI per the Matter standard.
In the EJBCA menu, under CA Functions, click Crypto Tokens.
Click Create new and specify the following on the New Crypto Token page:
Name: Specify a name for the Sub CA crypto token: in this example, tops-CryptoToken.
Auto-Activation: Click Use to enable.
Allow export of private keys: Click Allow to enable.
Authentication Code: Enter a password to activate the crypto token. [Remember this password]
Click Save to create the tops-CryptoToken crypto token.
Next, generate three CA keys:
For the signKey, use the default ECDSA P-256 / prime256v1 / secp256r1 and click Generate new key pair to create the keys.
Repeat to create an internal encryption key: name the key encryptKey and use the default ECDSA P-256 / prime256v1 / secp256r1, and click Generate new key pair.
Last, repeat to create a test key: name the key testKey, select ECDSA P-256 / prime256v1 / secp256r1, and then click Generate new key pair.
Step 2 - Create the Root and Issuing CA Certificate Profiles
Next, create a certificate profile for the root and another for the issuing CAs. The certificate profile defines the constraints of new certificates such as what keys it can use and what the extensions will be. For more information on certificate profiles, see Keyfactor’s Certificate Profiles Overview.
For this example, the CA profiles will be:
Root CA Certificate Profile = tops-PAA-cert-profile-ecdsa256
Issuing CA Certificate Profile = tops-PAI-cert-profile-ecdsa256
To create a certificate profile for PAA (root CA), follow these steps:
In EJBCA, under CA Functions, click Certificate Profiles.
The Manage Certificate Profiles page displays a list of default profilesHighlight ROOTCA and click Clone to clone the RootCA.
Specify a name for the Root CA in the bottom row of the next page, enter "tops-PAA-cert-profile-ecdsa256," and click Create from the template
Find the newly created profile displayed in the list and click Edit.
On the Edit page, update with:
For Type, select Root CA.
For Available Key Algorithms, select ECDSA.
For Available ECDSA curves, ECDSA P-256 / prime256v1 / secp256r1
For Signature Algorithm, use SHA256withECDSA
For Validity or end date of the certificate, specify 25y
Uncheck Subject Alternative Name
Uncheck Issuer Alternative Name
Uncheck LDAP DN order
Click Save to store the root CA certificate profile.
Repeat the above steps to create PAI (issuing CA) with the following settings. Clone the SUBCA certificate profile.
Name: tops-PAI-cert-profile-ecdsa256
Type: Sub CA
Key Algorithm: ECDSA
ECDSA curves: ECDSA P-256 / prime256v1 / secp256r1
For Validity or end date of the certificate, specify 15y
Uncheck Subject Alternative Name
Uncheck Issuer Alternative Name
Uncheck LDAP DN order
Click Save to store the issuing CA certificate profile.
The next step is to create the root and issuing certificate authorities and bind them to the certificate profiles we just created.
Step 3 - Create PAA CA
The next step is to create the Root and Issuing CAs. To create the Root CA, follow these steps in EJBCA:
Click Certification Authorities under CA Functions.
In the Add CA field, enter a name such as "tops-PAA-CA-EC1" and click Create.
On the Create CA page, update:
For Crypto Token, select the crypto token tops-CryptoToken (created earlier)
Note the keys are mapped for their intended usage, and the defaultKey, certSignKey, and testKey are automatically selected with the keys you created.
Under CA Certificate Data, specify the following:
Append the Matter VID=FFF1 at the end of Subject DN: CN=tops-PAA-CA-EC1, VID=FFF1
Signed By: Select Self-Signed
Certificate Profile: Verify the issuing CA profile is selected: in this example, tops-PAA-cert-profile-ecdsa256.
Validity: 25y
Uncheck LDAP DN order
Click Create to create the root CA.
Step 4 - Create PAI CA
To create the Issuing CA that will enroll CSRs and issue Matter Certs to tops, follow these steps in EJBCA:
Click Certification Authorities under CA Functions.
In the Add CA field, enter a name such as "tops-IssuingCA-EC01" and click Create.
On the Create CA page, update:
For Crypto Token, select the crypto token tops-CryptoToken (created earlier)
Under CA Certificate Data, specify the following:
Append the Matter VID=FFF1 at the end of Subject DN: CN=tops-IssuingCA-EC01, VID=FFF1
Signed By: tops-PAA-CA-EC1
Certificate Profile: Verify the issuing CA profile is selected: tops-PAI-cert-profile-ecdsa256
Validity: 15y
Uncheck LDAP DN order
Click Create to create the PAI issuing CA
Step 5 - Create End Entity profile
To create the end entity certificate profile to issue Matter Device Attestation Certificates (DAC) to the tops plug&go appliance:
Device Attestation Certificates or DACs verify the identity of a device. They ensure that the device is genuine and comes from the manufacturer it claims to be from.
In EJBCA, under CA Functions, click Certificate Profiles.
Specify a name for the profile in the bottom row, such as "MATTER-DAC,” and click Add.
Find the newly created profile displayed in the list and click Edit.
On the Edit page, verify the type is End Entity and update the following:
Uncheck End Entity E-mail
Under Subject DN Attributes, select the following Matter settings from the Subject DN Attributes drop-down list and select the VID and PID attributes.
VID, Vendor identifier (Matter)
Check required and uncheck Modifiable
Enter VID = FFF1
PID, Product identifier (Matter)
Check Required and leave Modifiable checked
Under Main Certificate Data, select tops-PAI-cert-profile-ecdsa256 for Default Certificate Profile.
For Available Certificate Profiles, select the same tops-PAI-cert-profile-ecdsa256.
For Default CA, select tops-PAI-CA-EC1.
For Available CAs, select tops-PAI-CA-EC1.
For Default Token, select User Generated.
Click Save to store the certificate profile.
The newly created profile is displayed in the list of certificate profiles.
EJBCA to Trusted Objects plug&go Settings
We will test the EJBCA PKI setup. First, we will modify tops plug&go settings to connect with EJBCA. Second, we will use a Python demo script running on a Windows PC that simulates a programming machine to request a certificate from EJBCA via the Trusted Objects plug&go instance using the REST API.
Please note: Installing and configuring the tops plug&go instance is beyond the scope of this reference architecture. However, we have included some common screenshots of the tops instance to show some of the configuration settings between plug&go and EJBCA.
Please contact your Trusted Objects representitve for a demo test instance.
Step 1: Check the Connection from Trusted Objects to EJBCA
Log into the TOPS instance and check that the EJBCA CA admin p12 certificate has been imported (this demo used admin73366.p12 from the Azure EJBCA lab, figure 2 ). The EJBCA admin certificate authenticates a user before connecting to EJBCA API. To check the connection, use the following steps.
In Projects View, select the Project in this example, BirthCertificate.
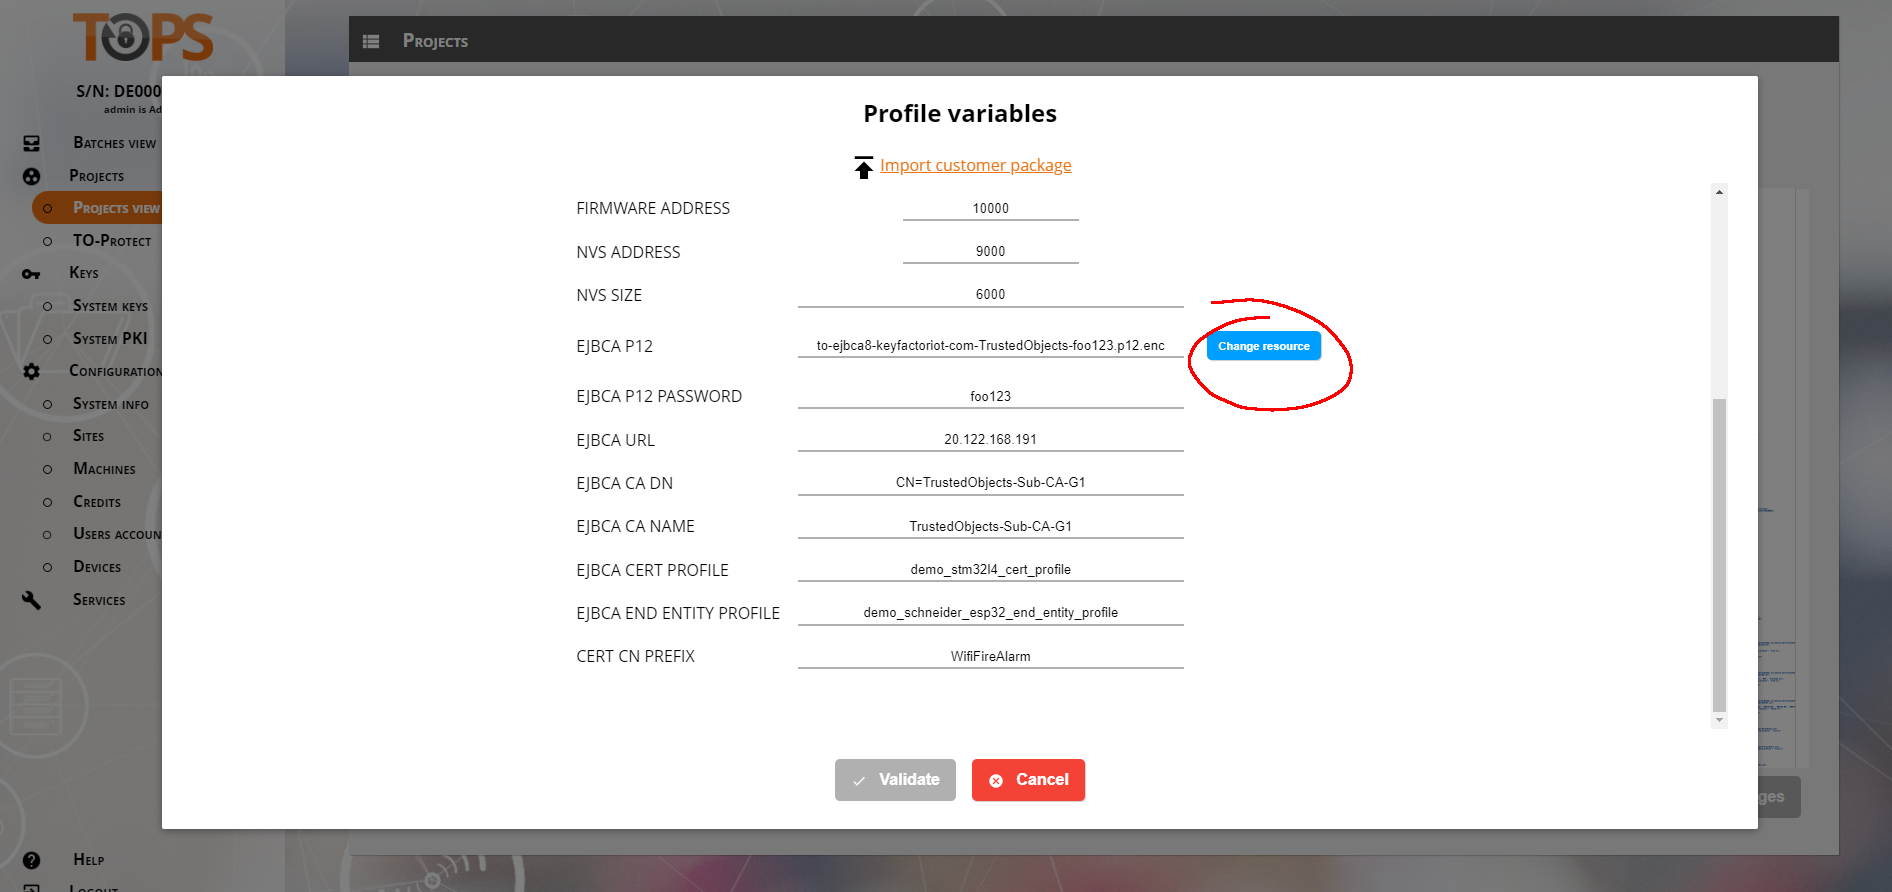
Next, select a profile, BirthCertificate-3. Then click Profile Variables (upper top right), which will display the configuration settings for this Project.

Figure 4. TOPs Instance Showing Project View
Scroll down in the profile variables list and modify the variables related to EJBCA.
EJBCA P12: p12 certificate file used to connect to the EJBCA server. From Azure , Figure 2.
EJBCA P12 PASSWORD: From Azure , Figure 2.
EJBCA URL: EJBCA Server address. See the Prerequisites section above for information.
EJBCA CA DN: Issuing (PAI) CA Distinguished Name
EBJCA CA NAME: Name of the "Certificate Authority" used to sign end entities certificates
EJBCA CERT PROFILE: Name of the "Certificate Profile"
EJBCA END ENTITY PROFILE: Name of the "End Entity Profile"
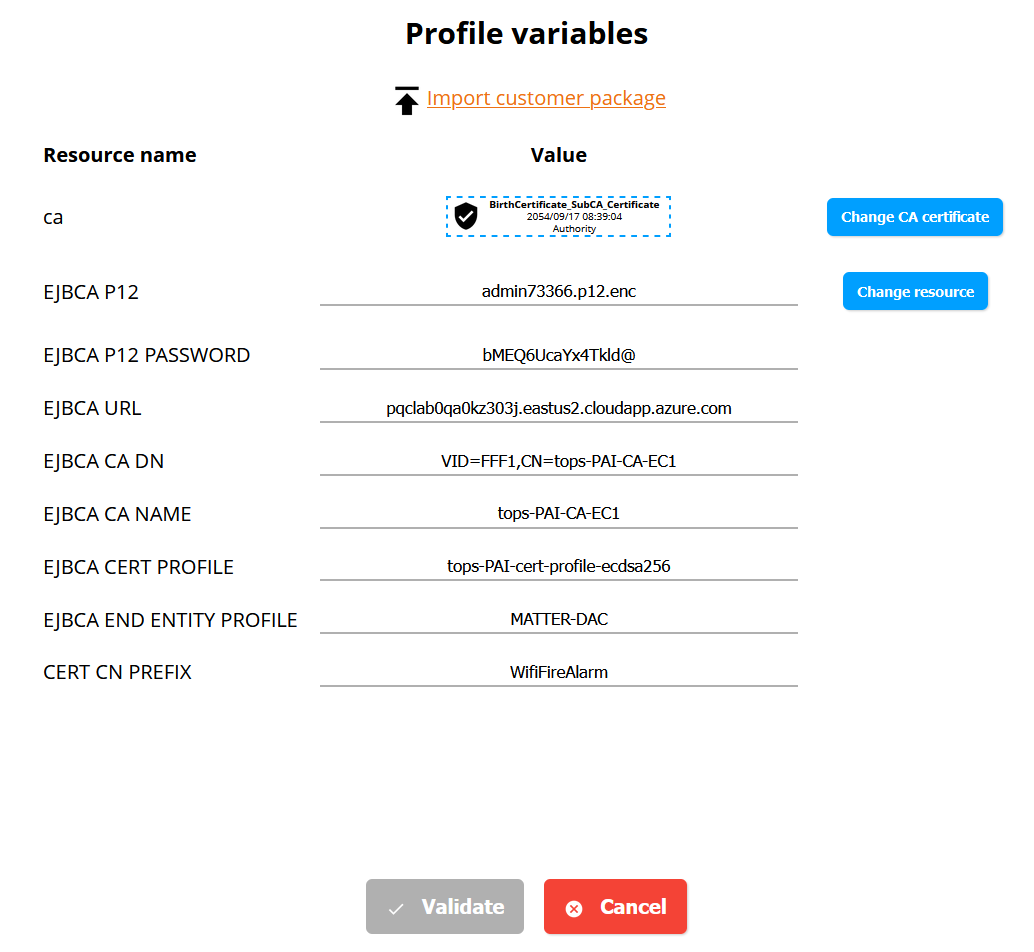
Figure 5. Profile Varibles for Project BirthCertificate-4
In this example, EJBCA administrator p12 is admin73366.p12, which was generated and imported into the TOPS instance.
If you need to upload a new .p12 file, you need to use the tops-exchange software running on a separate machine. The steps to generate a new p12 on the tops-exchange software are showen below for reference.
To use the tops-exchange software:
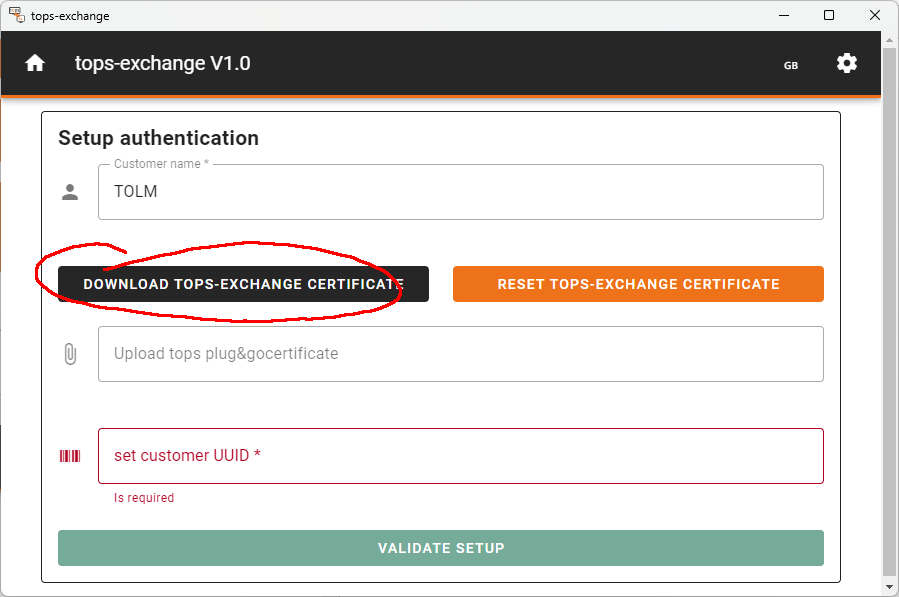
Open tops-exchange and select the "Gear" menu
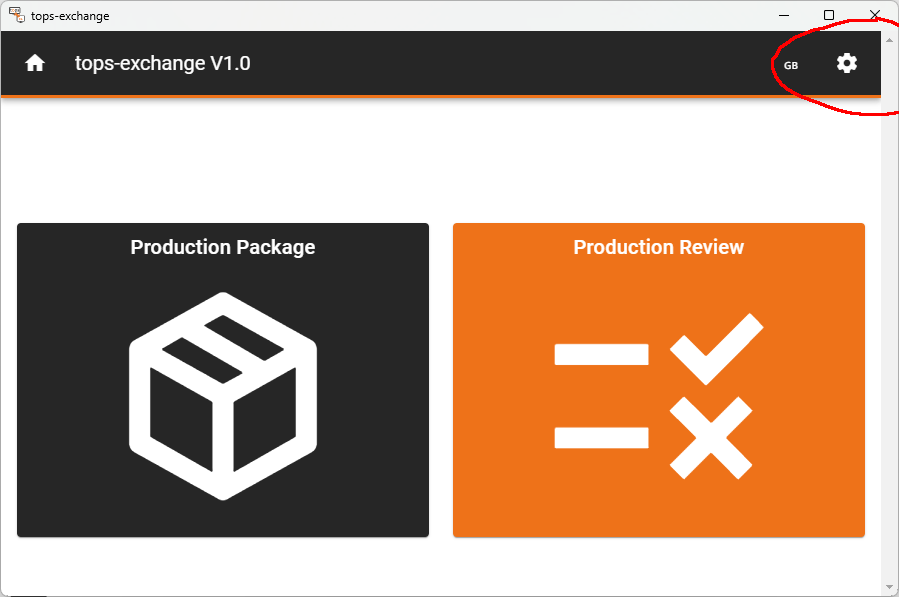
Select Authentication
Click on "Download tops-exchange certificate" and store the certificate on your computer
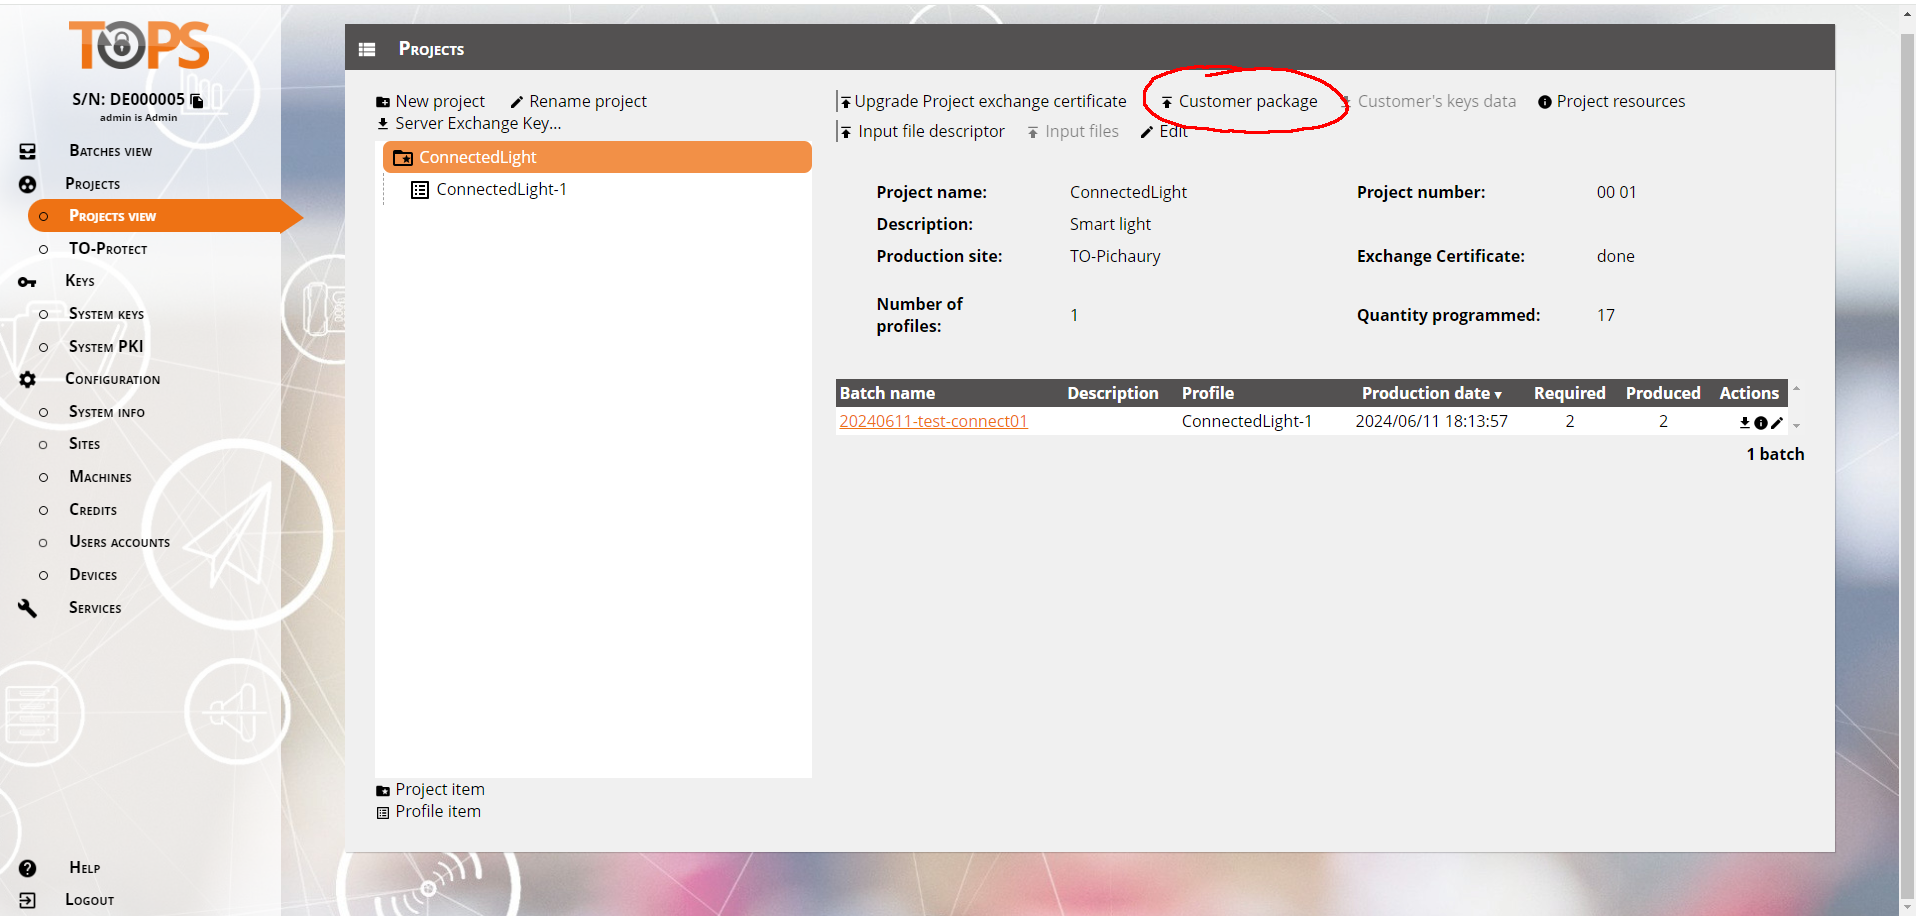
Go back to the tops configuration interface in the VM, go to Projects / ConnectedLights (select the project, not the profile, so without the "-1")

Click on "Upload Project exchange certificate" or "Upgrade Project exchange certificate."
Choose the tops-exchange certificate you stored on your computer and click "Import."
Click on Server Exchange Key
Select "Export Certificate", and click on Copy identifier
Then go back to tops-exchange, select the certificate you just exported, and paste the identifier copied in step 8 (you can validate to complete the pairing of tops-exchange and this project.)
You can now create your package to embed the new p12 file :
Click "Create a package"
Select your p12 file, give a name/description to this file, give a name description to the package, and click "create package"
Finally you can download this package on your computer and upload it in Trusted Objects using the "Customer package button"
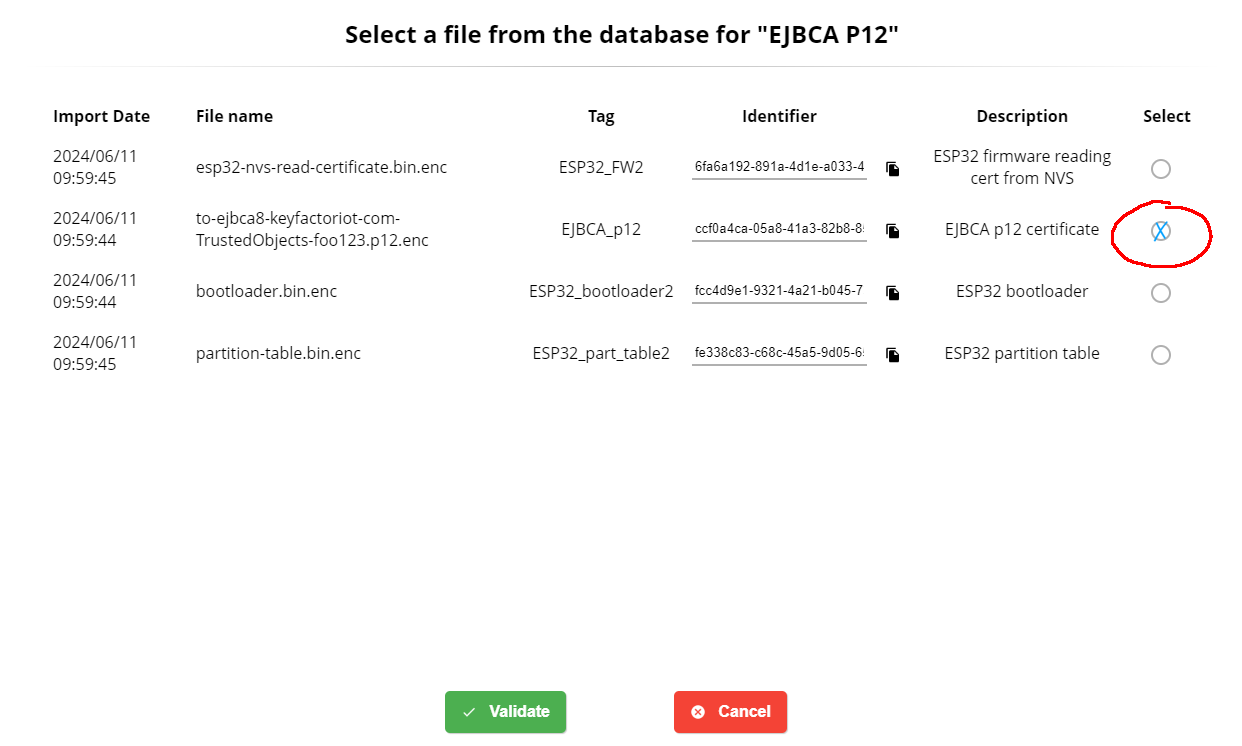
Finally, you can select the new p12 file from profile variable (select ConnectedLight-1 profile)
Run the Trusted Objects Python Demo Script
When a client runs the Python demo script (shown below), it will connect to the Trusted Objects plug&go test instance, in this case, IP/Port = 195.xxx.xxx.162:22443, and request a Matter certificate from EJBCA, as defined by which Project is configured to requests CSRs from EJBCA instance. In out case, Project BirthCertificate, profile BirthCertificate-4.
Edit the example_certificate_production.py script to work in your test environment as needed
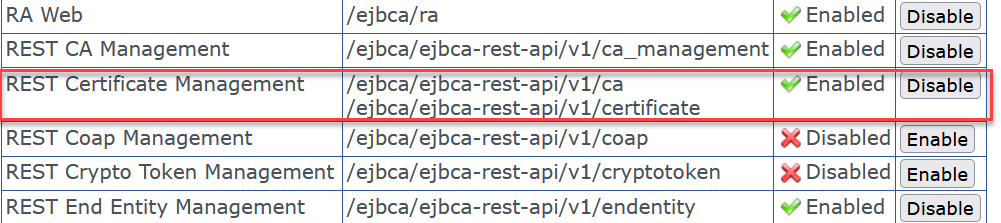
Check that REST API is enabled under System Configuration > Protocol Configuration
example_certificate_production.py
#!/usr/bin/env python3
##########################################################################################
# example_certificate_production.py
##########################################################################################
# THIS SOFTWARE IS PROVIDED "AS IS", WITHOUT WARRANTY OF ANY KIND, EXPRESS OR
# IMPLIED, INCLUDING BUT NOT LIMITED TO THE WARRANTIES OF MERCHANTABILITY,
# FITNESS FOR A PARTICULAR PURPOSE AND NONINFRINGEMENT. IN NO EVENT SHALL THE
# AUTHORS OR COPYRIGHT HOLDERS BE LIABLE FOR ANY CLAIM, DAMAGES OR OTHER
# LIABILITY, WHETHER IN AN ACTION OF CONTRACT, TORT OR OTHERWISE, ARISING
# FROM, OUT OF OR IN CONNECTION WITH THE SOFTWARE OR THE USE OR OTHER
# DEALINGS IN THE SOFTWARE.
##########################################################################################
# Author : Michel THEBAUD, hmthebaud@trusted-objects.com
# Copyright (C) 2024 Trusted Objects. All rights reserved.
##########################################################################################
# To run this example:
#   python3 example_certificate_production.py    or   ./ example_certificate_production.py
##########################################################################################

import tops_sdk

import requests                 # pip install requests
import json

from cryptography import x509
from cryptography.hazmat.backends import default_backend
from cryptography.hazmat.primitives import serialization
import base64


# if you disable server verification, the following line removes the warning
from requests.packages import urllib3
urllib3.disable_warnings(urllib3.exceptions.InsecureRequestWarning)

##############
# Parameters #
##############

TOPS_IP = "195.xxx.xx.162"           # tops plug&go IP address displayed on tops plug&go screen
TOPS_PORT = "22443"                   # TCP port. Default is 443

BATCH_NAME="TESTBATCH20240731_HMT01"  # The bach name. Define your value here
PROFILE_NAME="BirthCertificate-1"     # The name of the profile. Must be exactly the same as tops plug&go
DEVICE_TYPE="ESP32"                   # device type. Must be exactly the same as tops plug&go
DEVICES_QUANTITY=1                    # quantity of device to produce

###################
# Example program #
###################

hostname = TOPS_IP + ":" + TOPS_PORT

# Initialize the tops plug&go session
tops_session = tops_sdk.TopsSession(hostname)

# Check connectivity and authentication
print("Testing TOPS at " + hostname )
x = tops_session.is_alive()
if x.ok:
    print("TOPS is alive!")
else:
    print("TOPS is not there!")

# print Date and Time returned
print(x.text)

print("Creating Batch...")
x=tops_session.create_batch(BATCH_NAME, PROFILE_NAME, DEVICE_TYPE, str(DEVICES_QUANTITY), "1")
if x.ok:
    data=x.json()
    batch_uid=data['BatchUID']
    print("Batch created (", batch_uid, ")")
else:
    print("Error: Failed to create batch - ", x.status_code, " : ", x.text)
    exit(x.status_code)

print("Processing devices...")
# We iterate until all devices are programmed
nu=0
remaining_devices=DEVICES_QUANTITY
while(remaining_devices>0):
    # For each action (Create device, get provisioning data, change status of the device), we treat a block of N devices, where N is the TOPS_MACHINE_HEAD_COUNT

    #Creating devices
    print("    Creating device", nu)
    sn="HWSN" + format(nu, '#08')
    x=tops_session.create_device(batch_uid, sn)
    if x.ok:
        json_data=x.json()
        device_uid=json_data['DeviceUID']
    else:
        print("Error ", x.status_code, " while creating device", nu, " : ", x.text)
        exit(2)

    # Device is created, set default status to OK
    device_status='OK'

    # Get provisioning data for devices
    print("    Getting provisioning data for device", nu)
    x=tops_session.get_provisioning_data(device_uid)
    if x.ok:
        json_data=x.json()
        print(json_data)

        print("        Number of provisioning data received for device", nu, ": ", len(json_data))
        # Generate binary files - can be enabled to verify provisioning data
        # uncomment below if you want to store data
        # for b in json_data['Provisioning']:
            # #print(b)       # uncomment to see data. Should be big if firmware
            # filename="./bin/"+sn+"_"+b["Name"]+".bin"
            # f_bin=open(filename, "wb")
            # f_bin.write(bytes.fromhex(b["Value"]))
            # f_bin.close

        #-------------------------------------------------------------------
        # Make a human-readable display of the certificate
        #-------------------------------------------------------------------

        json_cert=json_data['DevCert']

        print("\n")
        print("--------------------------------------------------------------------------------")
        print("    Details of the X.509 Certificate provisioned ")
        print("--------------------------------------------------------------------------------")

        # Decode the base64 certificate
        cert_bytes = base64.b64decode(json_cert)
        # Load the certificate
        cert = x509.load_der_x509_certificate(cert_bytes, default_backend())

        # Display certificate details
        print(f"Subject: {cert.subject}")
        print(f"Issuer: {cert.issuer}")
        print(f"Serial Number: {cert.serial_number}")
        print(f"Not Valid Before: {cert.not_valid_before_utc}")
        print(f"Not Valid After: {cert.not_valid_after_utc}")

        # Display public key
        public_key = cert.public_key()
        public_key_pem = public_key.public_bytes(
            encoding=serialization.Encoding.PEM,
            format=serialization.PublicFormat.SubjectPublicKeyInfo
        )
        print(f"Public Key:\n{public_key_pem.decode('utf-8')}")

        # Display certificate extensions
        for ext in cert.extensions:
            print(f"Extension: {ext.oid} - {ext.value}")

        #-------------------------------------------------------------------
        # Make a human-readable display of the Private Key (?)
        #-------------------------------------------------------------------

        json_pkey=json_data['DevPKey']

        print("--------------------------------------------------------------------------------")
        print("    Details of the Private Key provisioned ")
        print("--------------------------------------------------------------------------------")

        print(json_pkey)

        print("\n--------------------------------------------------------------------------------")
        print("\n")

    else:
        print("Error ", x.status_code, " while getting provisioning data for device", nu, " : ", x.text)
        device_status='NOK'
        #exit(3) #Should not exit here as the device was created, we need to mark it as KO

    # Code to program the device
    # in case of failure must set device_status to 'KO' (and 'OK' in case of success)

    # Changing the state of devices
    print("    Changing state of device", nu)
    x=tops_session.update_device_status(device_uid, device_status)
    if x.ok:
        print("        Device", nu, "is "+device_status)
        remaining_devices-=1
        nu+=1
    else:
        print("Error ", x.status_code, " while trying to change state to OK for device", nu, " : ", x.text)
        exit(4)

# Now we release the batch
# it will start the generation of production logs. This operation can take some time.
print("Closing Batch...")
x=tops_session.release_batch(batch_uid)
if x.ok:
    data=x.json()
    batch_uid=data['BatchUID']
    print("Batch Finished (", batch_uid, ")")
    exit(0)
else:
    print("Error ", x.status_code, " while trying to Release batch (", batch_uid, ")", " : ", x.text)
    exit(5)
Note: To run the script make sure the following python dependencies are installed
>pip3 install cryptography
>pip install requests
Open a command prompt (or shell) and run the example_certificate_production.py. If set up correctly, you will get an output similar to the following:
python ./example_certificate_production.py
Testing TOPS at 195.200.166.162:28005
TOPS is alive!
{"time":"2024-12-06 14:58:52.576103"}
Creating Batch...
Batch created ( 90b8f9c6-86a8-47e4-bad0-151f7d4b02de )
Processing devices...
    Creating device 0
    Getting provisioning data for device 0
{'DevCert': 'MIIB7zCCAZSgAwIBAgIUNjdaBspLyAvejPUWH6K8zuyqXtUwCgYIKoZIzj0EAwIwMDEYMBYGA1UEAwwPdG9wcy1QQUktQ0EtRUMxMRQwEgYKKwYBBAGConwCAQwERkZGMTAeFw0yNDEyMDYxNDQ4NTZaFw0zOTExMjgyMjI4NDZaMFkxKzApBgNVBAMMIldpZmlGaXJlQWxhcm1fREUwMDAwMDEwMDAxMDAwMDAwMDUxFDASBgorBgEEAYKifAIBDARGRkYxMRQwEgYKKwYBBAGConwCAgwEODAwMDBZMBMGByqGSM49AgEGCCqGSM49AwEHA0IABHgHP7wNInmv4i2WLV4IYCbwnmTxTZnnDoUyXR1w/OBZkXWenKMgetCOg5aSdRCg77P6nV1zJPkoJoAec04sJh+jYzBhMA8GA1UdEwEB/wQFMAMBAf8wHwYDVR0jBBgwFoAUgkgnURX0RFF1Xv7B0GO44zLNaa4wHQYDVR0OBBYEFJrwGg4JxmZIjfK9viqLnuZBFSKCMA4GA1UdDwEB/wQEAwIBhjAKBggqhkjOPQQDAgNJADBGAiEApmbjoa9OkObSJJMAVIEKVWt3K40ClKXGMyz+Gr6RbjUCIQDLyLEz20BaBNLjF/lEfO0fkpGlUvpjyVhBS2v5cO9VUA==', 'DevPKey': 'XnMIwQh1o3U2A+wyADWNORwrSJ7nMATSLijyBSKuliY='}
        Number of provisioning data received for device 0 :  2


--------------------------------------------------------------------------------
    Details of the X.509 Certificate provisioned
--------------------------------------------------------------------------------
Subject: <Name(CN=WifiFireAlarm_DE000001000100000005,1.3.6.1.4.1.37244.2.1=FFF1,1.3.6.1.4.1.37244.2.2=8000)>
Issuer: <Name(CN=tops-PAI-CA-EC1,1.3.6.1.4.1.37244.2.1=FFF1)>
Serial Number: 309519885026732113364452926409971716236635692757
Not Valid Before: 2024-12-06 14:48:56+00:00
Not Valid After: 2039-11-28 22:28:46+00:00
Public Key:
-----BEGIN PUBLIC KEY-----
MFkwEwYHKoZIzj0CAQYIKoZIzj0DAQcDQgAEeAc/vA0iea/iLZYtXghgJvCeZPFN
mecOhTJdHXD84FmRdZ6coyB60I6DlpJ1EKDvs/qdXXMk+SgmgB5zTiwmHw==
-----END PUBLIC KEY-----

Extension: <ObjectIdentifier(oid=2.5.29.19, name=basicConstraints)> - <BasicConstraints(ca=True, path_length=None)>
Extension: <ObjectIdentifier(oid=2.5.29.35, name=authorityKeyIdentifier)> - <AuthorityKeyIdentifier(key_identifier=b"\x82H'Q\x15\xf4DQu^\xfe\xc1\xd0c\xb8\xe32\xcdi\xae", authority_cert_issuer=None, authority_cert_serial_number=None)>
Extension: <ObjectIdentifier(oid=2.5.29.14, name=subjectKeyIdentifier)> - <SubjectKeyIdentifier(digest=b'\x9a\xf0\x1a\x0e\t\xc6fH\x8d\xf2\xbd\xbe*\x8b\x9e\xe6A\x15"\x82')>
Extension: <ObjectIdentifier(oid=2.5.29.15, name=keyUsage)> - <KeyUsage(digital_signature=True, content_commitment=False, key_encipherment=False, data_encipherment=False, key_agreement=False, key_cert_sign=True, crl_sign=True, encipher_only=False, decipher_only=False)>
--------------------------------------------------------------------------------
    Details of the Private Key provisioned
--------------------------------------------------------------------------------
XnMIwQh1o3U2A+wyADWNORwrSJ7nMATSLijyBSKuliY=

--------------------------------------------------------------------------------


    Changing state of device 0
        Device 0 is OK
Closing Batch...
Batch Finished ( 90b8f9c6-86a8-47e4-bad0-151f7d4b02de )
In the above output, line 17 will shows a suceesful certificate renrollment
Subject<Name(CN=WifiFireAlarm_DE000001000100000005,1.3.6.1.4.1.37244.2.1=FFF1,1.3.6.1.4.1.37244.2.2=8000)>
The CN=WifiFireAlarm_DE000001000100000005wil be used to verify that the cerificate in the EJBCA database.
Next, to verify the cert, go to EJBCA Adminsitration > RA Functions, then Search End Entities.
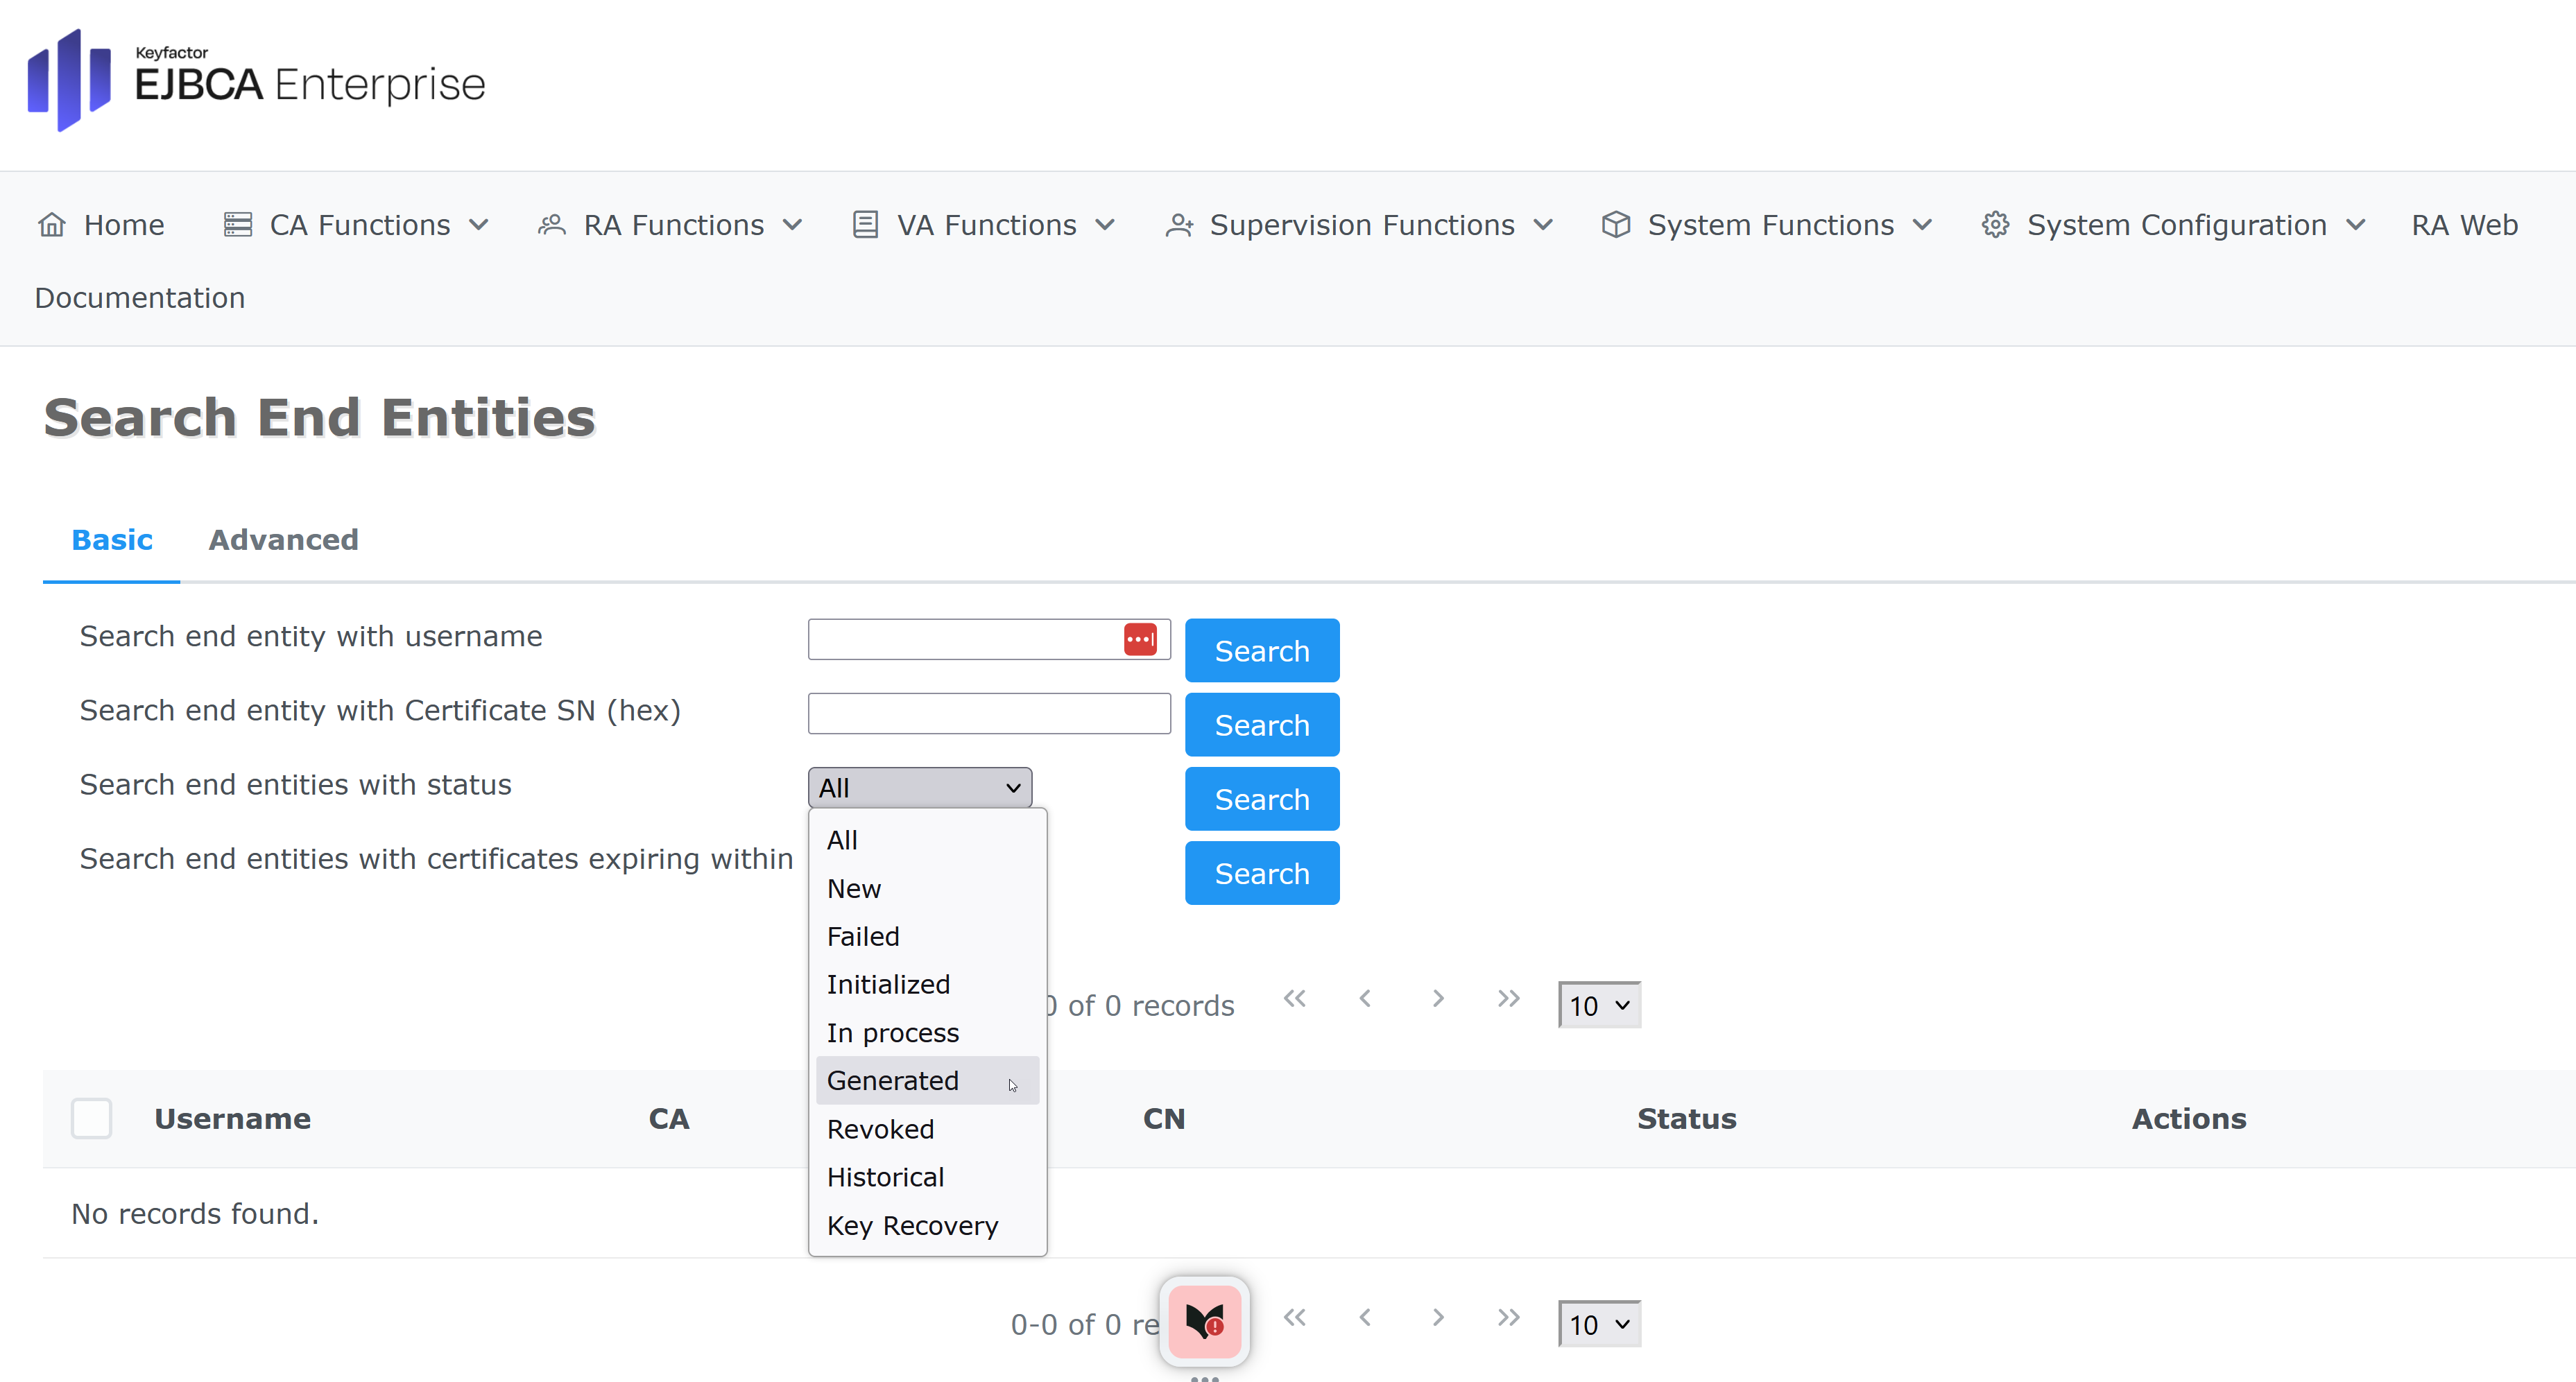
Select Search end entities with status and pick Generated from the drop-down menu. Click Search.
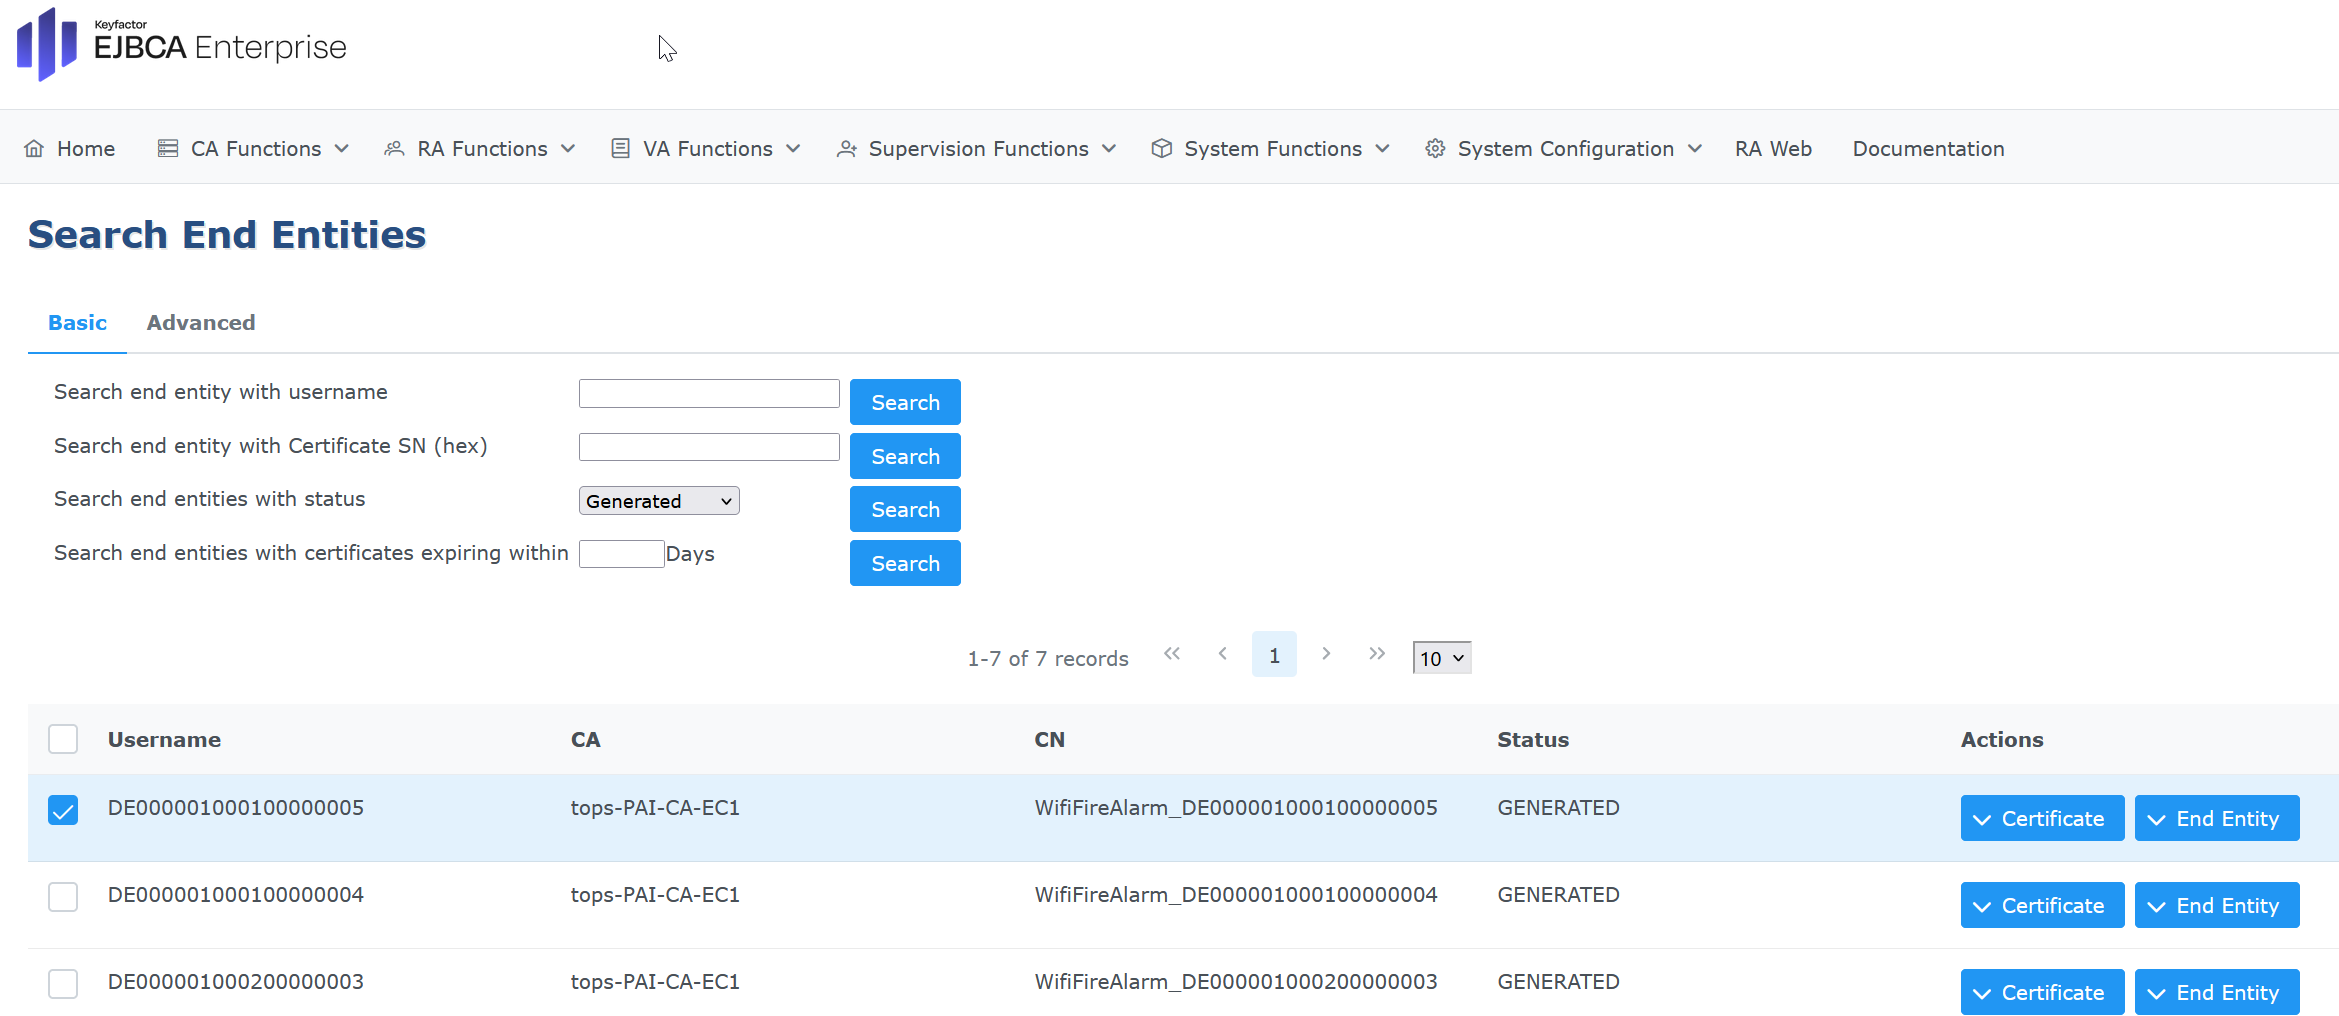
. In this example, the certificate returned by the Python script has CN=WifiFireAlarm_DE000001000100000005, click on Actions > Cerificate > View to inspect the certificate
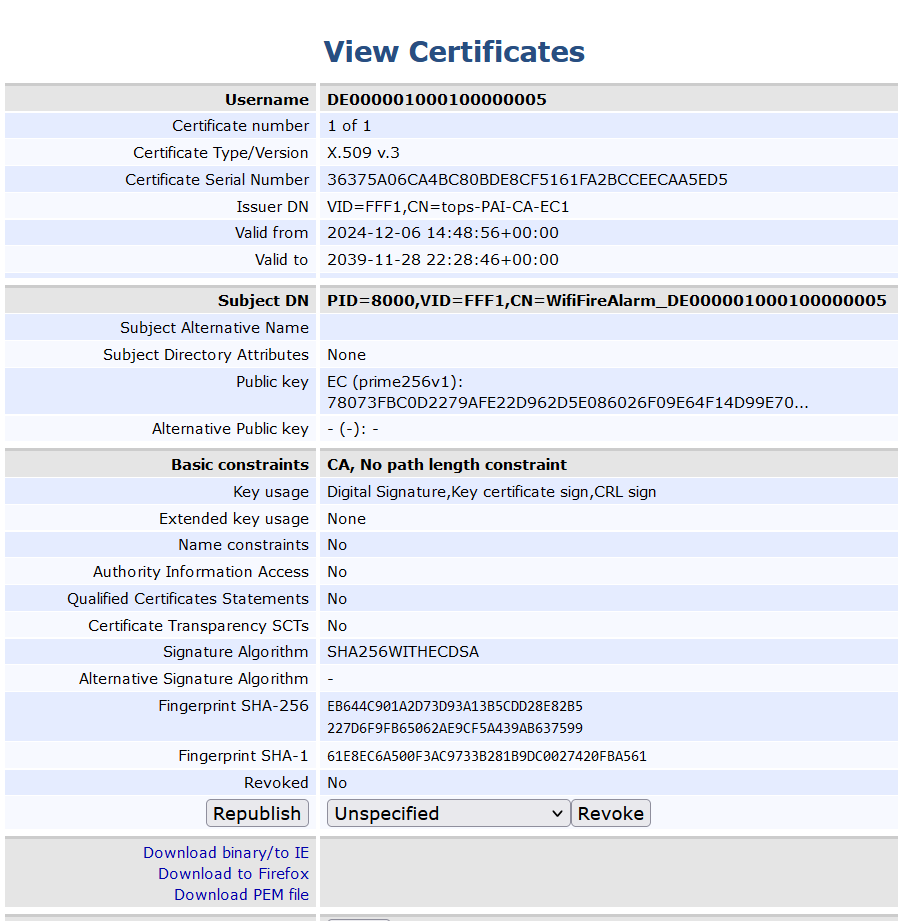
Verify the following fields in the issued certificate:
Issuer DN is VID=FFF1,CN=tops-PAI-CA-EC1
Subject DN=PID=8000,VID=FFF1,CN=WifiFireAlarm_DE000001000100000005
Public Key is EC (prime256v1)
Summary
This plug&go Reference Architecture demonstrates how a Keyfactor PKI-based security framework is essential for manufacturing security, especially when working with third-party contract manufacturers. In these situations, a "trust but verify" approach is crucial for protecting manufactured devices.
Keyfactor PKI, combined with Trusted Objects plug&go, offers a comprehensive security solution for manufacturers:
Establish Trust: Use EJBCA to issue digital certificates for authentication and access control.
Device Identity: Issue unique certificates for precise device identification.
Flexible Integration: Leverage serial numbers for device ID, even without UKID chips.
Firmware Protection: Ensure only authorized firmware is installed.
Secure Key Provisioning: Use strong cryptography for secure key management.
Comprehensive Reporting: Gain insights into device and security events.
With a best-in-class PKI model powered by EJBCA and Trusted Objects plug&go, manufacturers gain a scalable, secure, and fully controllable security framework.
Additional Resources