Reference Architecture - Private-5G Factory Floor
This reference architecture demonstrates the advantages of using a Private-5G network for IoT deployments in a factory setting, focusing on secure device onboarding and certificate lifecycle management. Private-5G networks provide ultra-reliable low latency communication (URLLC), enhanced security, and improved network performance crucial for Industry 4.0 applications.
This architecture showcases how to configure a Keyfactor EJBCA Hardware Appliance to issue and manage certificates for IoT devices using the Simple Certificate Enrollment Protocol (SCEP). Keyfactor EJBCA is a high-performance, scalable, and secure PKI platform ideal for managing the large number of devices in a factory environment. Its support for hardware security modules (HSMs) ensures the highest level of cryptographic key protection.
Note: While this architecture focuses on SCEP, EJBCA supports a wide range of enrollment protocols to cater to diverse IoT use cases. These include:
EST: Suitable for lightweight devices with limited resources.
ACME: Commonly used for automated certificate management for web servers.
CMP: Provides a versatile solution for more complex scenarios.
For use cases involving embedded systems and automation, where greater control over device automation is required, EJBCA's C-Agent offers streamlined certificate provisioning. These scenarios will be explored in separate reference architectures.
This document guides you through setting up and configuring a robust PKI using the Keyfactor EJBCA Hardware Appliance, enabling seamless and secure integration of IoT devices within your Private 5G network. For detailed configuration steps and best practices, refer to the Keyfactor/Primekey documentation."
Private Cellular Networks Overview
Private-cellular networks (collectively known as PCNs) are based on 4G/LTE or 5G cellular technology. PCNs are becoming more widely used in supporting technologies such as the Internet of Things (IoT/IIoT), Industry 4.0, Robotics, Warehousing, and Autonomous Vehicles, to name a few.
PCNs use small cells (like Wi-Fi access points) to set up a dedicated private wireless network covering tens of thousands of square feet. Frequency bands: Private LTE (CBRS b48), Private 5G New Radio (NR) and offer advantages over traditional Wi-Fi- networks such as:
More robust signals are less suspectable to the external interface, making them suitable for environments with a lot of electromagnetic interference, such as manufacturing lines or buildings with a lot of steel.
Low latency, especially with Private-5G for robotics and/or control applications.
A single Private-5G access point can cover a far greater physical area than an equivalent Wi-Fi AP.
Main Components of a Private-5G Network
The main components in a Private-5G network are:
Access Point (small cell)
In Private-5G networks the base station is called a gNodeB (next-generation NodeB) equivalent to the Access Point (AP) in Wi-Fi networks.
In Private-LTE (or CBRS) networks, the base station is called the Citizens Broadband Radio Service Device (CBSD)
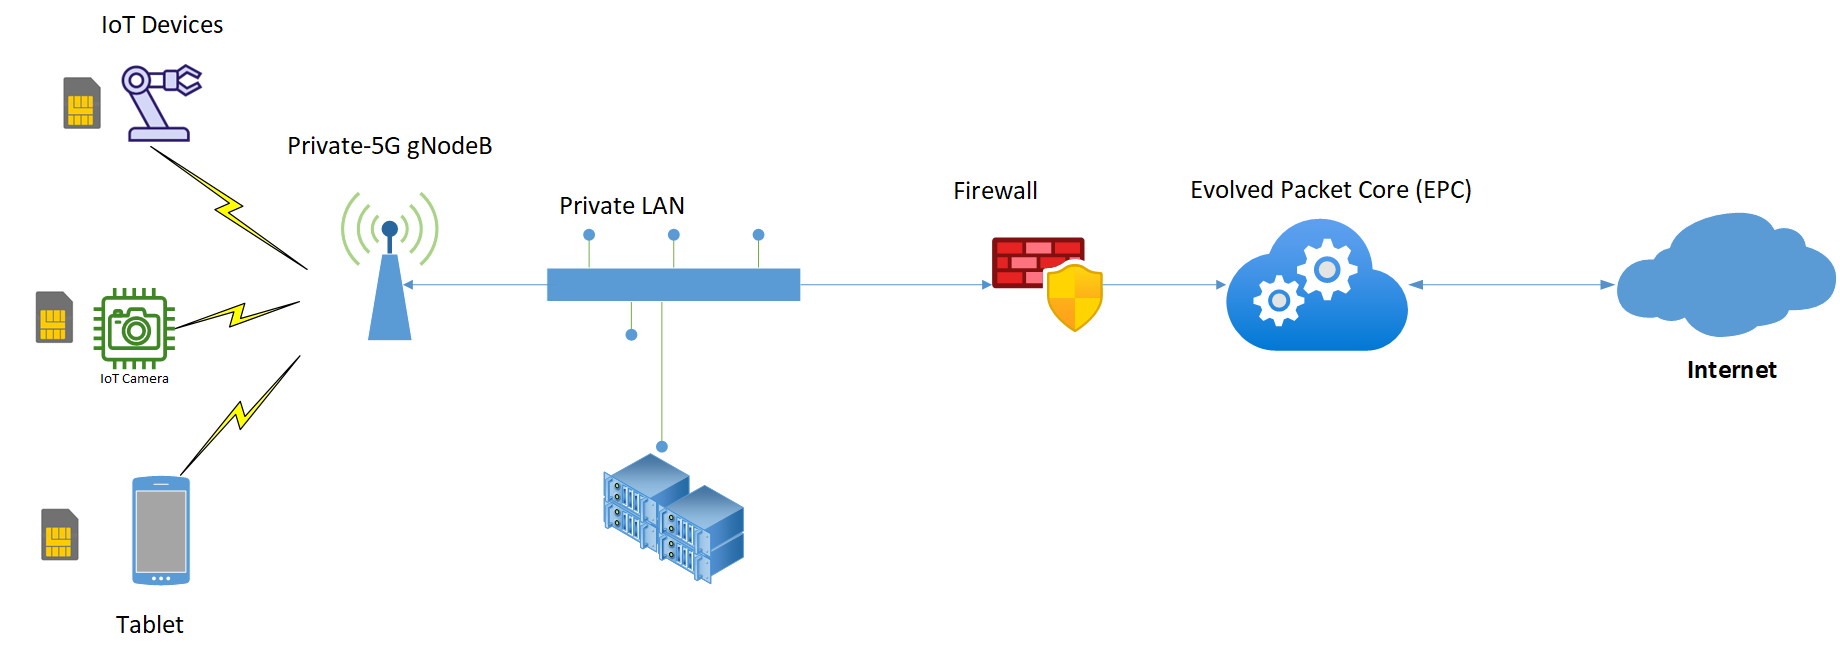
Figure 1: Private-5G Network Components
User Equipment (UE) – These are end devices like tablets, phones, Cameras, and IoT Sensors.
SIM\eSIM – a physical device to uniquely identify each UE. Same as a cell phone SIM.
Evolved Packet Core (EPC) - responsible for managing user sessions, routing traffic, and providing security.
Security Advantages of PCNs
In general, private cellular networks offer more inherent security than Wi-Fi networks, as
Man-in-the-middle attacks are exceptionally difficult to execute as everything between the User Equipment (UE) and the core is encrypted (5G on)
Security today – if physical SIM is stolen, providers are doing IMEI to IMSI locking.
New technologies like IoT SAFE to inject operator certs on eSIMs and the soon-to-be standard iSIM.
Utilize x.509 certificates to enable seamless roaming between private networks.
Use-Case: Secure Factory Floor Devices with EJBCA Hardware Appliance
Scenario: In factories and warehouses with a lot of interference, for example, Private-5G networks are preferred over Wi-Fi to issue x.509 certificates to devices and to manage certificates on those devices.
Goal: Set up a PKI to securely enroll IoT Devices via SCEP to securely onboard devices on the assembly line and enable Certificate Lifecycle Management (CLM) to rotate out old certs with new ones close to certificate expiration.
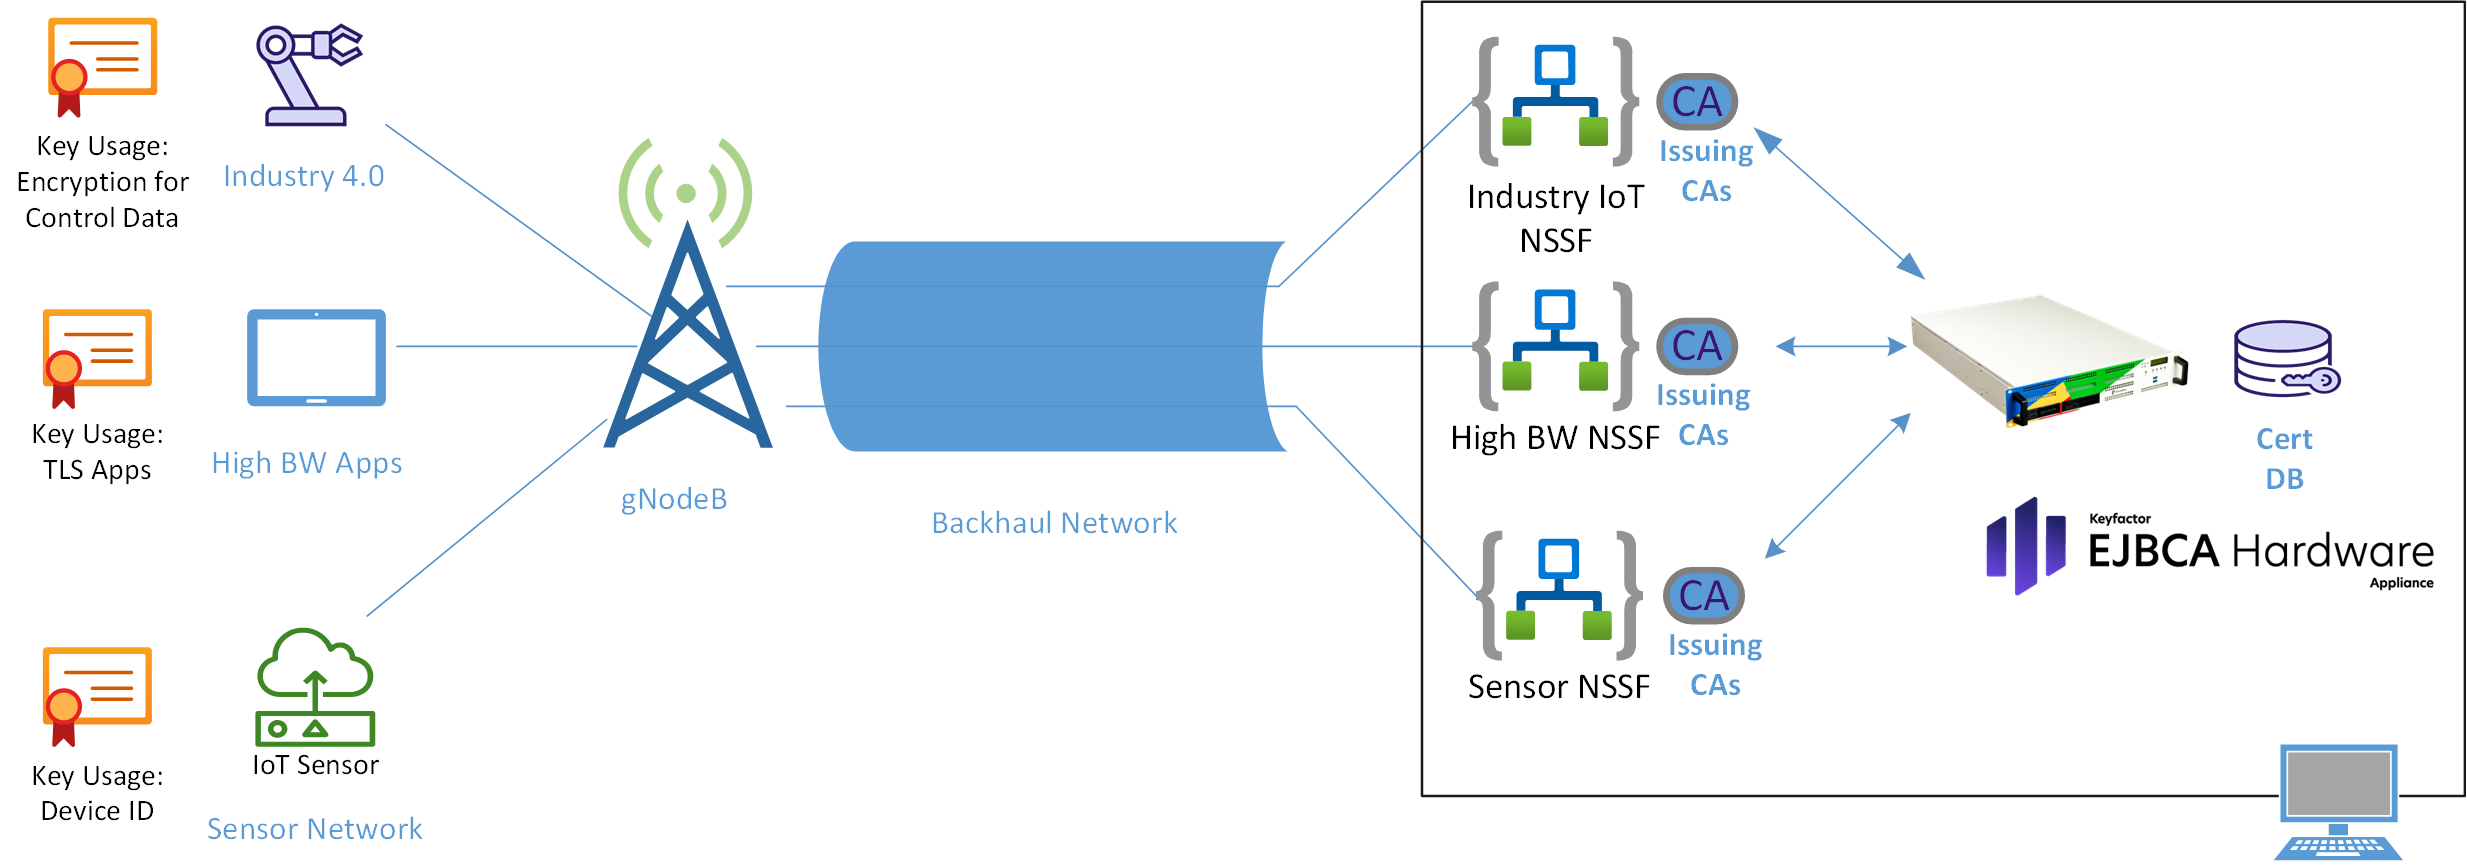
Figure 2: EJBCA Hardware Appliance issuing X.509 Certificates via SCEP
Solution: Install a Keyfactor EJBCA Hardware Appliance locally in the factory to issue certificates to devices.
A key advantage of deploying the Keyfactor Hardware Appliance locally is enhanced security. By keeping the PKI system within the factory's network and behind the manufacturing firewall, you significantly reduce the attack surface and protect the PKI from external threats. This approach ensures data sovereignty, giving the customer complete control over their sensitive PKI data and compliance with data privacy regulations.
In this example, we demonstrate how to securely enroll an IoT device running Ubuntu 22.04 with an issuing CA running on the EJBCA Hardware Appliance using the Simple Certificate Enrollment Protocol (SCEP). SCEP provides a standardized and secure method for automated certificate enrollment, utilizing challenge passwords and encryption to protect the communication between the device and the CA.
Once enrolled, the IoT device obtains a valid certificate that enables end-to-end encryption of data transmitted back to the control application within the factory. This safeguards sensitive operational data from unauthorized access and tampering. The certificate can also be used for device authentication and authorization, further strengthening the overall security posture of the factory environment."
Configure EJBCA Appliance
In this example, we will use the EJBCA Software Appliance running EJBCA_8.0 Enterprise Edition on a VMWare server to simulate the EJBCA Hardware appliance UI.
More information on installing the VM used in this TRA can be found in the links below.
EJBCA Hardware Appliance Documentation (primekey.com)
To run EJBCA on the Software Appliance on a virtual machine, use the SW appliance.
Configurations Steps
Create Crypto Tokens
Create a Root CA, e.g., IoTRootCA
Create a Sub CA, e.g., IoTSubCA
Build Certificate Profile, e.g. SCEPCertificateProfile
Build End Entity Profile, e.g., SCEP End Entity
Configure SCEP Client on Ubuntu test VM
Create RootCA
Log into the appliance [ this example used https://192.168.5.118/webconf ]

Click on Admin Web Open the Admin Web [ https://192.168.5.118/ejbca/adminweb/ ]
Configuration flow for creating Root CA is:
1. Create Crypto Token for Root CA.
2. Create Root CA Certificate Profile.
3. Create Root CA
Create Crypto Token for RootCA
From the EJBCA Home Page, click on Crypto Token
Click Create new
In the Name field, enter IoT_Token1
Leave Type as Soft
e. Leave Auto-activation checked
f. In the Authentication Code field, enter the password for the slot
g. Save
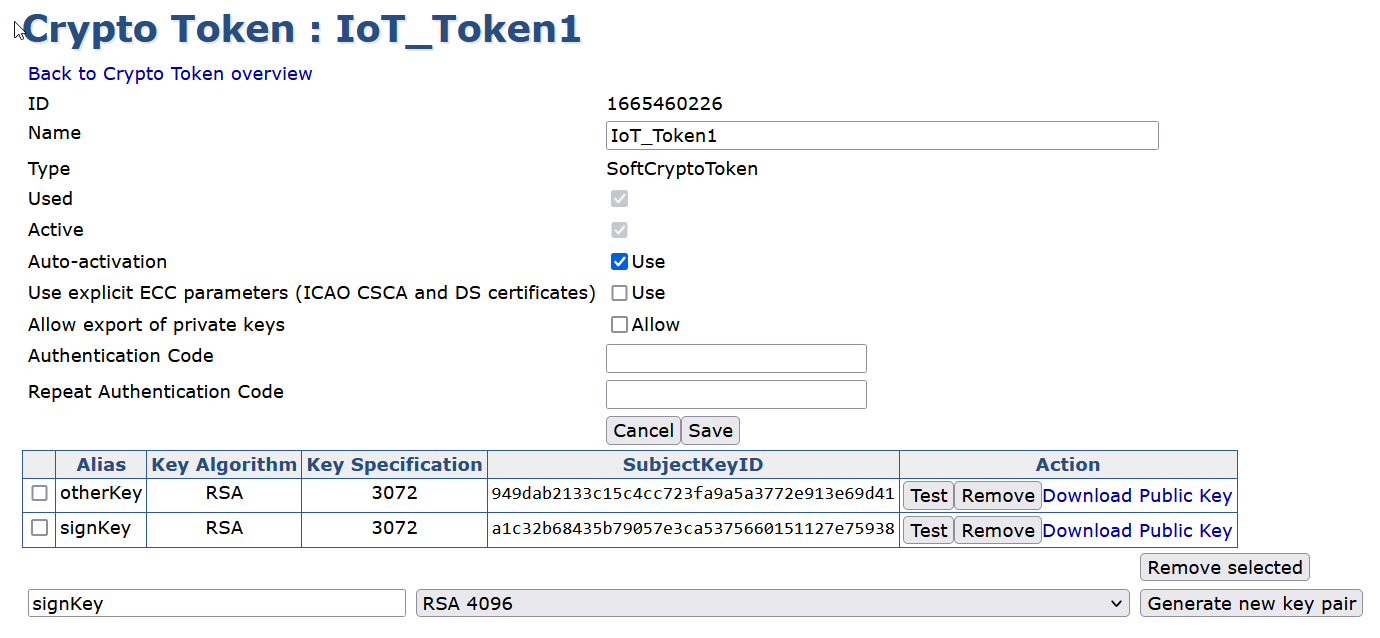
Figure 5: Create Crypto Token
Next, create the Root CA’s signing keys. In this example, we will create two RSA3072 keys for demo purposes.
Enter signKey as the name for the new key, choose RSA-3072 from the list, and click Generate new key pair
Click Test for the new key created, the result should be signKey tested successfully
Enter otherKey as the name for the new key, choose RSA-3072 from the list, and click Generate new key pair
Click Test for the new key created, the result should be RSA-3072 tested successfully
Now the key pairs that are used by the Certificated Authorities have been created, the next step is to configure Certificate Profiles and bind them to the CAs
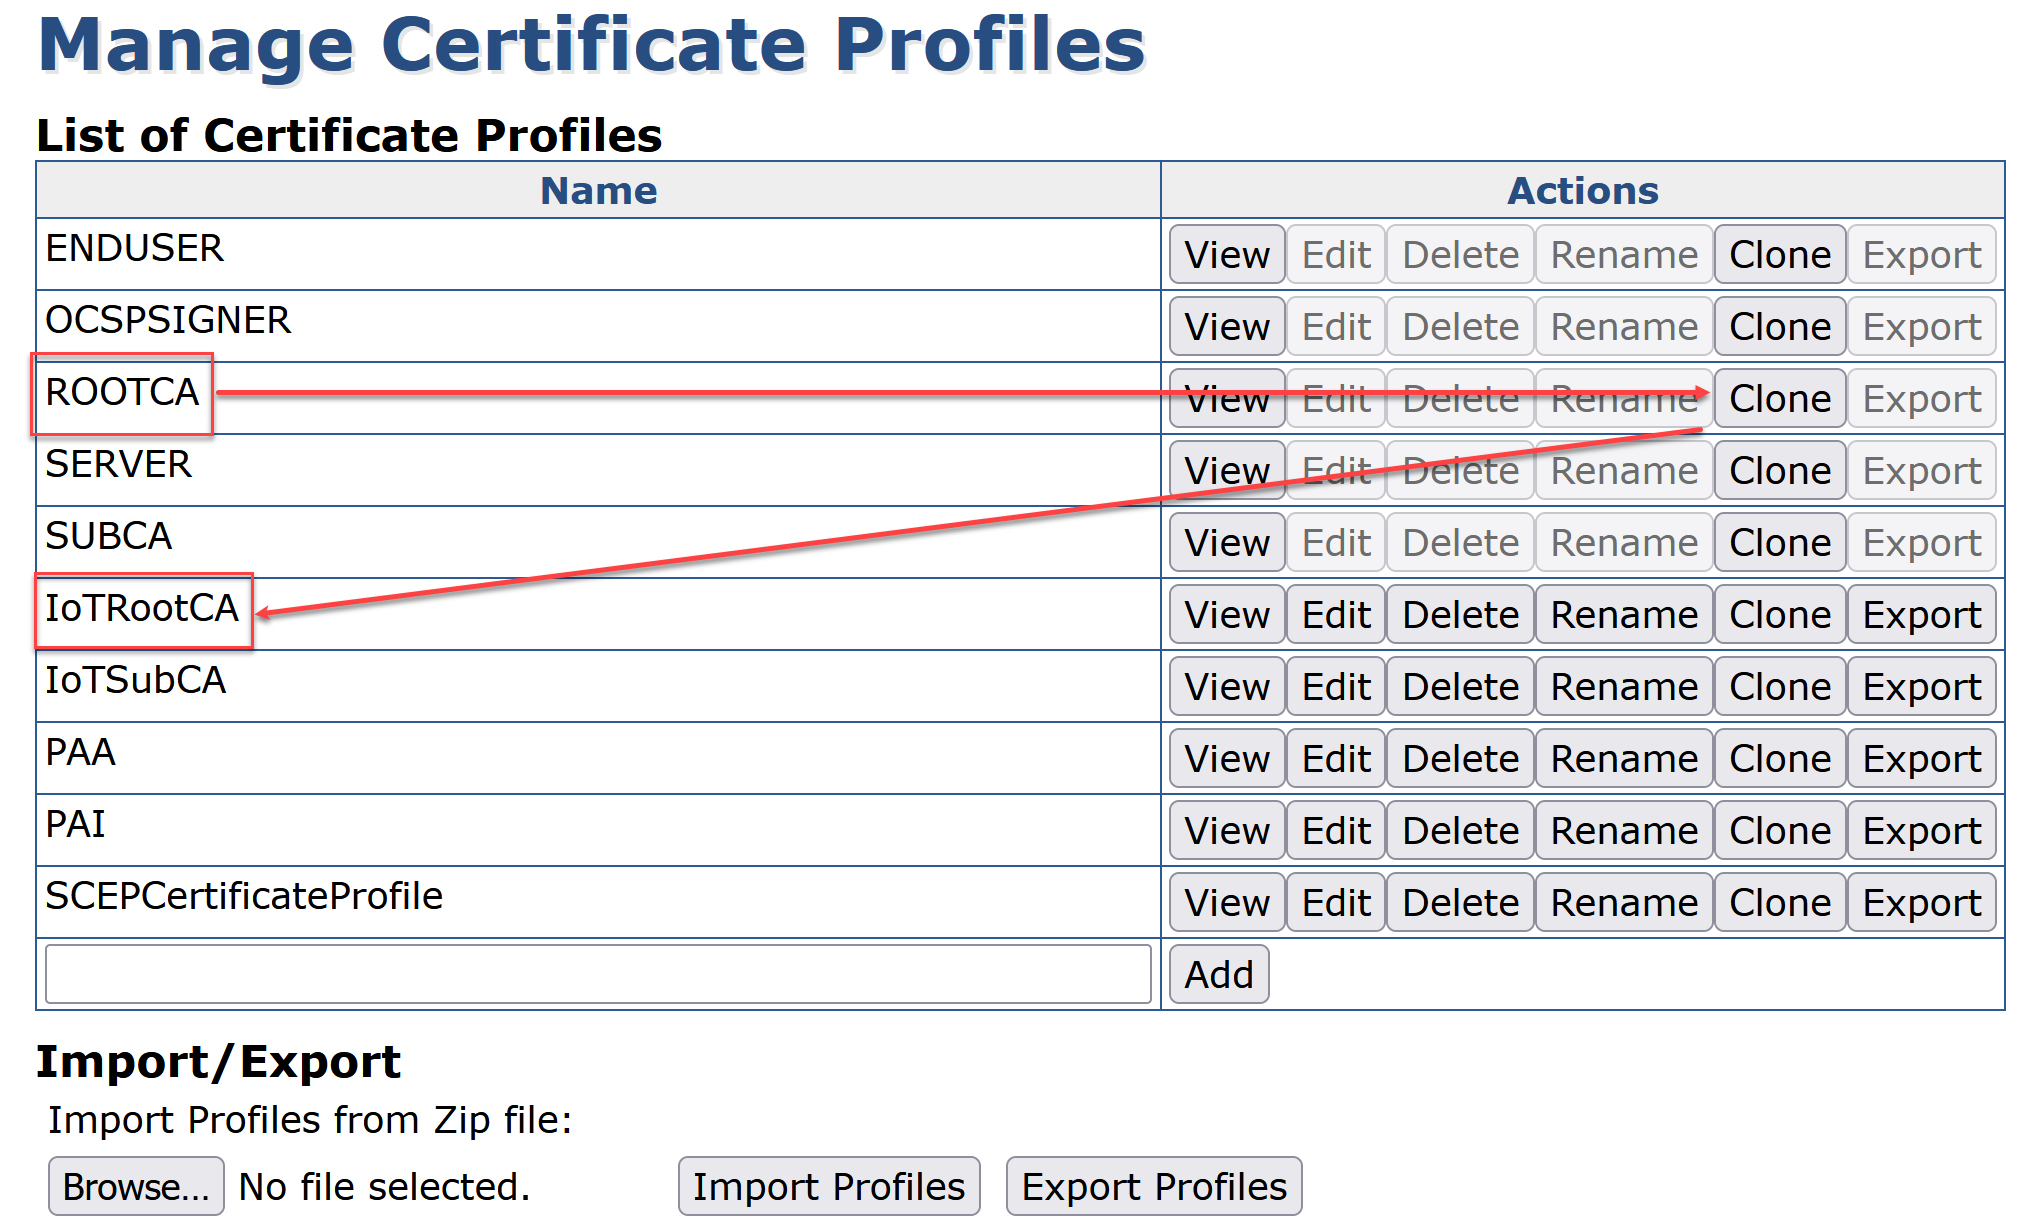
Create IoTRootCA Certificate Profile
Click Certificate Profiles
On ROOTCA click Clone
Enter IoTRootCA and click Create from template
Click Edit on the profile IoTRootCA
In the Available key algorithms list, select RSA
In the Available bit lengths list, select 3072 bits
In the Signature Algorithm list, select SHA256WithRSA
In the Validity field, enter 10y
Uncheck LDAP DN Order, box
Keep the other values as default
Click Save
Create Root CA
Click Certification Authorities
In the Add CA field, enter IoTRootCA and click Create
In the Crypto Token list, select IoT_Token1
In the Signature Algorithm list, select SHA256WithRSA
*Keep defaultkeys, certSignKey as default
In the Subject DN field, enter CN=IoTRootCA
In Signed By, keep at default of Self Signed
In the Certificate Profile list, select IoTRootCA
In the Validity field, enter 10y
In the LDAP DN Order, uncheck
In the Monitor if CA active (healthcheck), check Activate
Click Create
Create IoTSubCA
Repeat the steps for creating the RootCA to create a subCA.
Create IoTSubCA Certificate Profile
Click Certificate Profiles
On SUBCA click Clone
Enter IoTSubCA and click Create from template
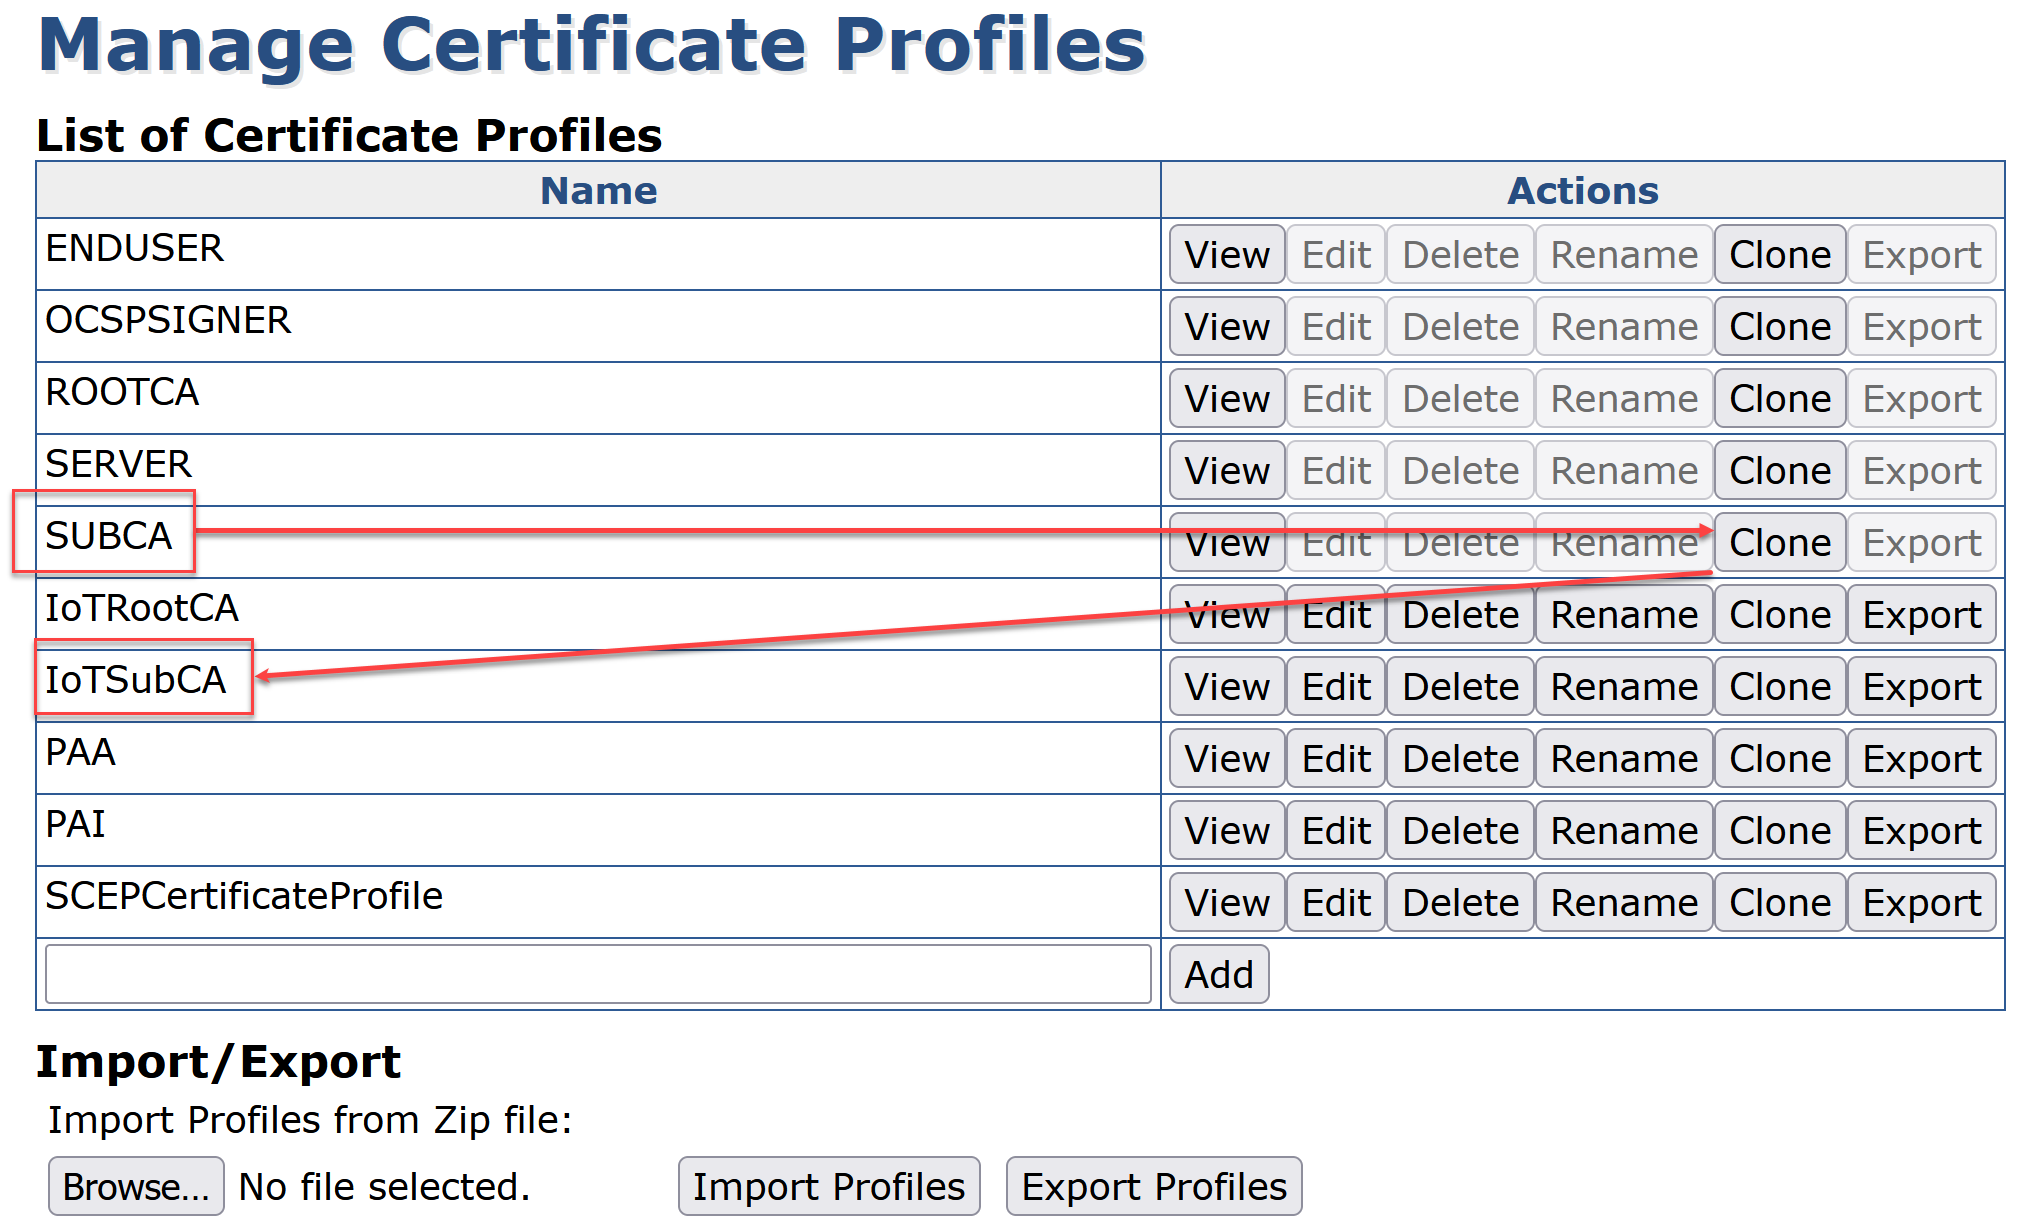
Click Edit on the profile IoTSubCA
In the Available key algorithms list, select RSA
In the Available bit lengths list, select 3072 bits
In the Signature Algorithm list, select SHA256WithRSA
In the Validity field, enter 5y **
Uncheck LDAP DN Order, box
Keep the other values as default
Under Available CAs, select IoTRootCA

Click Save
** PKI Best Practice! - Sub CAs will usually have a shorter Validity than Root CAs to reduce risk to the Root CA if a Sub CA gets compromised.
At this point, we have created the
IoT_Token1 Crypto Token
IoTRootCA and IoTRootCA Certificate Profile
IoTSubCA and IoTSuBCA Certificate Profile
We are now ready to setup the SCEP client and enroll to get CA certificate chain and device certificate downloaded to the client.
Simple Certificate Enrollment Protocol (SCEP)
SSCEP is a client-only implementation of the SCEP (Cisco System's Simple Certificate Enrollment Protocol). SSCEP is designed for OpenBSD's isakmpd, but it will probably work with any Unix system with a recent compiler and OpenSSL toolkit libraries installed. Official website: https://github.com/certnanny/sscep
Build Certificate Profile
Open a browser and go to the URL https://192.168.5.118/ejbca/adminweb/
Click Certificate Profiles
On ENDUSER click Clone
Enter SCEPCertificateProfileand click Create from template
Click Edit on the profile SCEPCertificateProfile
In the Available key algorithms list, select RSA
In the Available bit lengths list, select 2048 bits
In the Signature Algorithm list, select SHA256WithRSA
In the Validity field, enter 2y
For Key Usage make sure that only Digital Signature and Key Encipherment are selected
For Extended Key Usage select Client Authentication
Optional Issuer Alternative and Subject Alternative
Uncheck Subject Alternative Name (naming document will tell you to check or uncheck)
Uncheck Issuer Alternative Name (naming document will tell you to check or uncheck)
Optional
Check CRL Distribution Points
Check Use CA defined CRL Distribution Point
Check Authority Information Access
Check Use CA defined OCSP locator
Check Use CA defined CA Issuer
Uncheck LDAP DN Order
In the Available CAs list, and IoTSubCA
Click Save
Build End Entity Profile
Open a browser and go to the URL https://192.168.5.118/ejbca/adminweb/
Click End Entity Profiles
In the Add End Entity Profile field, enter SCEP End Entity and click Add Profile
Select SCEP End Entity and click Edit End Entity Profile
For End Entity E-mail deselect the check box
In the Subject DN Attributes list, select O, Organization and click Add
In the O, Organization field:
Enter the text Keyfactor
Select Required
Deselect Modifiable
In the Subject DN Attributes list, select C, Country (ISO 3166) and click Add
In the C, Country (ISO 3166) field:
Enter the text US
Select Required
Deselect Modifiable
In Subject Alternative Name, select DNS Name and click Add
In the Default Certificate Profile list, select SCEPCertificateProfile
In the Available Certificate Profiles list, select SCEPCertificateProfile
In the Default CA list, select IoTSubCA
In the Available CAs list, and IoTSubCA
In the Default Token list, select User Generated
In the Available Tokens list, select User Generated
Click Save
SCEP Configuration
Click on SCEP configuration
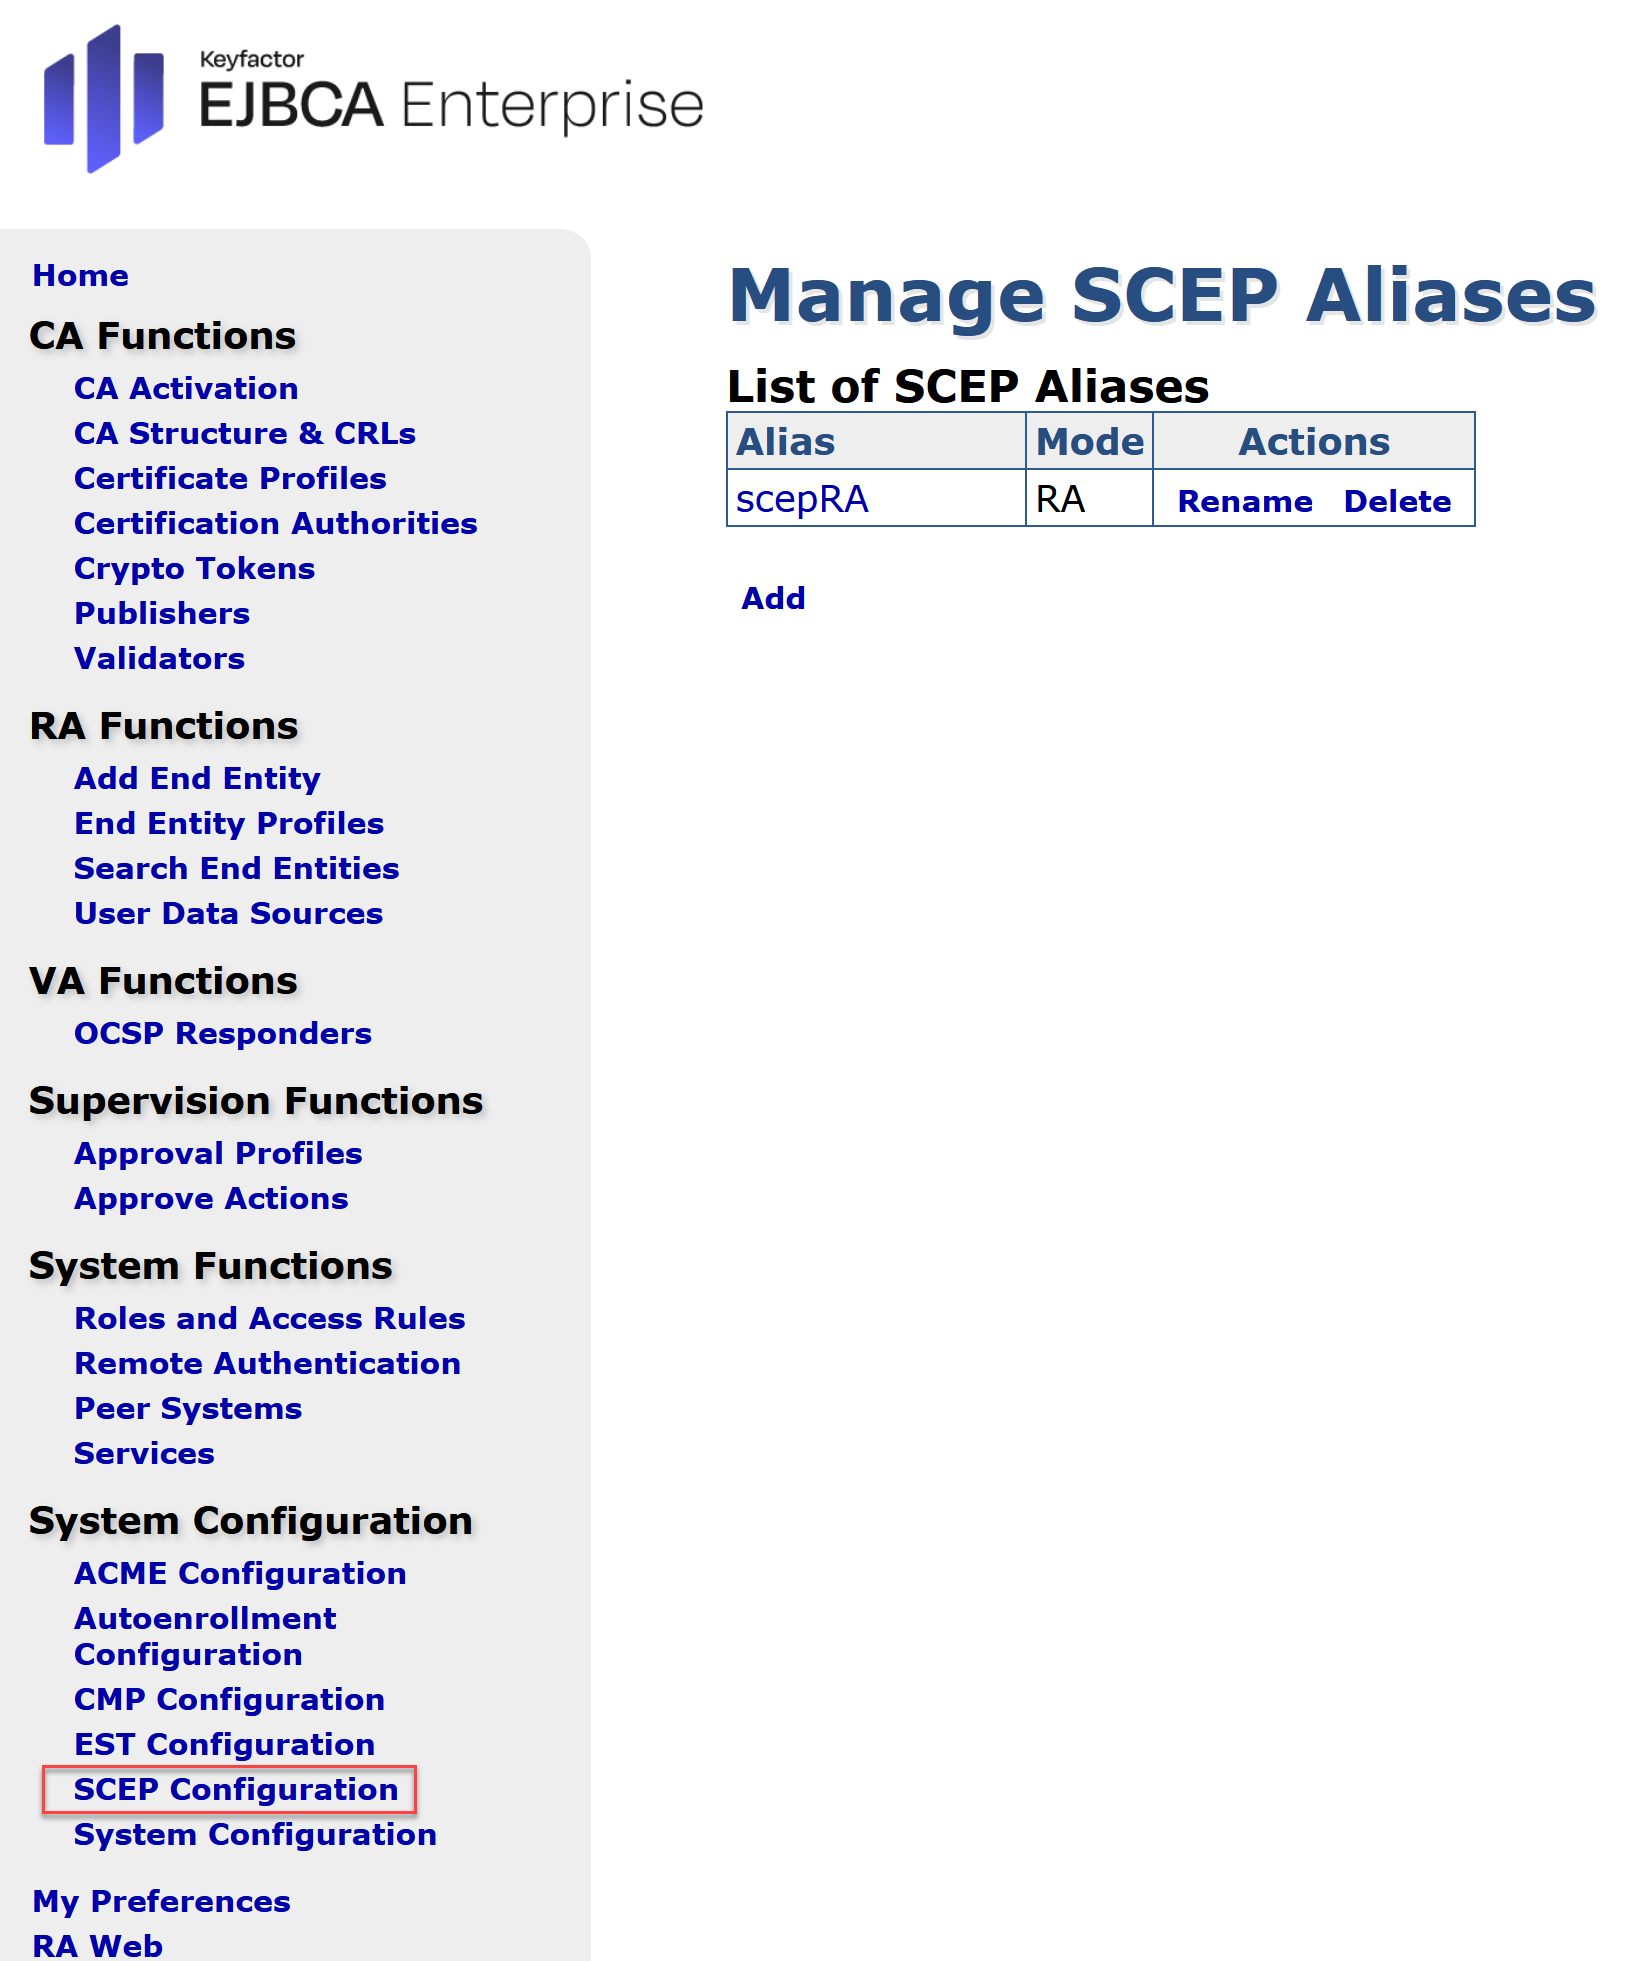
Click "Add"
Enter Scep name "SCEP"
Click on the name just created "SCEP"
Click switch to edit mode
Set operational mode to RA
Set RA End Entity profile to SCEP End Entity
Set RA authentication password e.g. foo123
Set RA name generation to DN part
Set RA generation parameters to CN
Set Prefix to "SCEP-"
Install Simple Scep Linux Client
sudo apt-get install autoconf automake libtool pkg-config libssl-dev make
wget https://github.com/certnanny/sscep/archive/refs/heads/master.zip
unzip -q master.zip
cd sscep-master/
./bootstrap.sh
./configure
make
./sscep –help
Create a folder for issued certificates.
mkdir cert && cd cert
Operate Simple Scep Linux Client in RA mode
Create configuration file
nano ../scep-ra-csr.conf
[ req ]
default_bits = 2048
distinguished_name = req_distinguished_name
req_extensions = req_ext
attributes = req_attributes
prompt = no
[ req_distinguished_name ]
countryName = US
organizationName = Keyfactor
commonName = scep-ra-test.keyfactor
[ req_attributes ]
challengePassword = foo123
[ req_ext ]
subjectAltName = @alt_names
[alt_names]
DNS.1 = scep-ra-test.keyfator
Create a certificate request:
openssl req -new -config ../scep-ra-csr.conf -newkey rsa:2048 -nodes -keyout scep-ra-csr.key -out scep-ra-csr.csr
this will generate a certificate request to EJBCA and if successful, will return IotSubCA.crt back to the client, like the cli output show below.

Obtain the CA cert using SCEP
sscep getca -u http://192.168.5.118/ejbca/publicweb/apply/scep/scepRA/pkiclient.exe -i "IoTSubCA" -c IoTSubCA.crt
Alias may not be included if it has been named "scep" lowercase, so /apply/scep/scepRA/pkiclient.exe will become /apply/scep/pkiclient.exe. This only occurs if the alias is named precisely "scep"
Enroll for a certificate using the SCEP RA mode alias:
sscep enroll -u http://192.168.5.118/ejbca/publicweb/apply/scep/scepRA/pkiclient.exe -i "IoTSubCA" -k scep-ra-csr.key -r scep-ra-csr.csr -l scep-ra-test.keyfactor.IoT.crt -c IoTSubCA.crt

Note: In multi level CA's you may receive subca.crt-0 and subca.crt-1, in this scenario treat 0 as the root and 1 as the sub sca. Therefore in the command above change the last variable to subca.crt-01
Test the Solution
Check that the Certificate has been installed on the IoT Client
$ ls -ltr scep-ra*
-rw------- 1 gran gran 1704 Feb 28 17:17 scep-ra-csr.key
-rw-rw-r-- 1 gran gran 1054 Feb 28 17:17 scep-ra-csr.csr
-rw-rw-r-- 1 gran gran 1395 Feb 28 18:43 scep-ra-test.keyfactor.IoT.crt <<<
Verify Contents of Certificate using OpenSSL
$ openssl x509 -in scep-ra-test.keyfactor.IoT.crt -text -noout
Certificate:
Data:
Version: 3 (0x2)
Serial Number:
3e:91:60:ea:12:1e:70:65:1e:0f:4b:9d:29:32:d1:66:69:ff:d4:4d
Signature Algorithm: sha256WithRSAEncryption
Issuer: CN = IoTSubCA
Validity
Not Before: Feb 28 21:31:13 2024 GMT
Not After : Feb 27 21:31:12 2026 GMT
Subject: C = SE, O = Keyfactor, CN = scep-ra-test.keyfactor <<<
Subject Public Key Info:
Public Key Algorithm: rsaEncryption
RSA Public-Key: (2048 bit)
Modulus:
00:c7:9b:63:28:ce:45:df:36:38:18:8c:04:da:37:
8d:06:85:f5:89:21:20:a8:08:c1:ca:47:a3:fd:e7:
c2:7e:4b:46:ad:a5:4b:db:20:cd:58:25:ff:26:f3:
ab:68:d1:b8:86:75:cf:a5:a3:bf:1a:b6:a6:37:a8:
e3:30:6b:1f:31:77:40:5c:6a:fc:88:15:a3:51:b0:
61:99:35:e2:28:ea:d7:3f:d1:9e:a6:f4:88:d7:87:
03:a6:8b:8a:68:7a:54:5a:75:ec:e4:b5:b8:bd:b0:
0a:e4:f7:e6:a8:a6:be:79:47:c3:77:cb:d7:3a:b5:
e4:e7:5a:66:5d:2c:85:76:af:ae:7b:fa:4b:99:a6:
39:55:3b:fe:da:ae:c9:0d:9d:d8:d8:1b:26:a8:12:
1a:e5:fe:fd:f6:d4:e2:cc:b5:58:c4:c1:c6:ae:54:
a3:ae:54:f3:93:4f:64:ff:e5:f6:10:bc:e0:56:ce:
87:3e:ee:ef:ef:51:f5:33:7a:e4:f1:90:73:85:c5:
a4:50:70:5a:10:d8:04:e8:14:79:e0:f5:6b:bd:f7:
67:38:80:db:8d:66:7a:5c:d5:98:91:ae:d3:87:b4:
fc:42:b9:66:fd:c9:4c:72:38:05:55:5d:3a:ea:82:
c0:81:2f:82:a7:c2:7f:36:47:66:9c:fe:e4:d4:be:
43:0d
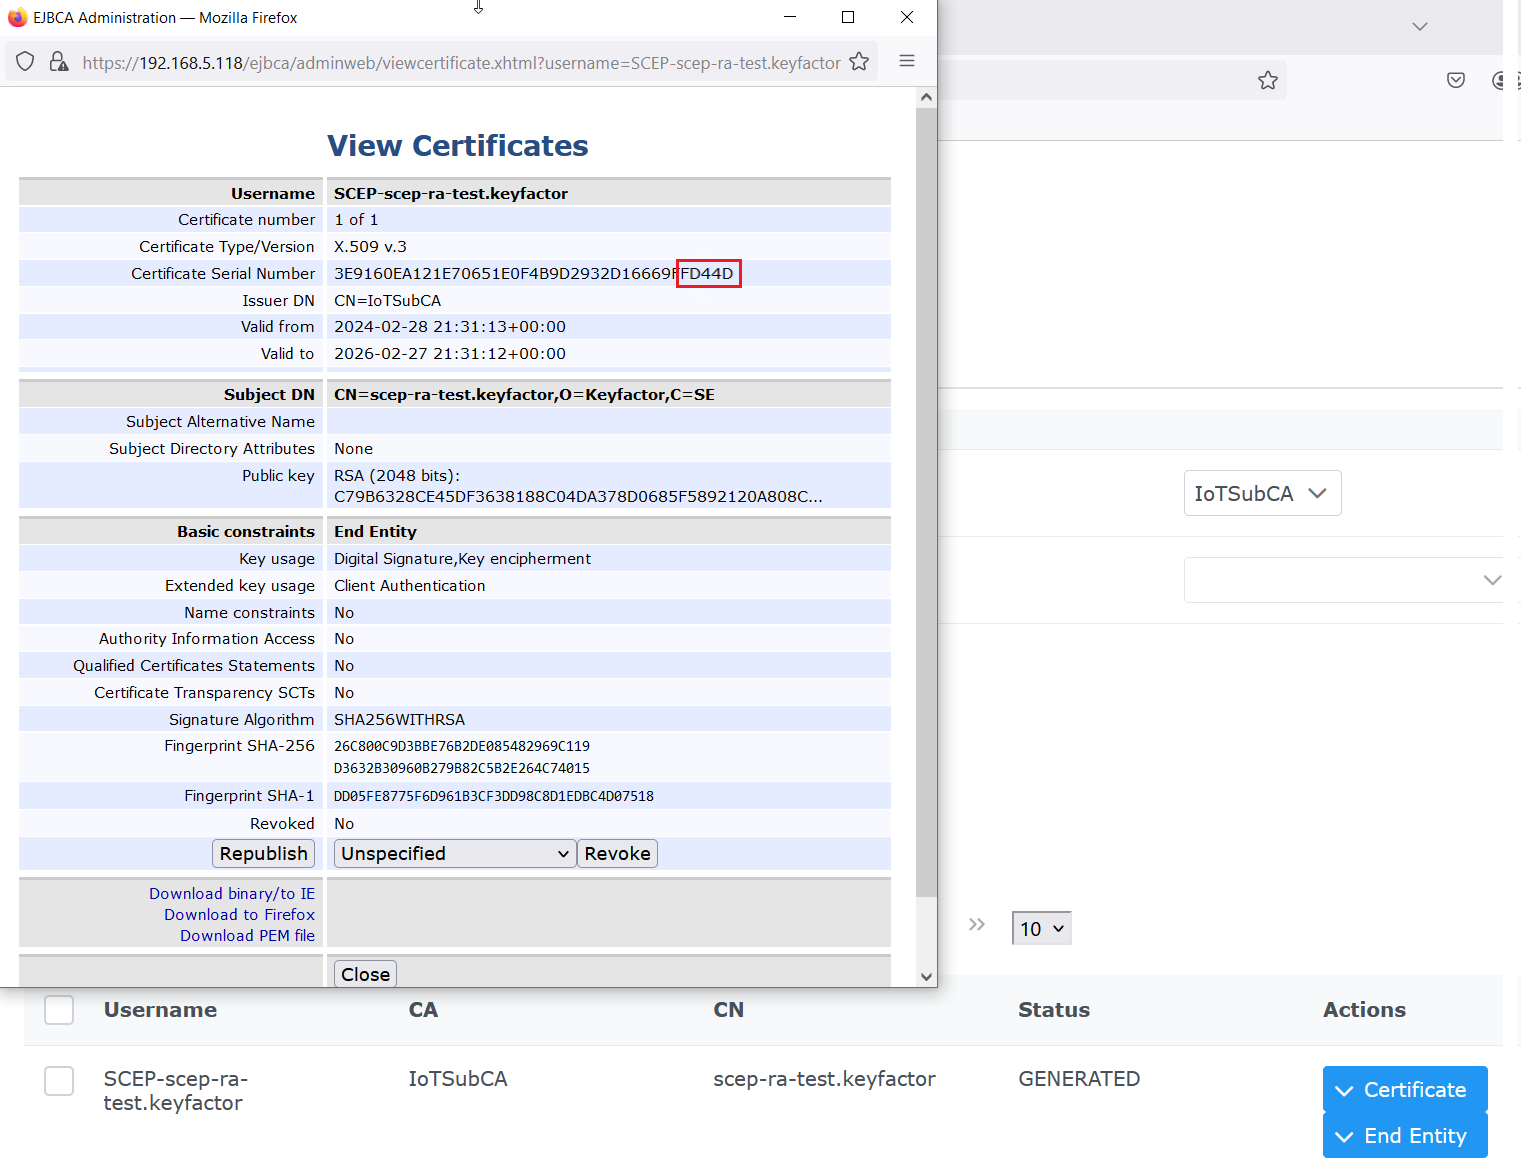
Verify Certificate is in EJBCA and Serial Numbers Match
Go to Search End Entities
Click on Advanced Mode, configure search for CA equals CA name (in this example IoTSubCA)
View for certificates, and the certificate should be Status GENERATED and have matching Serial Numbers, in this case ending in d4:4d
Conclusion
This concludes the configuration of the Keyfactor EJBCA Hardware Appliance for secure certificate issuance and management within the factory's Private 5G network. We have successfully established a Root CA (IoTRootCA) and an intermediate CA (IoTSubCA) and implemented SCEP enrollment for IoT clients.
By deploying the EJBCA Hardware Appliance on-premises and utilizing SCEP, we have achieved a secure and controlled environment for managing device identities within the factory. This ensures that only authorized devices can connect to the Private 5G network and communicate securely with the control applications.
This robust PKI infrastructure contributes to the overall reliability, performance, and security of the Private 5G network, enabling seamless and secure integration of IoT devices and supporting the factory's digital transformation initiatives.
Real world example of John Deere using P5G on the factory floor.