Reference Architecture - Matter
This technical reference architecture (TRA) demonstrates how to set up a simple PKI for Matter-compliant devices in smart homes.
Important Note: This document is intended to be a How-to guide for setting up a demo using EJBCA to issue Matter certificates. It is not designed to replace the EJBCA user manual but to complement and guide the reader through setting up Matter PKI for demo purposes only.
Device Identity - why it Matters!
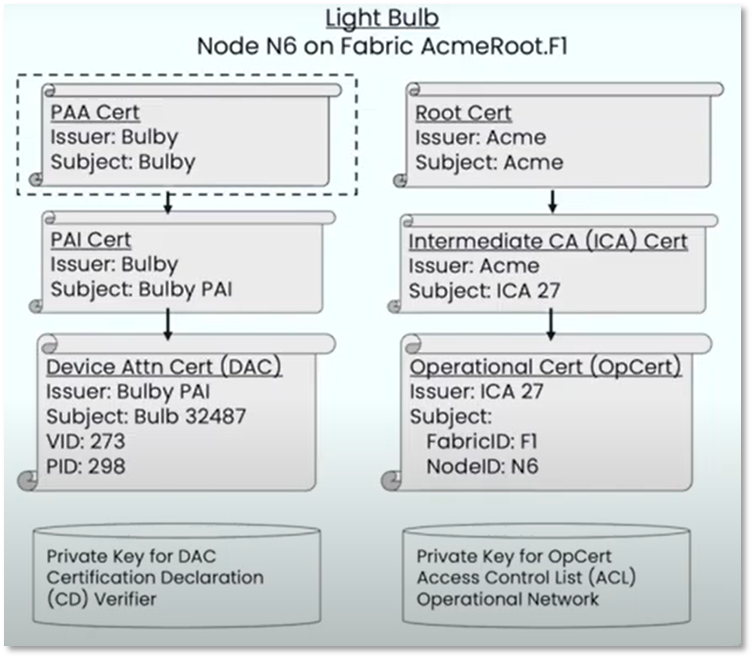
Each Matter device holds a number of certificate chains. A Device Attestation Certificate (DAC) proves the manufacturer's authenticity and the certification status of the device’s hardware and software. During commissioning, the Commissioner service uses the DAC to ensure only trustworthy devices are admitted into a Matter switching fabric.
Each Matter device is issued an Operational Node ID and a Node Operational Certificate (NOC) for that Operational Node ID. The NOC certificate enables a Node to identify itself within a Fabric by cryptographically binding a unique Node Operational Key Pair to the operational identity of its subject, attestable through the signature of a trusted Certificate Authority (CA). Operational Node IDs are removed on factory reset or removal of Fabrics. A NOC is issued during the commissioning process of a device into a Fabric. These steps help protect the end-user's privacy and adapt to different trust models.
Adding Nodes to a Matter Fabric
Nodes are added to a Matter fabric using PKI through a process called commissioning. Below is an overview of the node commissioning flow:
Commissioning is the initial setup process for introducing a new device to the Matter network. A commissioner, often a smartphone app, facilitates this process.
Certificates:
PAA (Product Attestation Authority): This is the Root CA in the Matter context. It's the ultimate authority that issues certificates to manufacturers (OEMs).
PAI (Product Attestation Intermediate): This is a Sub CA that sits below the PAA. Manufacturers (OEMs) use their PAI to issue certificates for their specific devices.
Verification: The Node uses the PAA certificate to validate the NOC, ensuring a secure connection to a trusted network.
Secure Communication: Matter primarily uses AES-CCM for secure communication. Once the NOC is validated, the Node can establish secure communication with other devices on the Matter fabric using its key pair for encryption and authentication. The underlying datagram transport is IPv6 across the Node Fabric.
Device Attestation Certificate Issuance Model
Matter PKI establishes a three-tiered trust structure to facilitate secure communication amongst devices:
Product Attestation Authority (PAA):
Root CA
The foundational trust anchor.
Highly secure, often air-gapped for enhanced protection.
Sole responsibility: Signs certificates for the next level, the PAI.
Product Attestation Intermediate (PAI)
Sub-CA
Issues Device Attestation Certificates (DACs) to individual devices.
Obtains its certificate by submitting a CSR to the PAA.
Device Attestation Certificate (DAC)
End Entity (EE)
Issued to each Matter device.
It contains the device's unique identity and crucial information.
Signed by the PAI.
Exchanged during communication for mutual authentication and secure connections.
Matter Use Case Example
This How-to guide will show you how to set up an instance of Keyfactor PKI on Microsoft Azure and how to issue a Matter-complaint DAC to a simulated test device.
The provisioning workflow for creating a Matter PKI to issue DAC certificates is as follows;
Example Matter PKI Issuance for a Light Bulb DAC
Create a PAA as a standalone Root CA (meant to be off-line/air-gapped)
Create a PAI and create a Certificate Signing Request (CSR) to send to the PAA Root CA
Upload the CSR to the PAA and issue a PAI certificate
Activate the PAI by importing the issued certificate
Create DAC profiles on the PAI issuing CA
Generate a CSR and simulate a CSR from a DAC (using OpenSSL)
Upload the CSR to the PAI and issue a DAC certificate
Verify the DAC certificate and display the certificate contents
Prerequisites
Before you begin, you need the following:
This TRA uses a 30-day free trial of Keyfactor Command-for-IoT running on Azure.
An AWS 30-day trial version is also available. The setup is similar for both Azure and AWS.
OpenSSL is required for generating a key pair and a CSR. For more information, refer to openssl.org.
Firefox is the recommended browser. Its trust store is independent of the OS trust store, making troubleshooting easier. However, other browsers, like Chrome, will work.
The Matter standard and certificate policy may be updated, so always verify any profiles created below to meet the latest version of Matter specifications and policies.
Create a Keyfactor Command for IoT instance on Azure
Click on the Azure link to go to Keyfactor’s Test Drive page for EJBCA Enterprise Cloud -
Click “Get it Now” to activate the 30-day free trial, and follow the prompts to configure your test instance.
Please follow the EJBCA AZURE LAUNCH GUIDE or EJBCA AWS LAUNCH GUIDE to launch and get access to your EJBCA Enterprise Cloud.
Save the "Your Test Drive is ready" information. It will be needed later for admin and deleting the instance.
Follow the steps carefully to configure the Superadmin certificates to gain access to EJBCA Enterprise UI via a browser.
After the 30-day trial, Azure may bill you to keep the instance up and running. You can delete the instance before 30 days and not be billed.
Once the EJBCA demo instance is configured and you have access to the EJBCA Adminsitration page, configure the crypto toekesn, PAA and PAI certificate profiles, CAs and the device DAC end entity profiles byt follwoing the steps below.
Step 1 - Create Root and Issuing CA Crypto Tokens
To create a Root CA (PAA) crypto token and keys, follow these steps:
Once the Azure Test Drive has been completed, the user will see a test Drive location URL on the Azure Keyfactor Command for IoT test drive page. This URL will access the EJBCA home page.
for example: https://<IP>/ejbca/adminweb/
In the EJBCA menu, under CA Functions, click Crypto Tokens.
Click Create new and specify the following on the New Crypto Token page:
Name: Name the Root CA crypto token for example Matter-PAA-token-ecdsa.
Type: Select Soft.
Auto-activation: Use.
Allow export of private keys: Allow.
Authentication Code: Choose a password to be used to activate the crypto token.
Click Save to create the PAA crypto token.
Next, to generate three keys for the PAA that comply with the Matter standard:
For the signKey, select ECDSA P-256, and then click Generate new key pair to create the keys.
Repeat to create a testKey using ECDSA P-256, and then click Generate new key pair.
Repeat to create the default encryptKey using ECDSA P-256, and then click Generate new key pair.
The signKey will be used for the digital signatures and the testKey and encryptKey are used internally by EJBCA.
Step 2 - Create a PAA and PAI Certificate Profiles
Next, create a certificate profile for the root PAI and the issuing PAI CAs. The certificate profile defines the constraints of new certificates such as what keys it can use and what the extensions will be. For more information on certificate profiles, see Keyfactor’s Certificate Profiles Overview.
For this example, the CA profiles will be:
PAA Certificate Profile Name = MatterPAA-cert-profile-ecdsa256
PAI Certificate Profile Name = MatterPAI-cert-profile-ecdsa256
To create a certificate profile for the PAA (root CA), follow these steps:
In EJBCA, under CA Functions, click Certificate Profiles.
The Manage Certificate Profiles page displays a list of default profilesHighlight ROOTCA and click Clone to clone the RootCA.
Specify a name for the Root CA, enter "MatterPAA-cert-profile-ecdsa256," and click Create.
Find the newly created profile displayed in the list and click Edit.
On the Edit page, update with:
For Type, select Root CA.
For Available Key Algorithms, select ECDSA.
For Available ECDSA curves, ECDSA P-256 / prime256v1 / secp256r1
For Signature Algorithm, use SHA256withECDSA
For Validity or end date of the certificate, specify 25y
Uncheck Subject Alternative Name
Uncheck Issuer Alternative Name
Uncheck LDAP DN order
Click Save to store the root CA certificate profile.
Repeat the above steps to create PAI (issuing CA) with the following settings. Clone the PAA certificate profile that was created above and change.
Name: MatterPAI-cert-profile-ecdsa256
Type: Sub CA
Key Algorithm: ECDSA
ECDSA curves: ECDSA P-256 / prime256v1 / secp256r1
For Validity or end date of the certificate, specify 15y
Uncheck Subject Alternative Name
Uncheck Issuer Alternative Name
Uncheck LDAP DN order
Click Save to store the issuing CA certificate profile.
The next step is to create the root and issuing certificate authorities and bind them to the certificate profiles we just created.
Step 3 - Create PAA Certificate Authority
The next steps are configuring the issuing PAA (rootCA) Certificate Authority.
Return to the EJBCA Admin UI and click Certificate Authorities under CA Functions.
Under Add CA, name MatterPAA-CA-ecdsa256 Click Create
On the Edit page, update the following:
Crypto Token, Matter-PAA-token-ecdsa
For Alternative Signing Algorithm, SHA256withECDSA.
Signed By: Select Self-Signed
Certificate Profile: Verify the issuing CA profile is selected: in this example, MatterPAA-Cert-profile-ecdsa256
Validity: 25y,
Uncheck LDAP DN order
Click Save.
Step 4 - Create the Issuing PAI CA
To create the Issuing CA that will enroll CSRs and issue Matter Certs, follow these steps in EJBCA:
Click Certification Authorities under CA Functions.
In the Add CA field, enter a name such as "MatterPAI-CA-ecdsa256" and click Create.
On the Create CA page, update:
For Crypto Token, select the crypto token Matter-PAA-token-ecdsa (created earlier)
For Alternative Signing Algorithm, SHA256withECDSA.
Under CA Certificate Data, specify the following:
Append the Matter VID=FFF1 at the end of Subject DN: CN=MatterPAA-CA-ecdsa256, VID=FFF1
Signed By: MatterPAA-CA-ecdsa256
Certificate Profile: Verify the issuing CA profile is selected: MatterPAI-cert-profile-ecdsa256
Validity: 15y
Uncheck LDAP DN order
Click Create to create the PAI issuing CA
Step 5 - Add Matter End Entity Profile
To create Matter-compliant end entity profile for the first IoT device, follow these steps:
In the bottom row, specify a name for the profile, such as "MATTER-Device-DAC-EE-Profile,” and click Add then Edit..
Uncheck End Entity E-mail.
Under Subject DN Attributes, select the following Matter settings from the Subject DN Attributes drop-down list and select the VID and PID attributes.
VID, Vendor identifier (Matter)
Check required and uncheck Modifiable
Enter VID = FFF1
PID, Product identifier (Matter)
Check Required and uncheck Modifiable
For Default Certificate Profile, select MatterPAA-cert-profile-ecdsa256
For Available Certificate Profiles, select the same MatterPAA-cert-profile-ecdsa256.
For Default CA, select MatterPAI-CA-ecdsa256
For Available CAs, select MatterPAI-CA-ecdsa256
For Default Token, select User Generated.
Click Save to store the certificate profile.
Step 6 - Add DAC End Entity Profile
To create a Device Attestation Certificate (DAC) end entity for the first IoT device you want to put a DAC certificate on, follow these steps:
Go to RA Funcations, then Add End Entity
For End Entity Prfile, select "MATTER-Device-DAC-EE-Profile,”.
In Username, specify a name for the device, such as Device001.
In Password, specify a one-time enrollment code.
for CN, Common Name, MyFirstDAC001
Under Main Certificate Data, verify that Certificate Profile, CA and Token match the prvious settings, shown below.
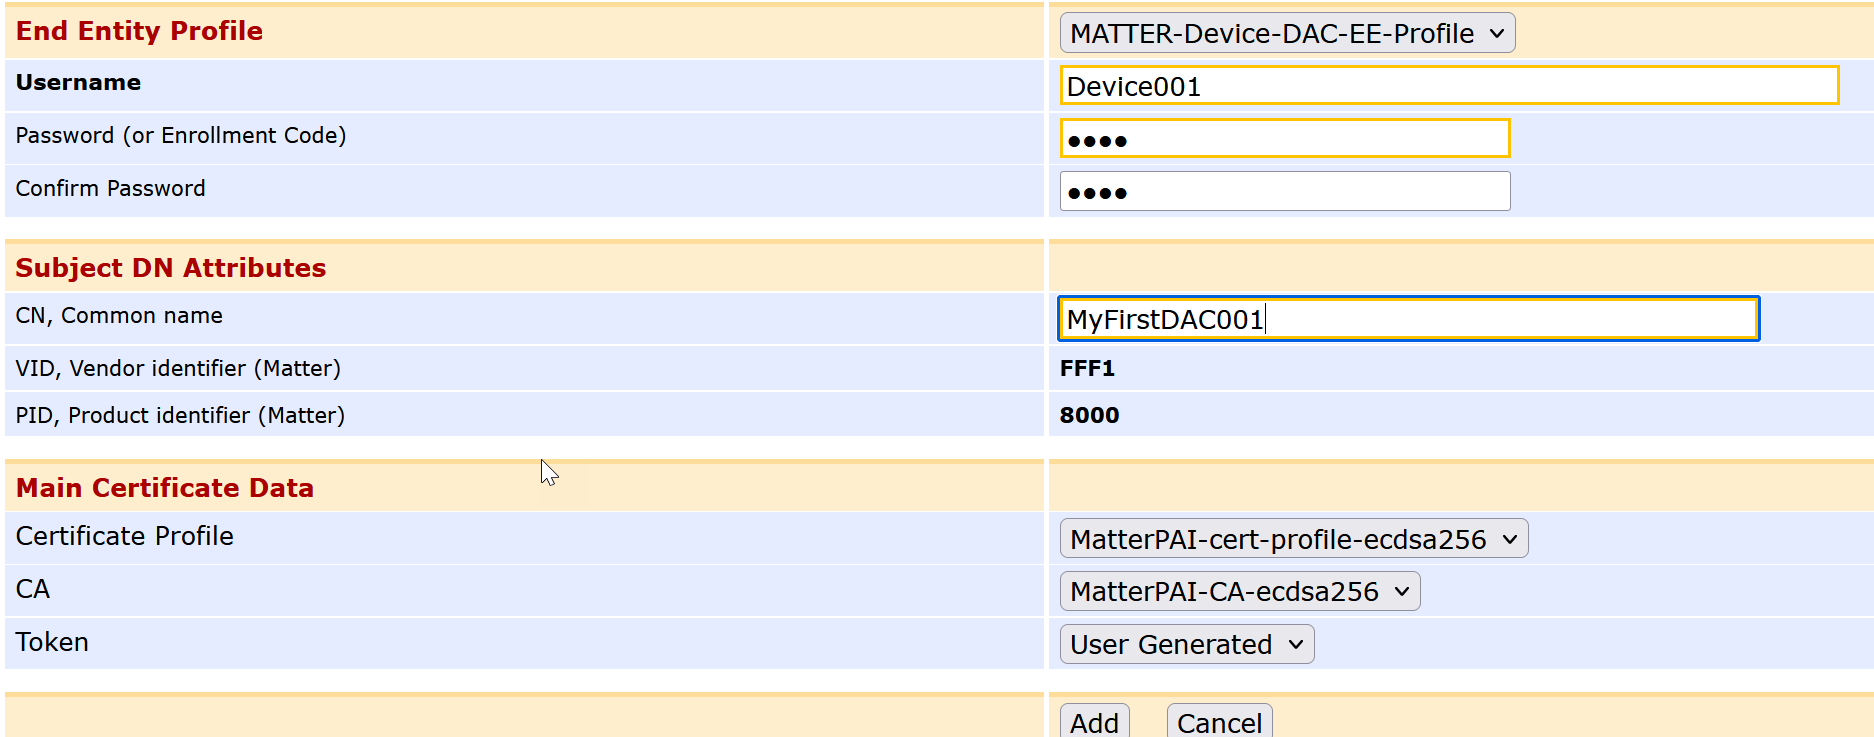
Click Save
The DAC end entity is added and your PKI is aware of your first device to get a Matter-compliant DAC.
Test a Device Attestation Certificate
The following steps demonstrate how to simulate an IoT device using OpenSSL, generate a key pair for the device, and create a Certificate Signing Request (CSR).
To generate a key pair for the device and create a CSR, follow these steps:
Open a new terminal and enter the following to generate a key pair and save it to a file (device001-private.pem):
CODEopenssl ecparam -genkey -name prime256v1 -noout -out device001-private.pemCreate a new Certificate Signing Request (CSR) using the
openssl reqcommand, by specifying the newly created keys (dac-001-private.pem) and saving it to a file (dac-001-csr.pem).CODEopenssl req -new -key dac-001-private.pem -out device001-csr.pem -subj "/CN=001"
Note that the exact Subject DN in the CSR is not important since EJBCA will not trust the device by default. Instead, the Subject DN specified in the profile takes precedence over the Subject DN included in the CSR.
Use cat to view the created CSR:
CODEcat device001-csr.pemSelect the displayed certificate request and copy it to the clipboard. Proceed to sign and create a DAC certificate.
Sign DAC Certificate
Next, to allow the PAI to sign the DAC, follow these steps:
Switch back to the browser tab for the PAI
(found on the Test Drive instance page or https://mycahostname:38443/ejbca/adminweb/)
Click RA Web to access the EJBCA RA UI.
To enroll, select Enroll > Use Username and specify the following:
Username: Enter the username Device001 specified in the DAC end entity.
Enrollment code: Enter the password specified earlier in the DAC end entity.
Click Check.
In the text field, paste the CSR you copied from the terminal in the previous step.
Click Download PEM to download and save
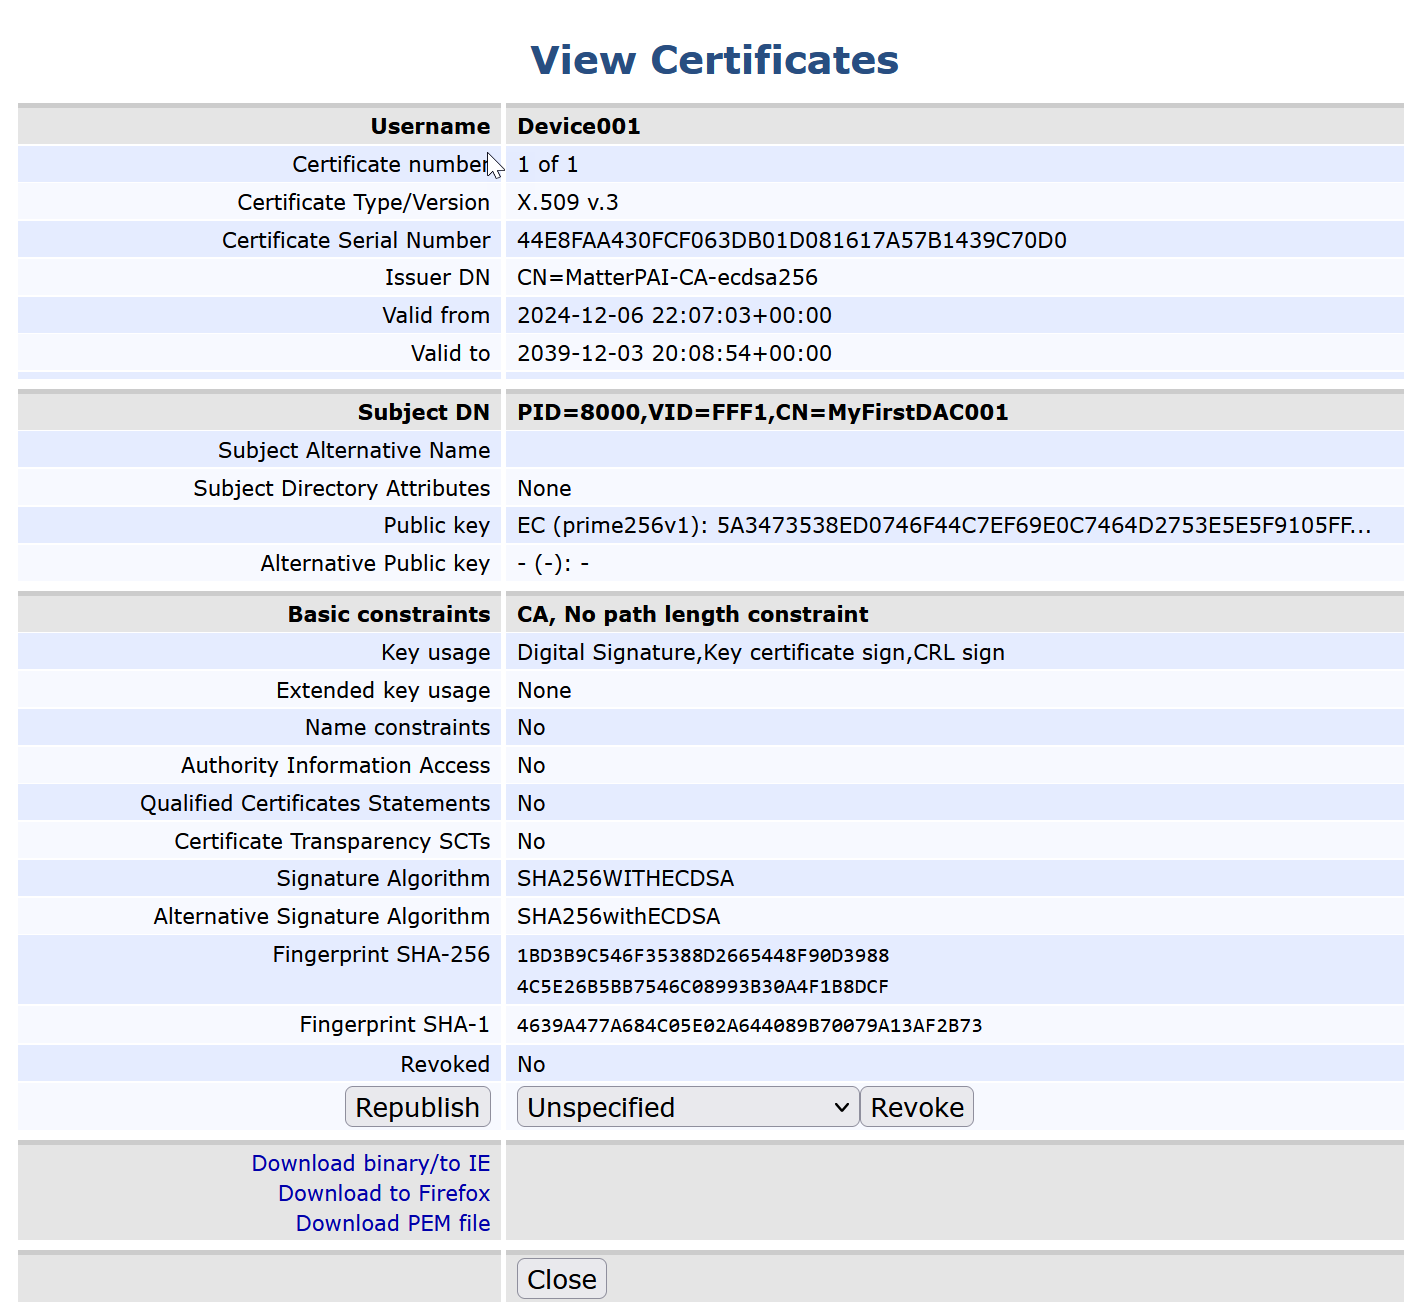
Inspect DAC Certificate
To inspect the issued certificate, open the downloaded PEM file to view the received certificate. In EJBCA, go to Search End Entities under RA Functions, then enter the username (Device001 in this case) and click Search.

Note: The Matter-specific DN attributes Vendor ID (VID) and Product ID (PID) are listed in the Subject DN field in EJBCA’s viewer. In this example PID=8000,VID=FFF1,CN=001.
Conclusion
This technical reference architecture has demonstrated how to set up a PKI compatible with the Matter IoT standard and issue Device Attestation Certificates (DACs) using EJBCA. For a production environment an Hardware Security Module (HSM) would be used for storing private keys and the root PAA would be off-line and airgapped for added layer of security.