Reference Architecture - ISO 15118
Introduction
Purpose of the Reference Architecture
This document is intended to show example PKI Architectures that are defined in ISO 15118. In particular this document aims to show how a Keyfactor PKI can issue x.509v3 certificates that comply with the ISO 15118-2 and ISO 15118-20 standards.
This reference architecture is not intended to be a complete overview of the ISO 15118 standard, but one that focuses on possible PKI Architectures for the various players in the charging industry. The architectures presented are references that use the standard to define how Keyfactor’s PKI can be leveraged in such an environment.
In addition, this shows a single EJBCA instance setup. In practice a hybrid setup is used. There is a separation of functions between EJBCA nodes & node locations are determined based on several factors that are outside of the scope of this document. Keyfactor offers services to design, install, and configure the PKI to meet all of these factors.
This reference architecture is designed to complement the Keyfactor product documentation and is not intended to replace it. In some cases, it references the appropriate documentation associated with the specific Keyfactor product used.
Overview
This reference architecture is targeted at individuals who want an understanding of how a PKI could be set up in one of the use cases defined in ISO 15118-2. The architecture shows how a Private Environment (PE) set of roots and issuing authorities can be constructed to meet ISO 15118-2. The other architectures defined in both the -2 and the -20 standard are stood up in a similar manner. However, the details of the certificate profiles, key types, end entity profiles and the like vary based on the standard’s definition. That is, the PKI setup follows the same steps; the values and options selected differ (and are defined in the standard).
From a high-level point of view, the ISO 15118 standard defines how information is transferred between the vehicle and the charging environment. This includes the ability to pay without a credit card; called Plug and Charge. This document will provide an overview of the environment and then showcase how to set up a PKI for the Private Environment use case. This use case places a private environment certificate as a means to identify charging stations to Electric Vehicles within a fleet of vehicles.
Architectural Overview
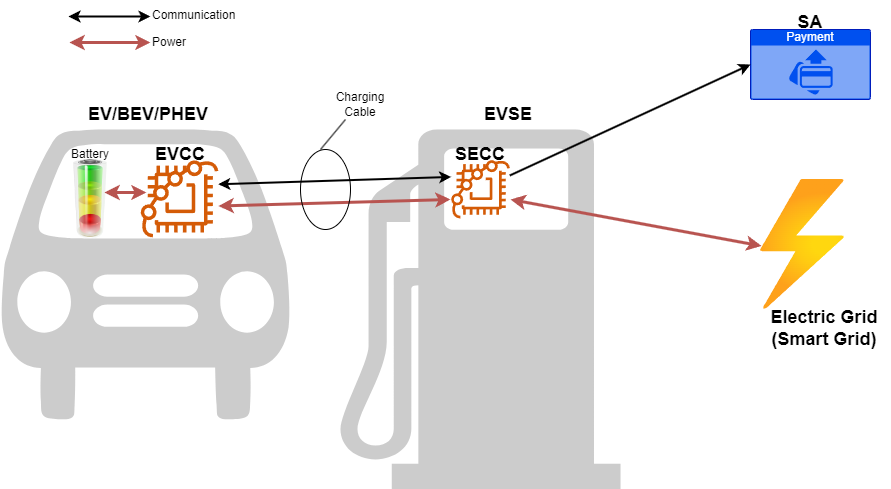
ISO 15118-2 defines the information transfer and communications protocol associated with Electric Vehicles (EV) and Electric Vehicle Supply Equipment (EVSE) that are created by Original Equipment Manufacturers (OEM). EVSEs are commonly called Charging Stations (CS) or Charging Points (CP). EVs are also known as PHEV (Plug-in Hybrid Electric Vehicles) or Battery Electric Vehicles (BEV). The standard enables an Internet Protocol (IP) communication between the EV and the EVSE.
Internal to the EV is an Electric Vehicle Communications Controller (EVCC). Internal to the EVSE is a Supply Equipment Communication Controller (SECC). Therefore, the standard defines a Vehicle-to-Grid-Transport-Protocol (V2GTP) that uses Transport Control Protocol (TCP), Transport Layer Security (TLS), and IPv6 sitting on the IP protocol.
ISO 15118-2 describes Layers two (2) through (7) of the Open Systems Interconnect (OSI) model. That is, the physical (Layer 1) and data link (Layer 2) layers are not specified by this ISO standard. Instead, standards like SAE J1772 or IEC 62196 Type 2 define the physical pin layouts, voltage levels, and the like (Layer 1).
Additionally ISO 15118-2 describes how automatic payment processing, commonly called plug-and-charge (PnC), smart charging, and payment service communications can occur between the EVCC, SECC, and a Secondary Actor (SA). A Secondary Actor would be a company like a Mobility Operator (MO) or eMobility Service Provider (eMSP). The eMSP (or MO) is a company that provides access to a charging infrastructure and payment services.
The charging infrastructure may be a different entity than the eMSP (or MO, which are interchangeable terms). The entity that runs and maintains the charging stations is known as the Charge Station Operator (CSO) or Charge Point Operator (CPO). An example of a CPO may be a city, private station operator, or the like.
ISO 15118-20 is an update to the ISO 15118-2 standard released in March of 2023. Amongst other things, this standard updates:
The cryptography used in the PKI
The option of allowing the EVSE to trust the EV
Larger certificates (1600 bytes instead of 800)
Additional publicly trusted roots (10 roots maximum are allowed in -2)
Logical View
ISO 15118-2 and -20 define multiple possible ecosystem PKIs that must interact. Each PKI can be up to a three-tiered PKI.
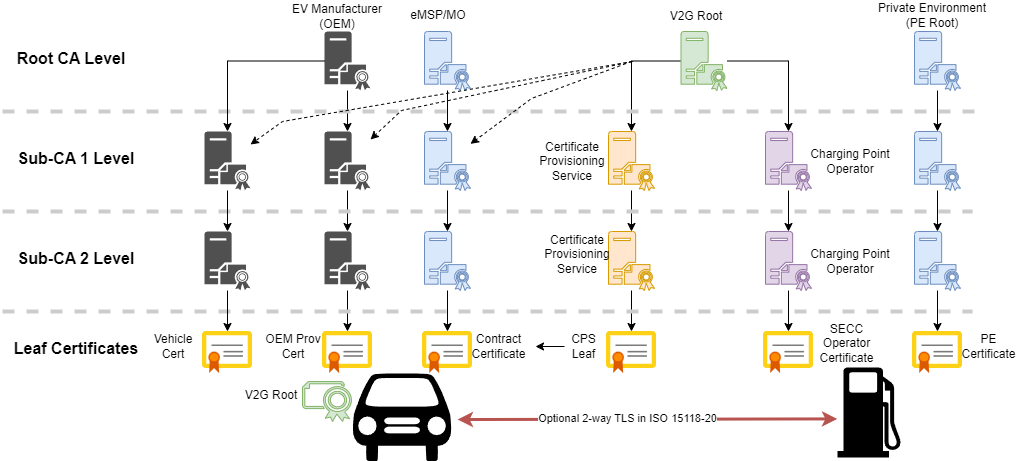
The Vehicle Cert in the diagram is only defined in ISO 15118-20 & is (optionally) used to prove that a valid vehicle is connected to the charging station.
What follows are the specific use cases for each PKI tree above for each of the standards.
NOTE: ISO 15118-2 has a maximum certificate size of 800 bytes. -20 increases this size to 1600 bytes!
Example Implementation
ISO 15118-2 Private Environment (PE) PKI
A private environment is typically used by a fleet of vehicles and chargers that are specific to a fleet (e.g., Hertz, Avis, etc)
The certificate profiles required in this tree include:
PE Root Certificate
Sub CA 1 Certificates
Sub CA 2 Certificate
PE Device Leaf certificate
Hardware and Software Requirements
The use case requires:
EJBCA in some form (Hardware appliance, container, VM, SaaS)
A simulated (or real) charging station.
For the purposes of this demonstration, a simple Ubuntu VM will suffice.
Certificate Revocation Lists (CRLs) are outlined in this example. In practice, the decision to include Online Certificate Status Protocol (OCSP) in revocation checking should be considered. This is outside the scope of this document.
This example shows the Registration Authority (RA) and the Certificate Authority (CA) placed on the same EJBCA node. In practice, these nodes are separated. The implementation and location of the RA on separate nodes is outside the scope of this document.
This example shows the use of Soft Keys (keys stored in a database) for the implementation. This is not recommended in a production environment. Key material should be stored in a Hardware Security Module (HSM). The key creation method is the same, but the target is the HSM.
Connecting EJBCA to an HSM or Cloud Key Provider is outside the scope of this document & is provided in the EJBCA documentation.
Limitations in the example
In a real implementation, the decision about which versions of EJBCA (i.e. a hybrid deployment) to utilize depends on several factors:
The scope of manufacturing
One manufacturing facility or many
Internet connectivity at the factories
Contract manufacturing
Key material generation and injection
Security posture and policies
Certificate issuance methods
Protocols in use
The legal requirements for key storage in different regions
The regional requirements
Response time for revocation checks
Response time and issuance speeds for certificate signing
Location of cryptographic materials
Deployment and Configuration
EJBCA Deployment
In this example, we are going to use the 30-day trial of EJBCA Enterprise Cloud from Azure; an AWS 30-day trial version is also available. The setup is similar in both instances.
The minimum machine configuration to run an EJBCA trial is the current Burst 2vCPU machine as shown below (standard B2s). Production instances are selected based on workload.
After that, please follow the EJBCA AZURE LAUNCH GUIDE or EJBCA AWS LAUNCH GUIDE to launch and get access to your EJBCA Enterprise Cloud.
We can now configure EJBCA with:
Crypto Tokens = The storage for our Certificate Authority Keypairs
Certificate Profiles = The data that appears on the certificate that is NOT user specific
Certificate Authorities = The Root of Trust and Sub authorities that are linked to provide a Chain of Trust
End entity profiles = The data required to identify a specific end user (leaf) certificate for a specific SECC’s identity in the Private Environment
End entities = The specific SECC in the Private Environment; this is used to finalize a certificate signing request (CSR / PKCS#10) coming from an SECC.
Configure crypto tokens for the Root and Sub CAs
ISO 15118-2 Table F.6 defines the PE Root key as ECDSA using the named curve secp256r1. While it doesn’t specifically define the Sub CAs, we can use the guidance from the CPO Certificates defined in Table F.2 to use the same ECDSA secp256r1 named curve. Here is how to configure these inside of a crypto token:
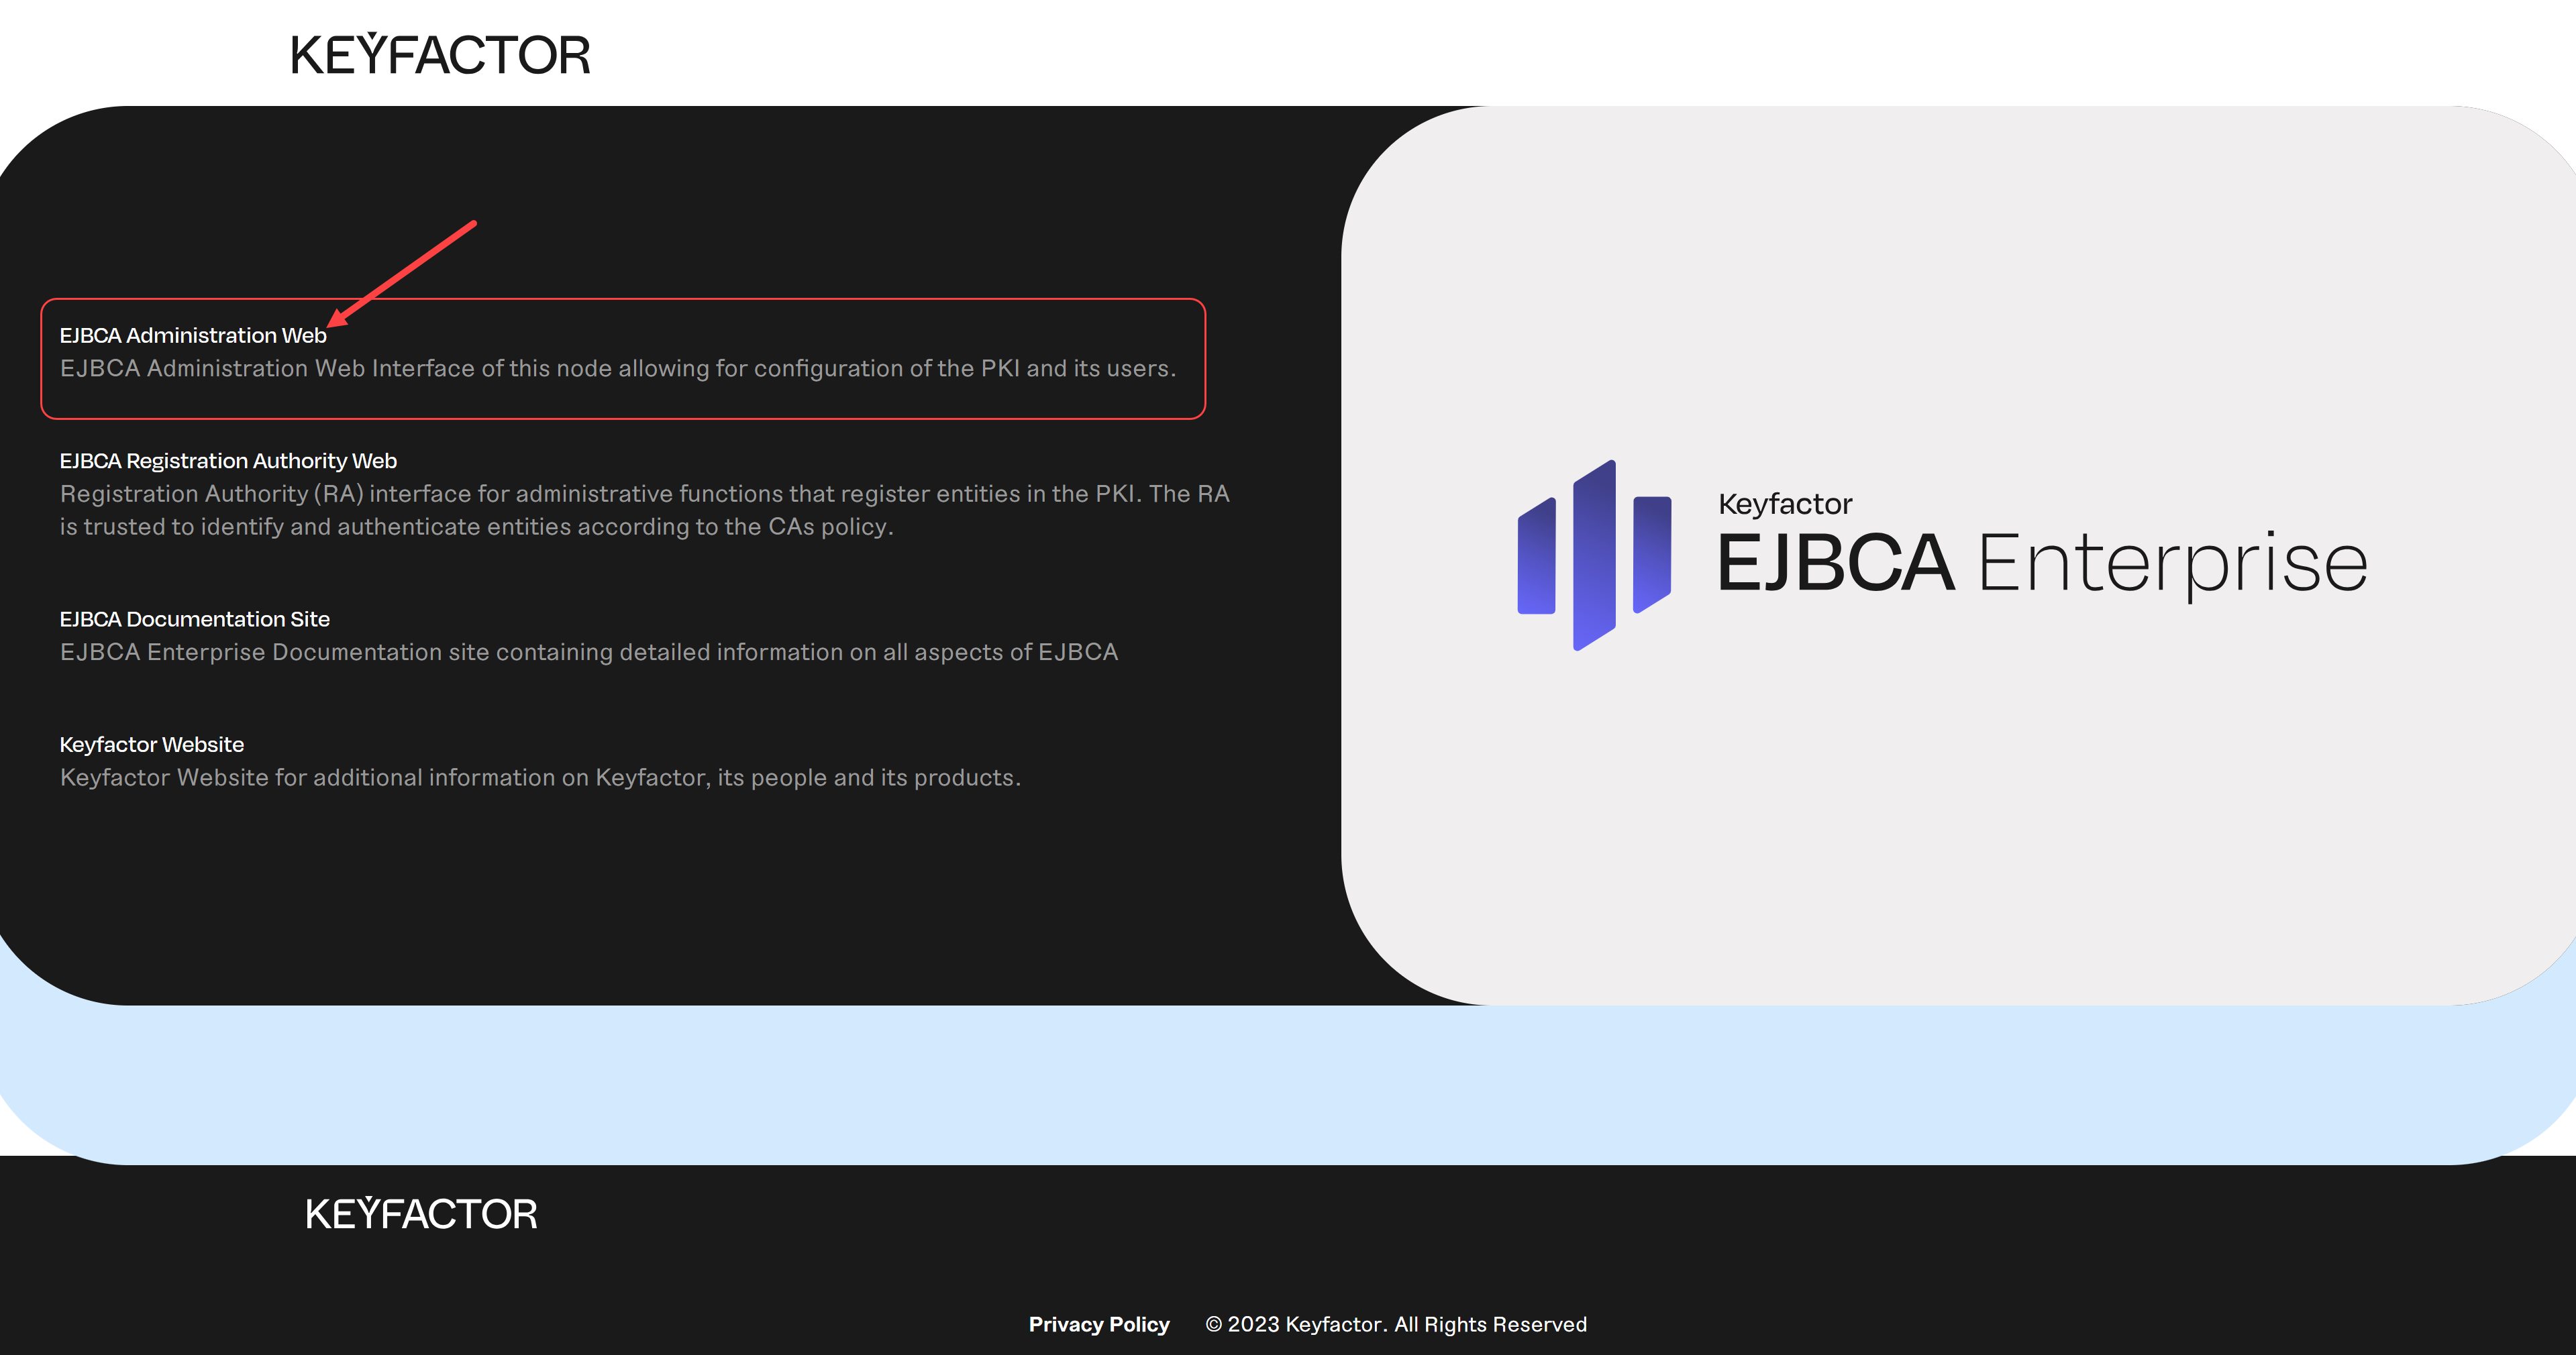
Enter the EJBCA Administration Web
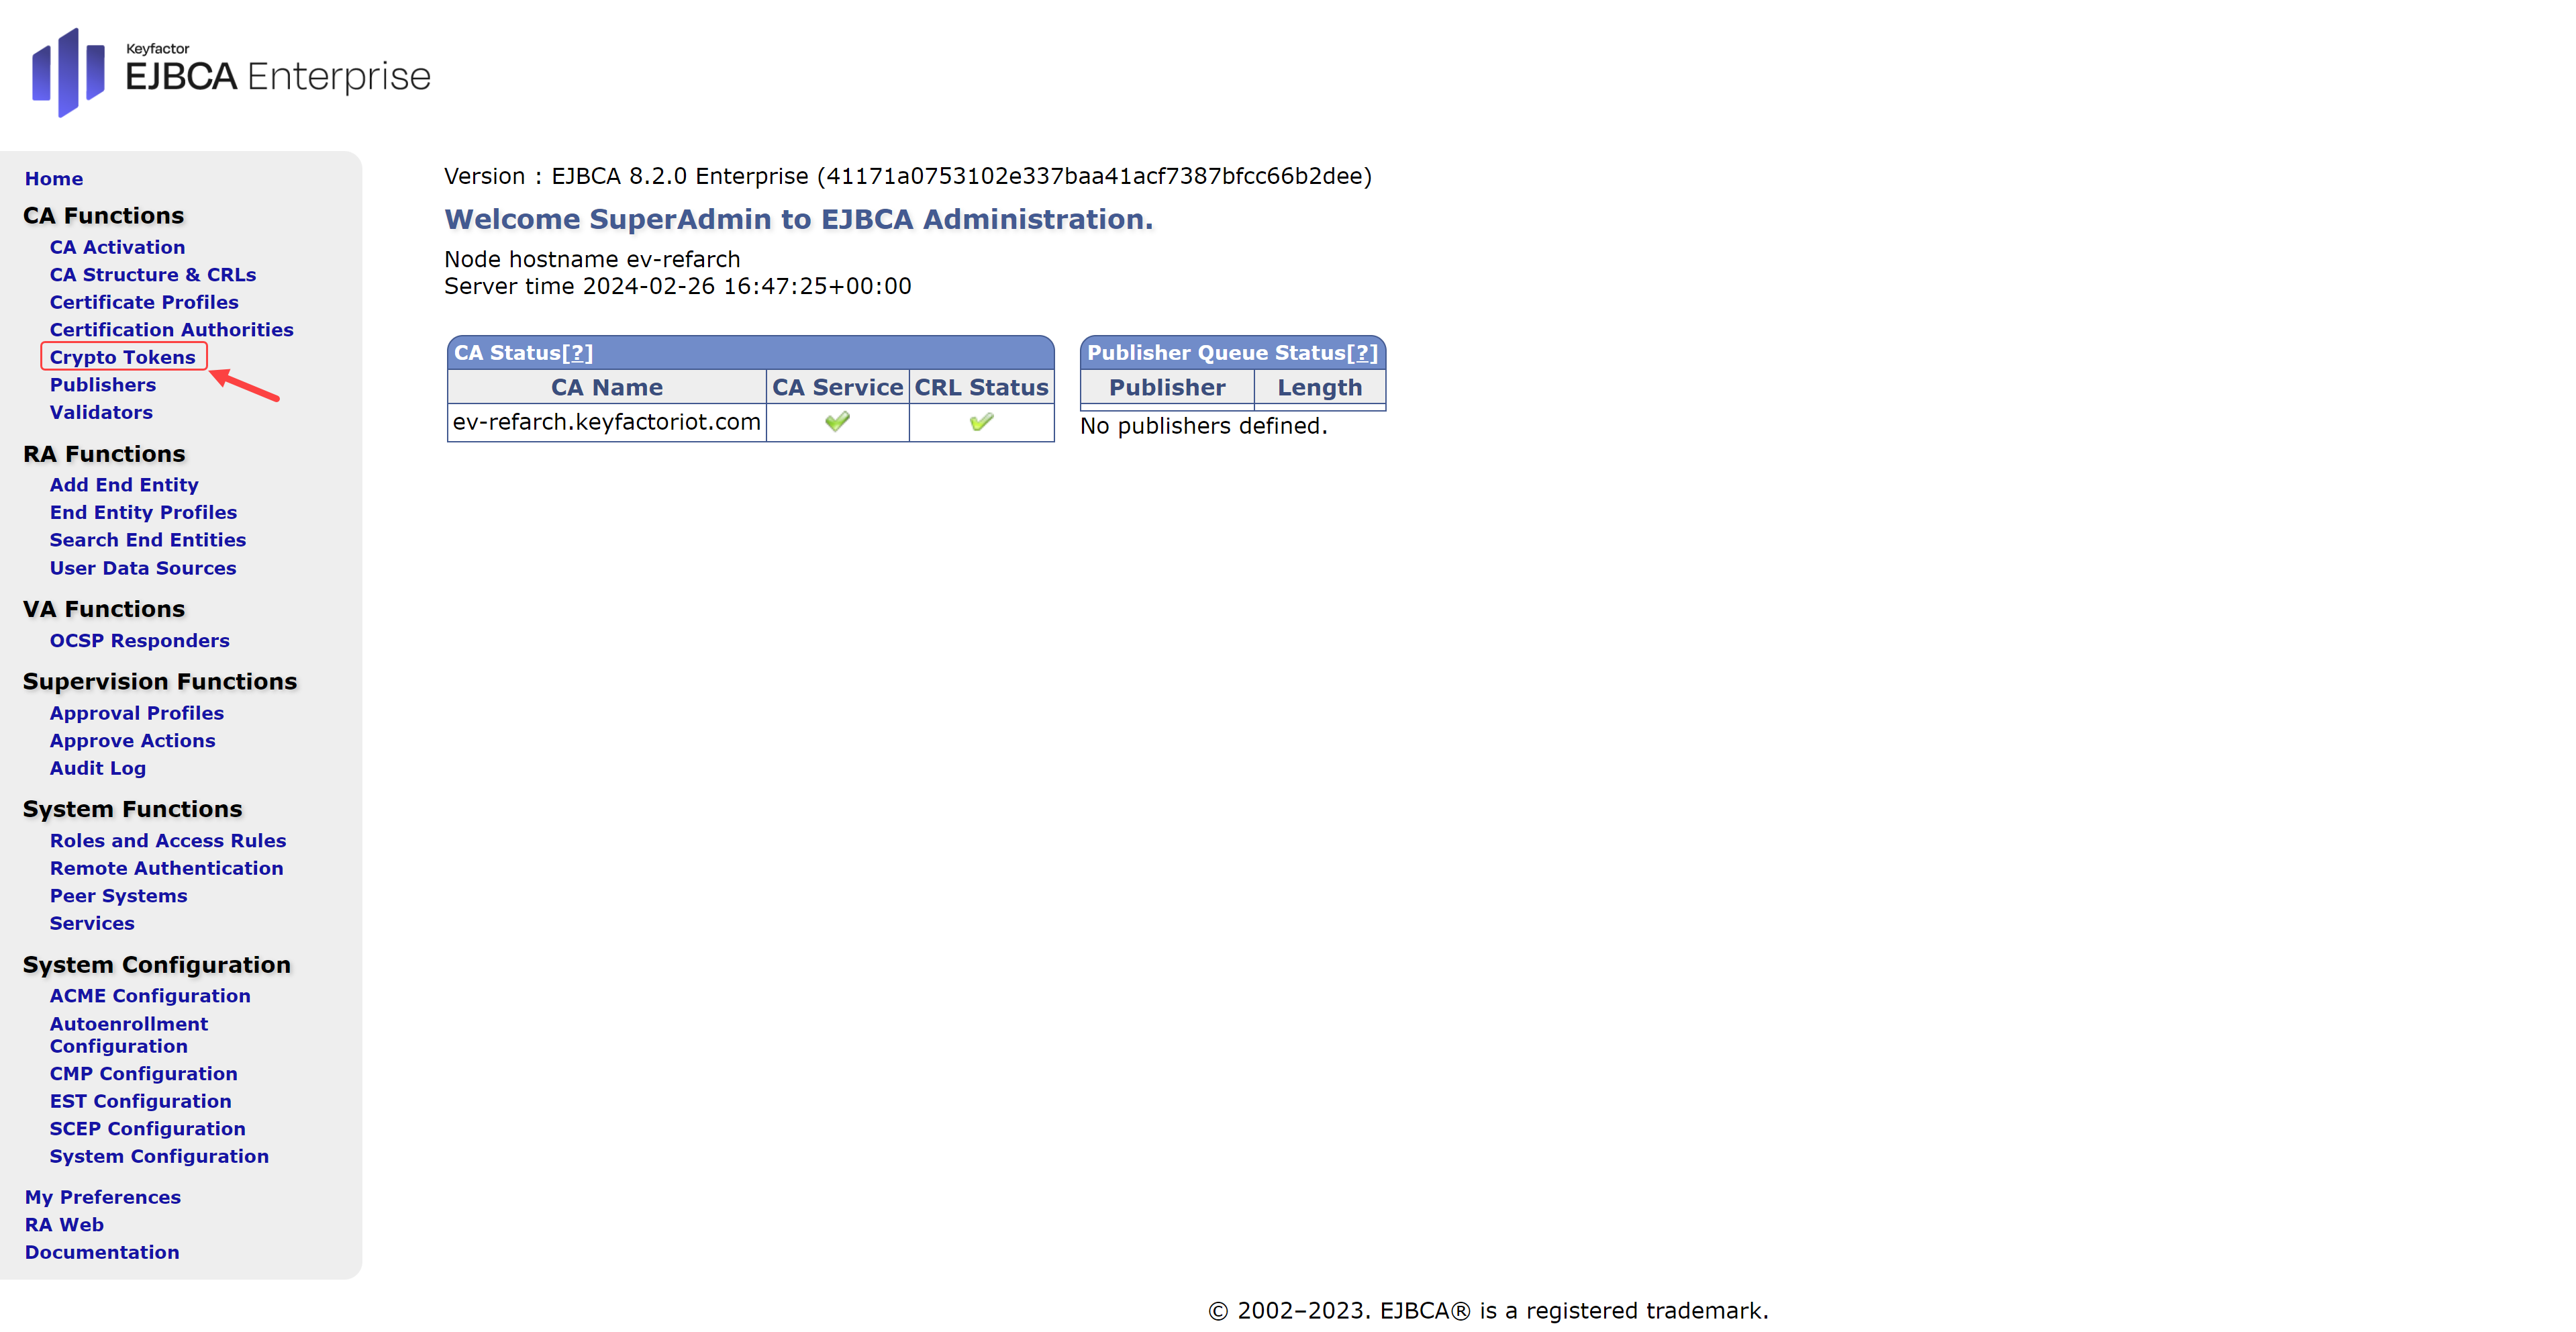
Select Crypto Tokens
(Optional) If EJBCA was configured to connect to a Key Vault in AWS or Azure, skip this step. If not, select Create new…

For the new Crypto Token (a place to store keys) enter:
A Name for this Crypto Token
Leave the Type as Soft
Select Auto-activation
(Optionally) Select Allow export of private keys
Enter an Authentication Code (passphrase)
Repeat the Authentication Code
Save

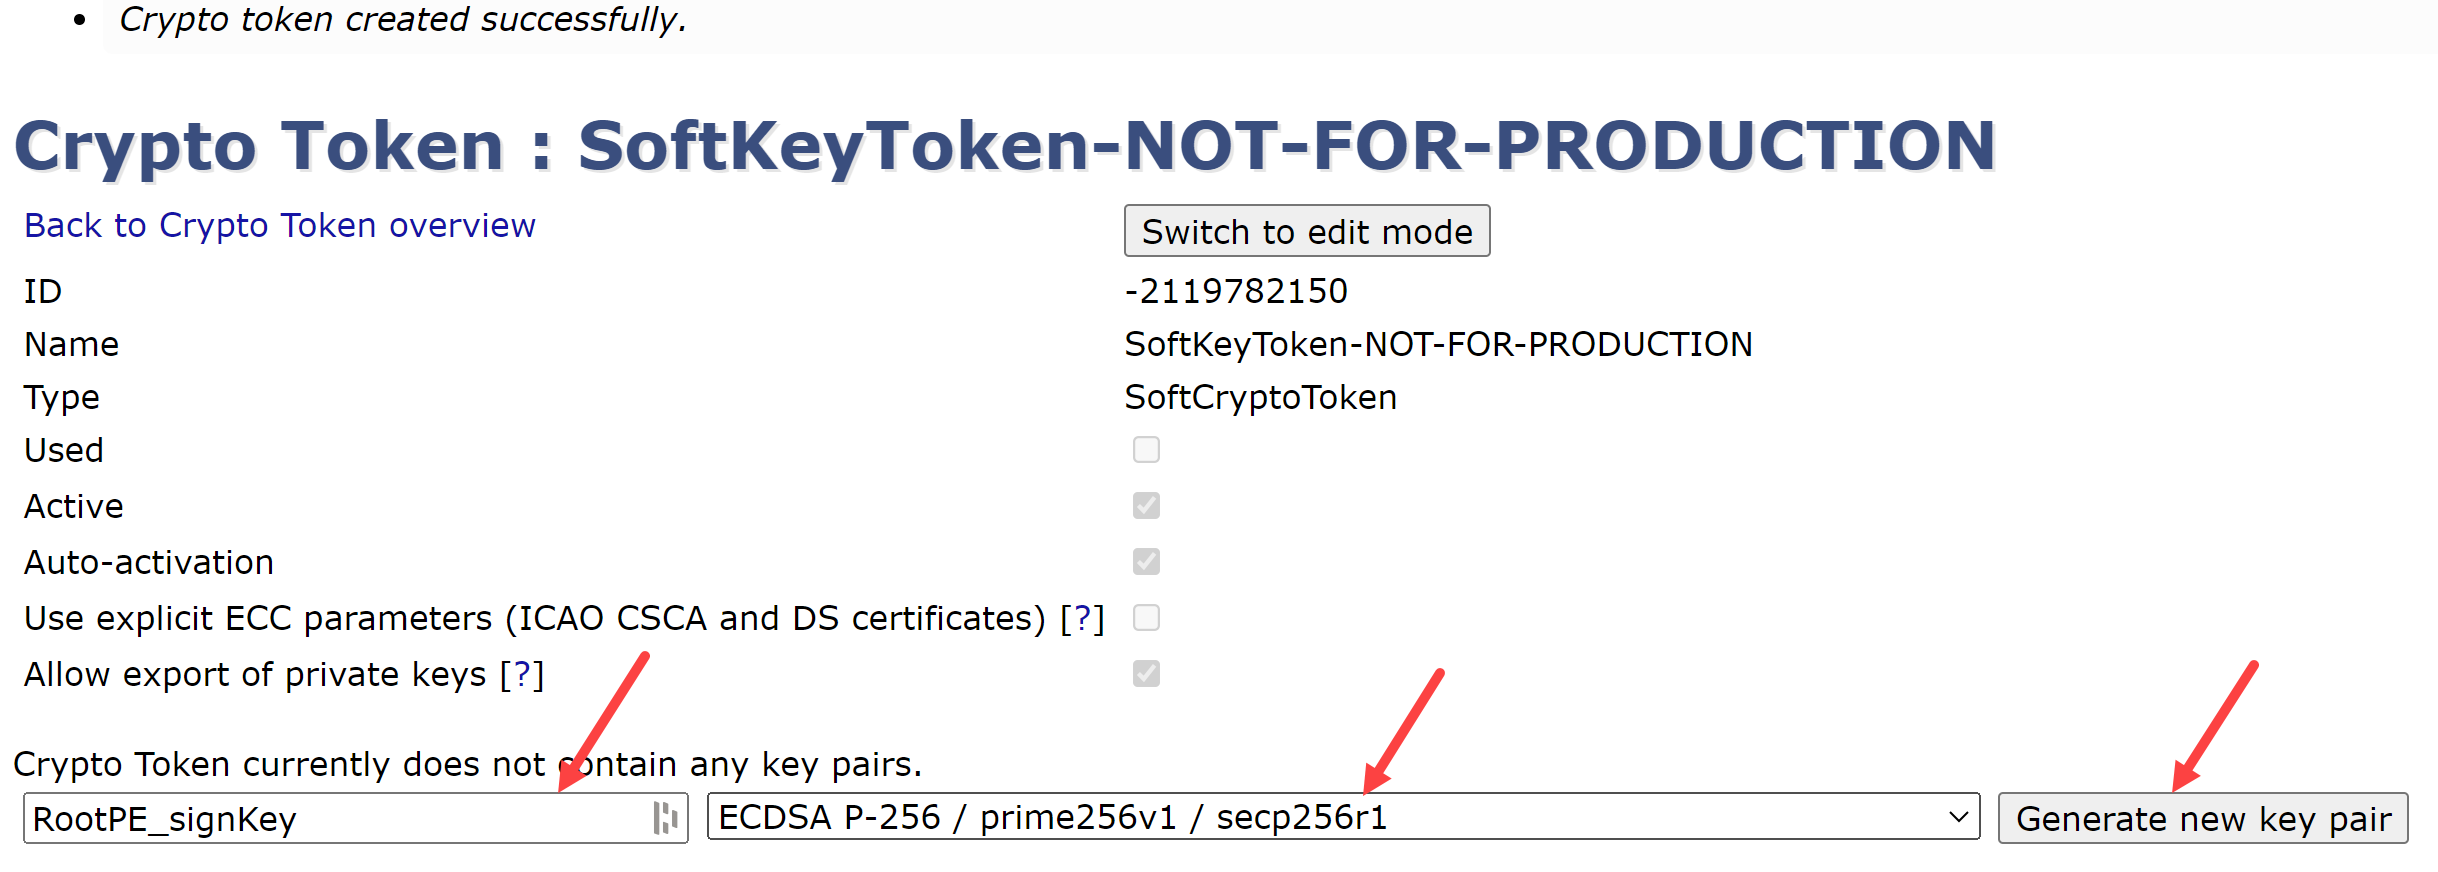
EJBCA now requires three (3) keys for each Certificate Authority; a signing key, a testing key, and a default key. For the Root CA’s signing key:
name the first key RootPE_signKey
select the ECDSA P-256 / prime256v1 / secp256r1 curve from the dropdown box
Generate new key pair
Repeat this process to create the following key pairs in the Crypto Token:
RootPE_testKey
RootPE_defaultKey
Sub1PE_signKey
Sub1PE_testKey
Sub1PE_defaultKey
Sub2PE_signKey
Sub2PE_testKey
sub2PE_defaultKey
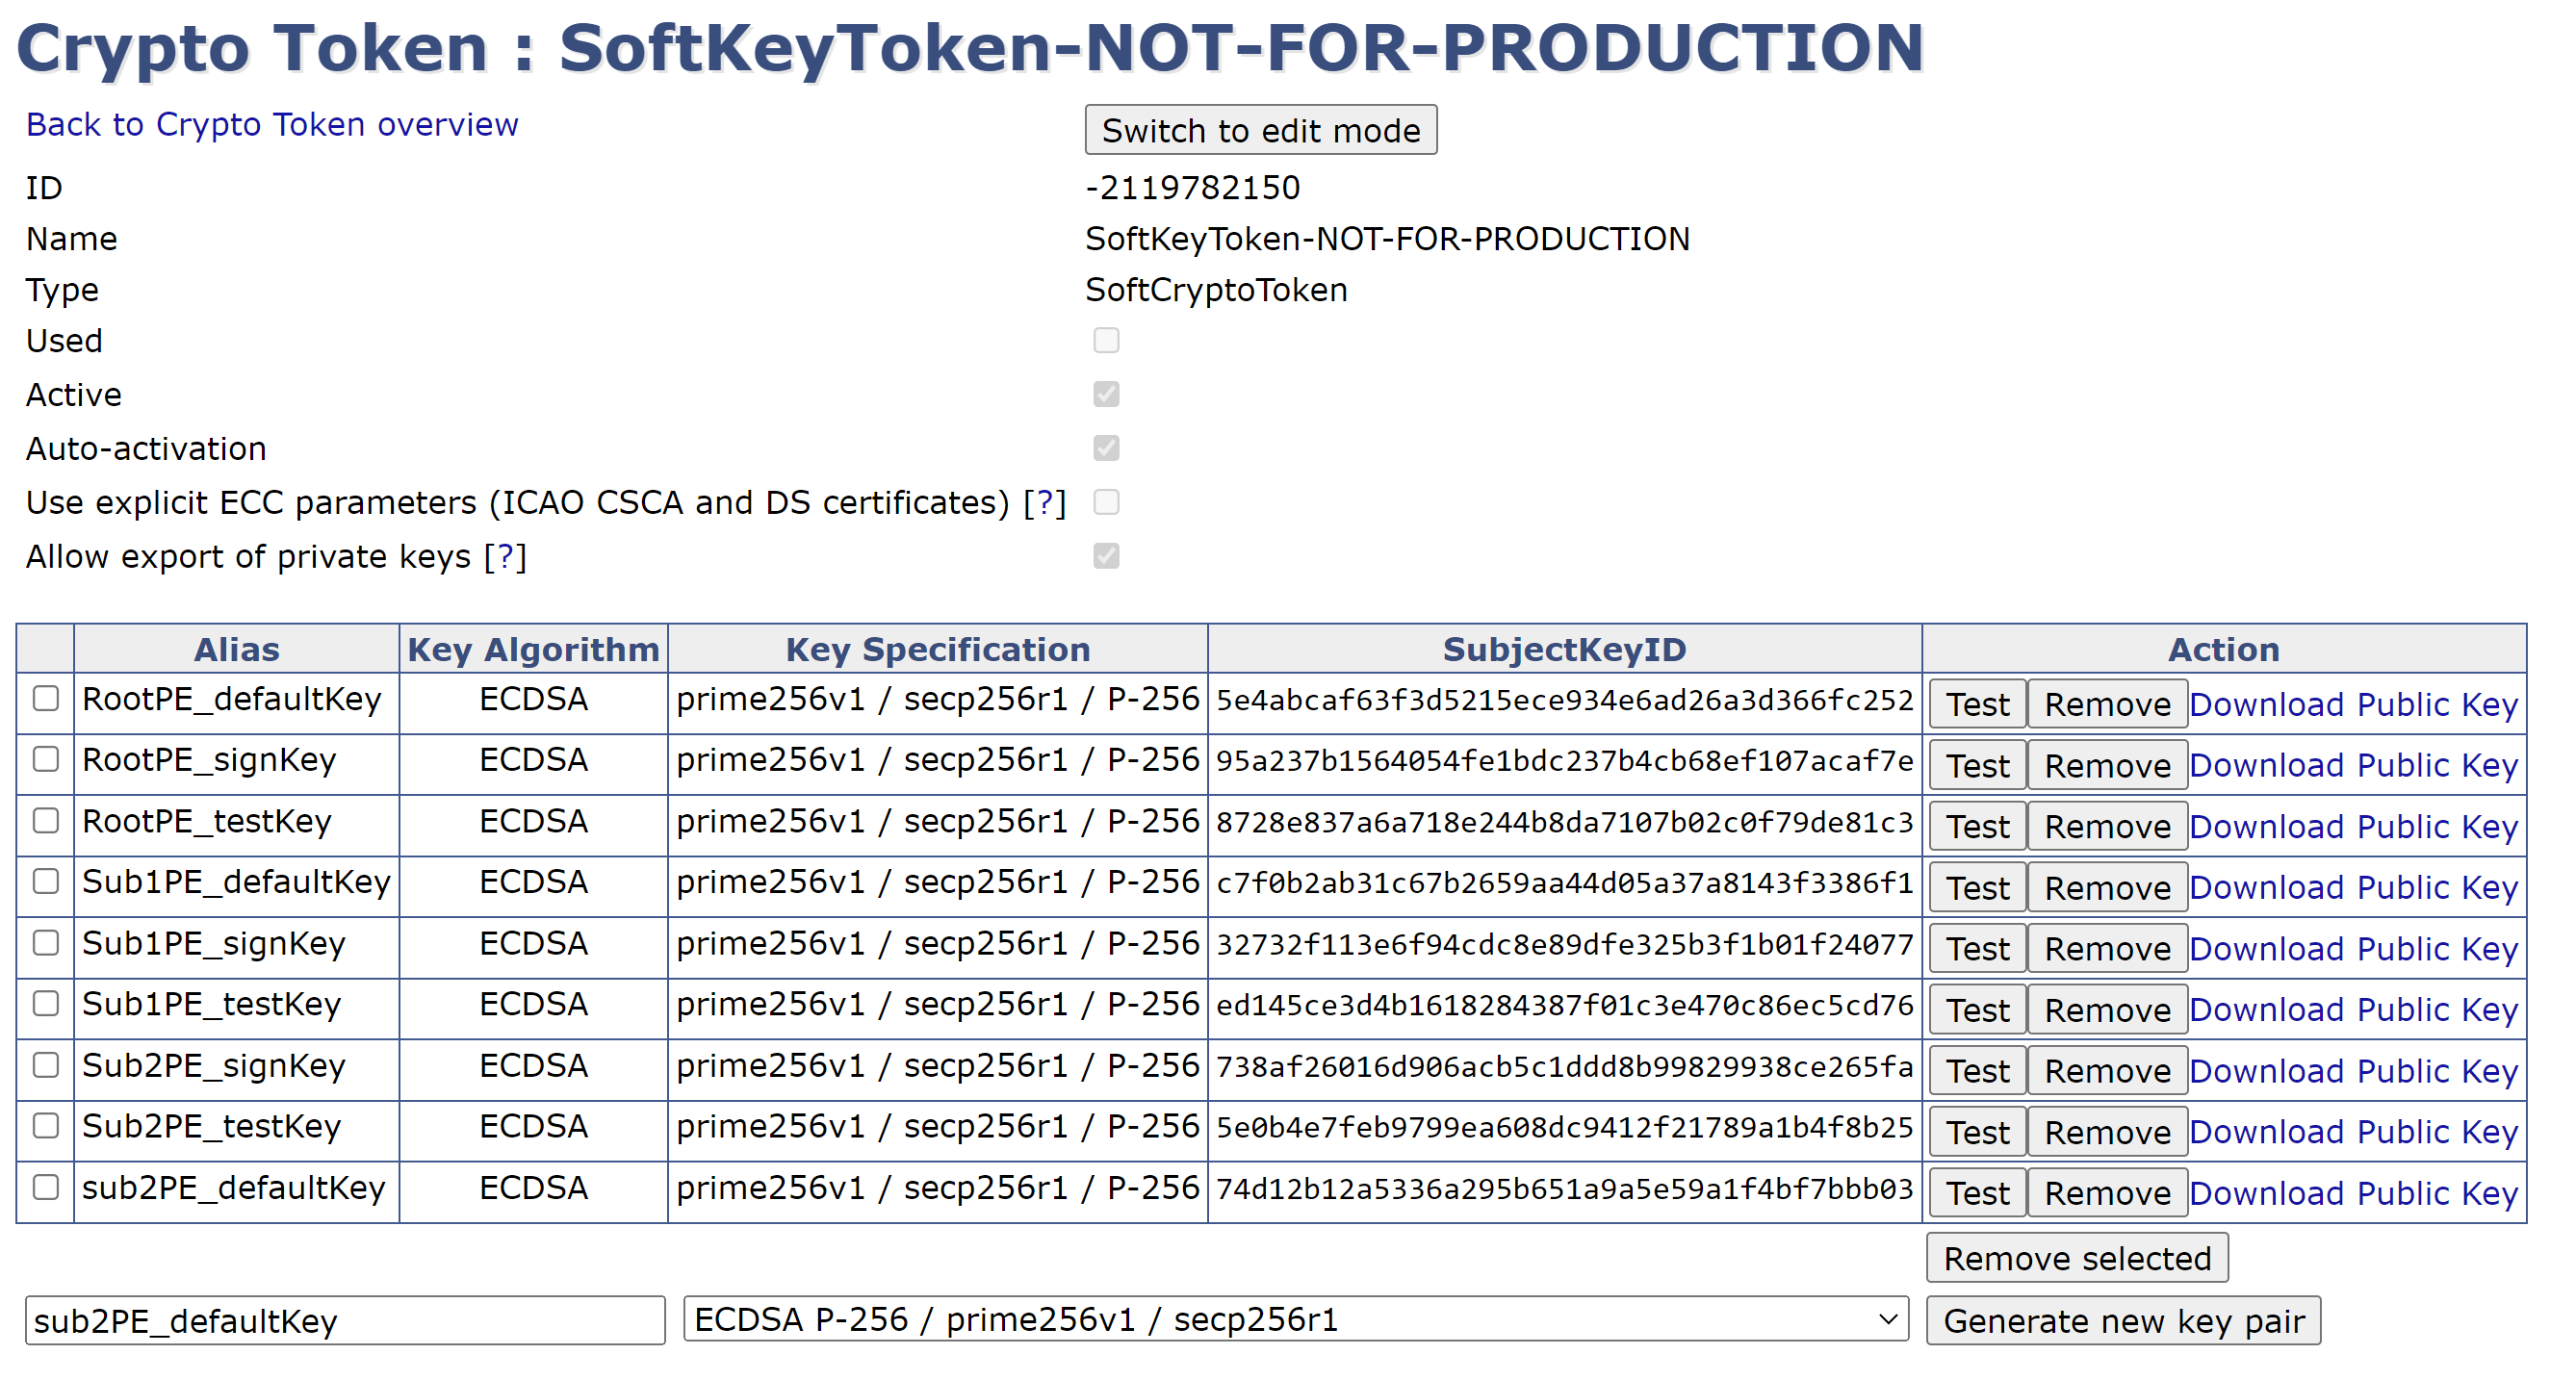
COMPLETED CRYPTO TOKENS
You have now successfully created the key pairs for use by the Certificate Authorities. The next step is to configure the Certificate Policies specific to these Certificate Authorities.
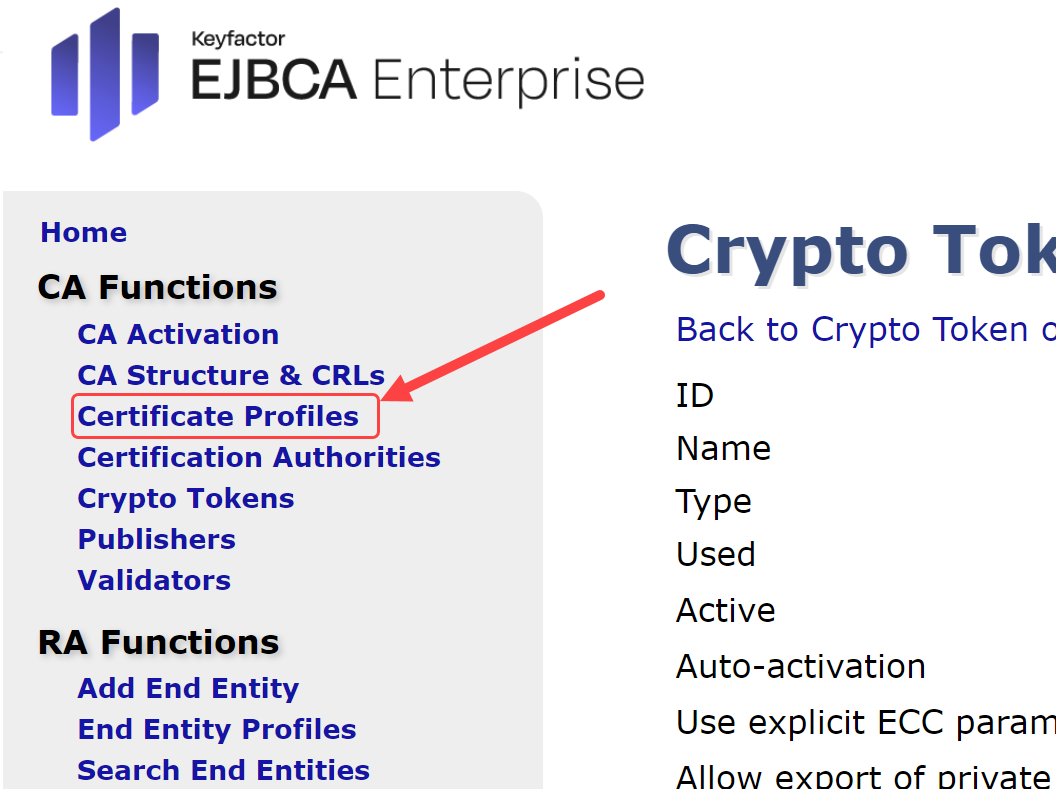
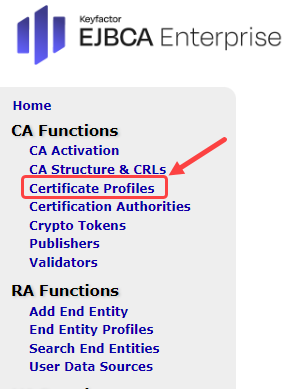
Configure Root CA Certificate Profile
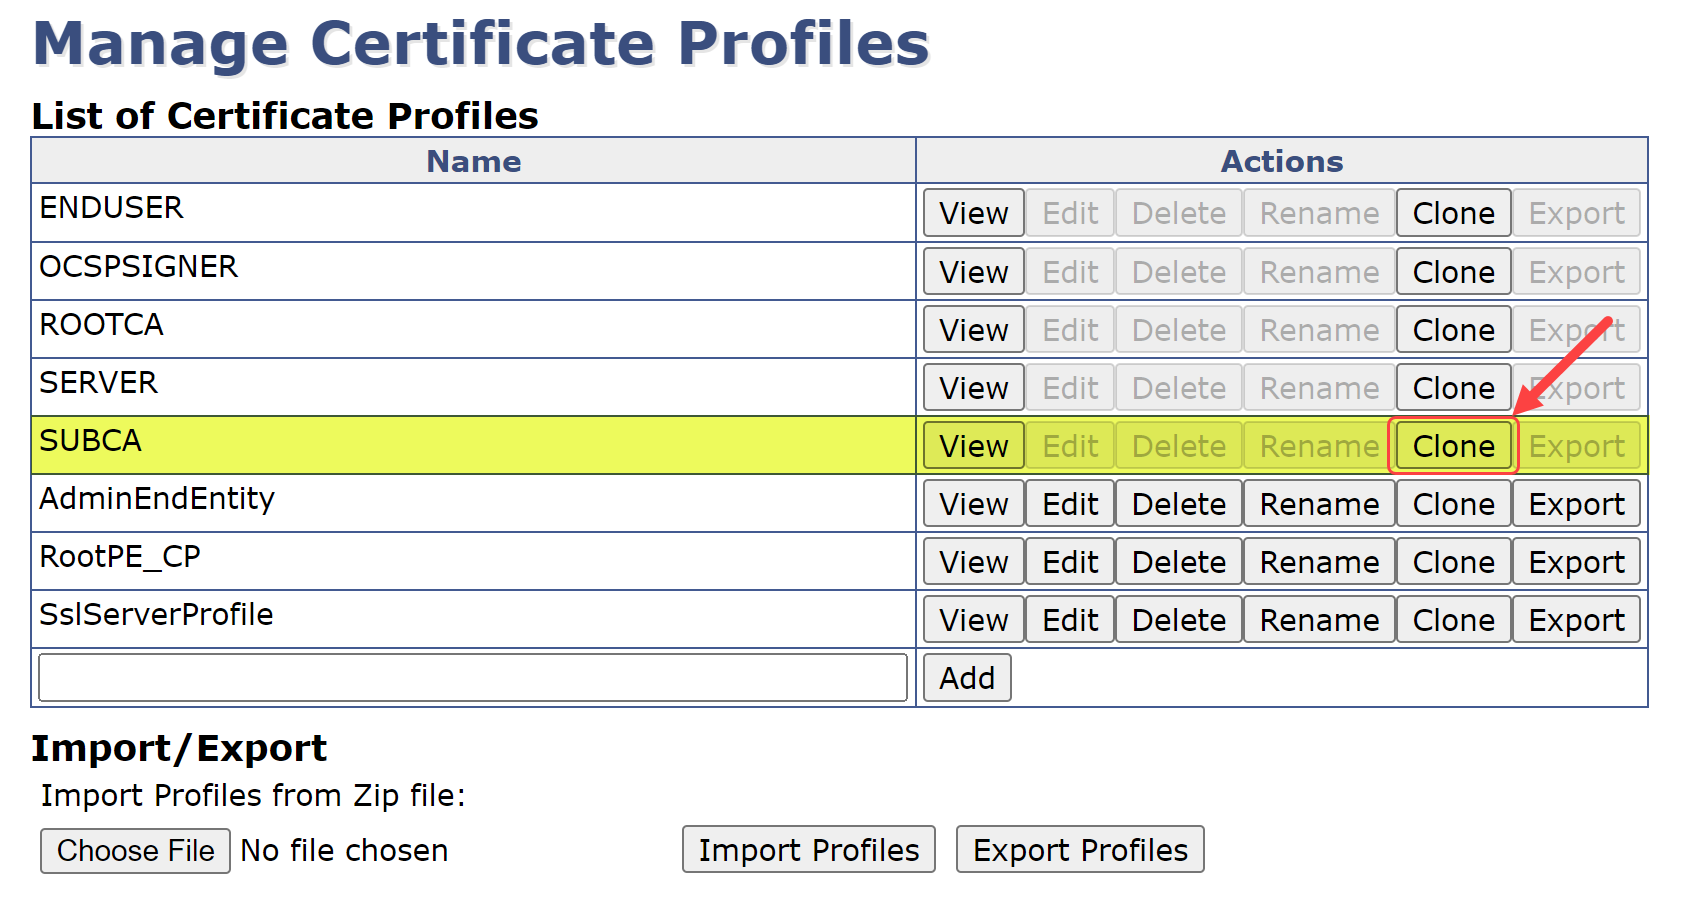
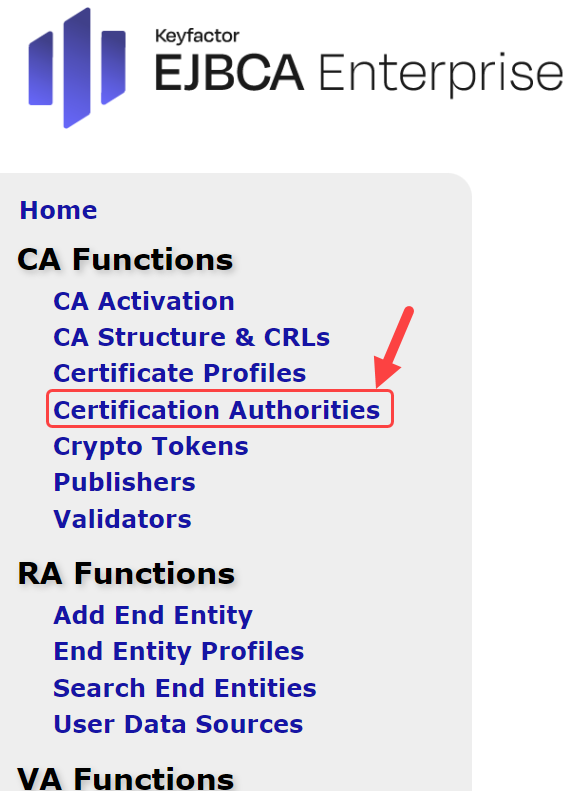
On the EJBCA Administration Webpage, select the Certificate Profiles under CA Functions:
Under the List of Certificate Profiles, select the Clone button on the ROOTCA row:
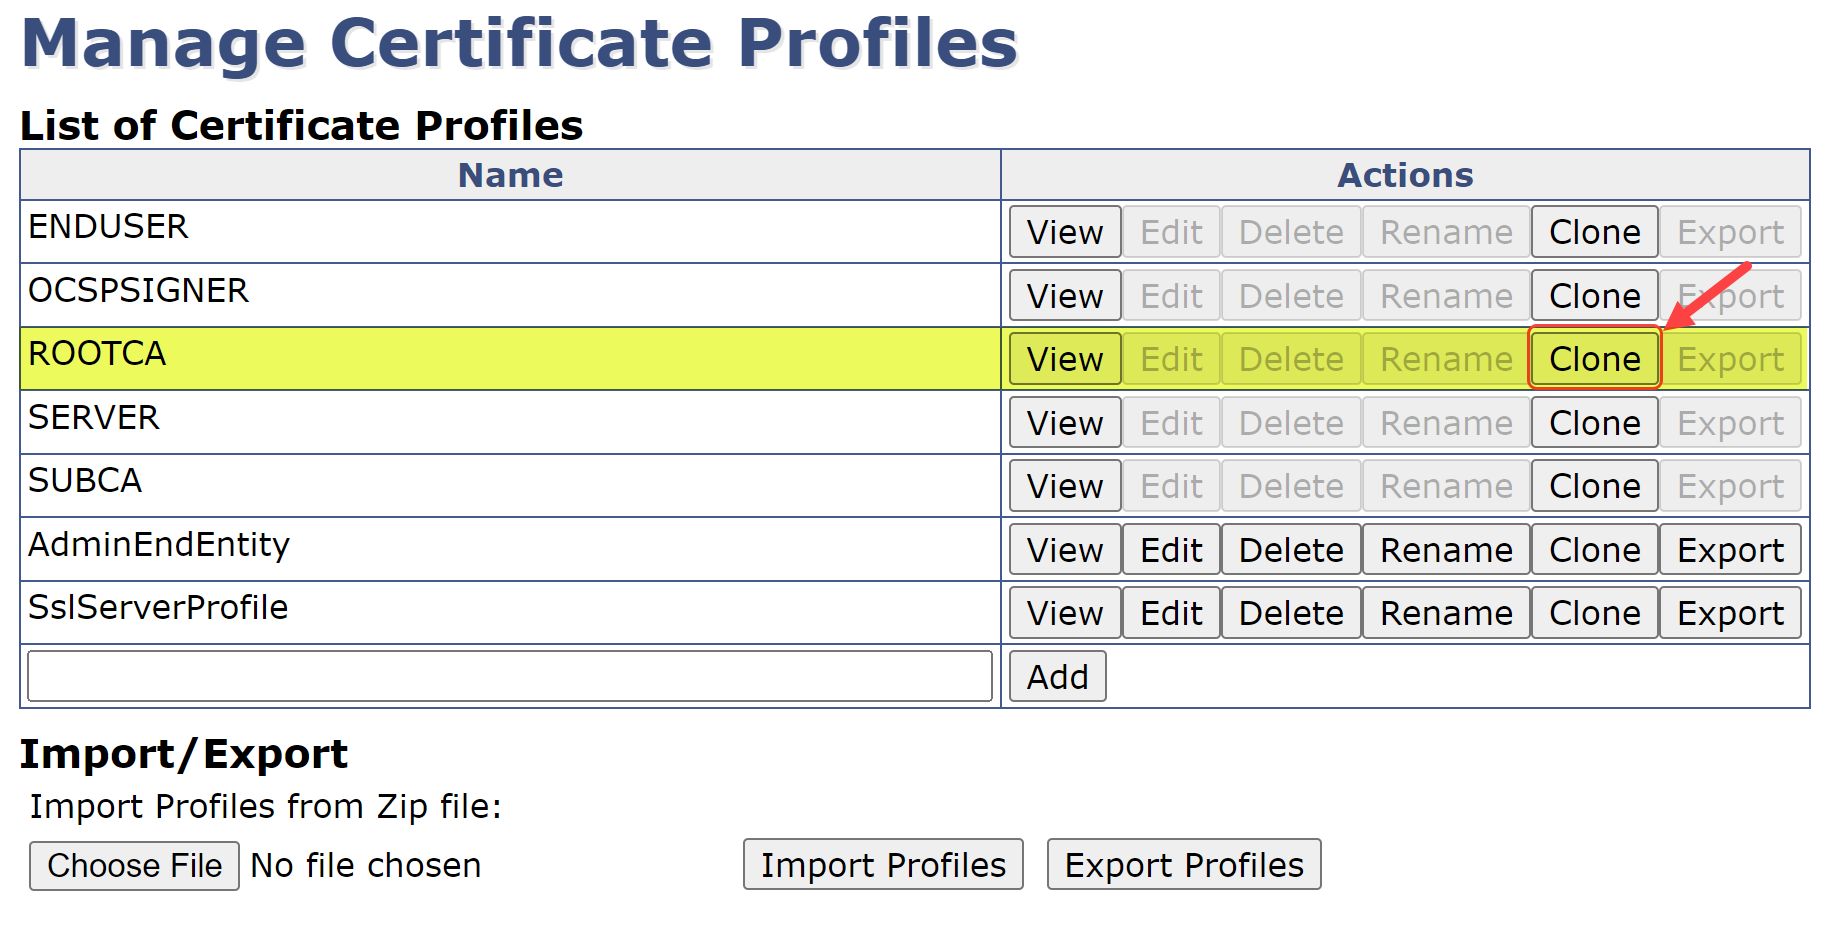
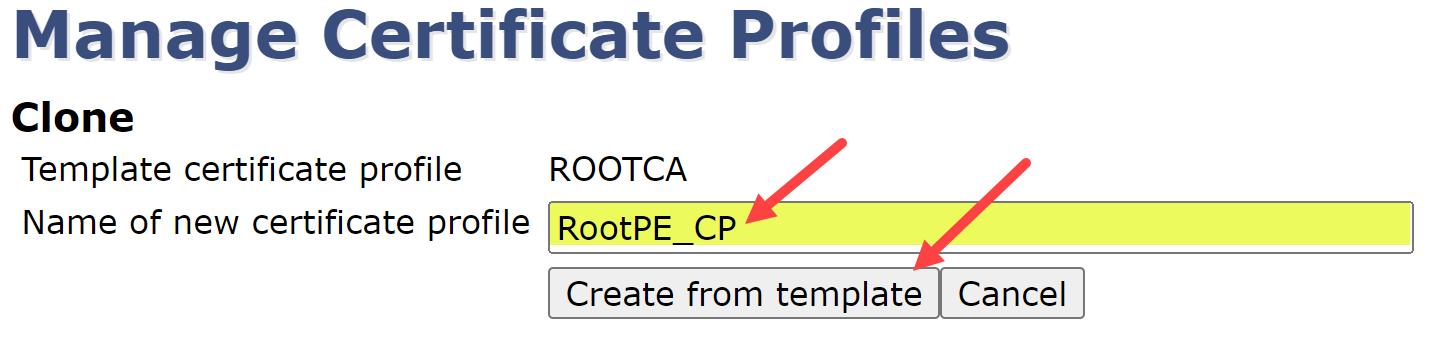
Name the new certificate profile RootPE_CP & select Create from template
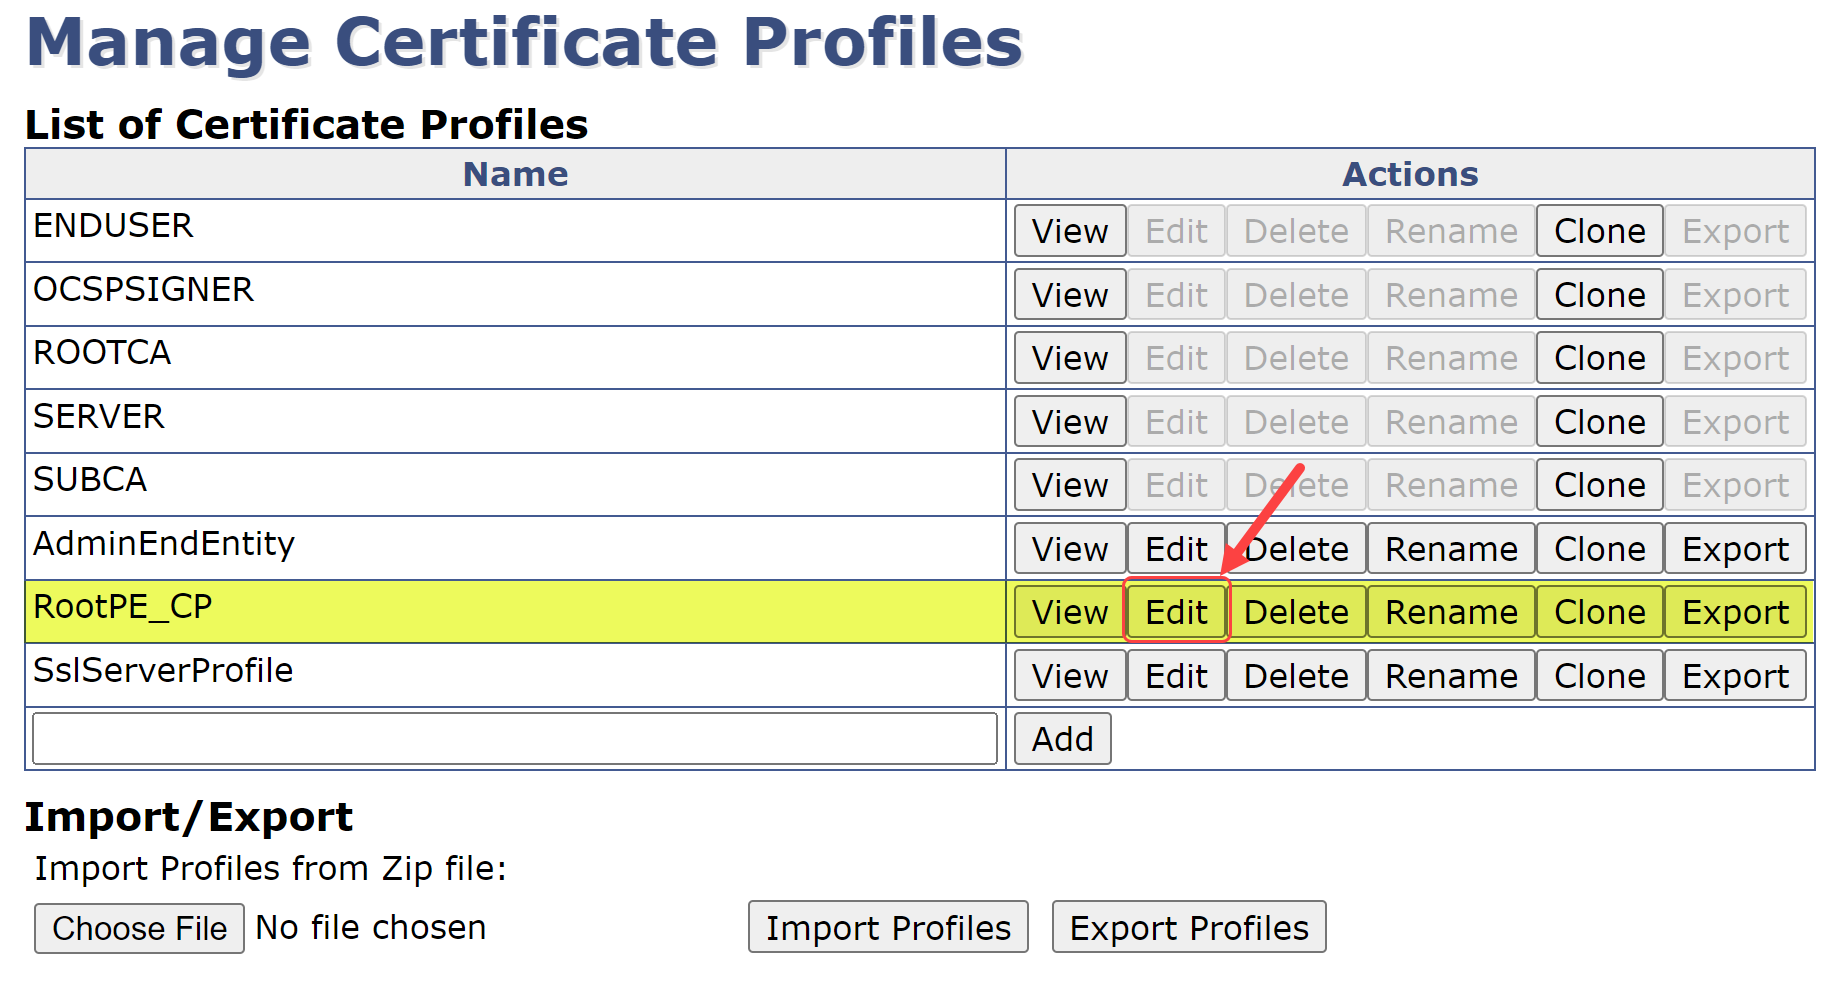
At the List of Certificate Profiles selection, select Edit on the row for the RootPE_CP:
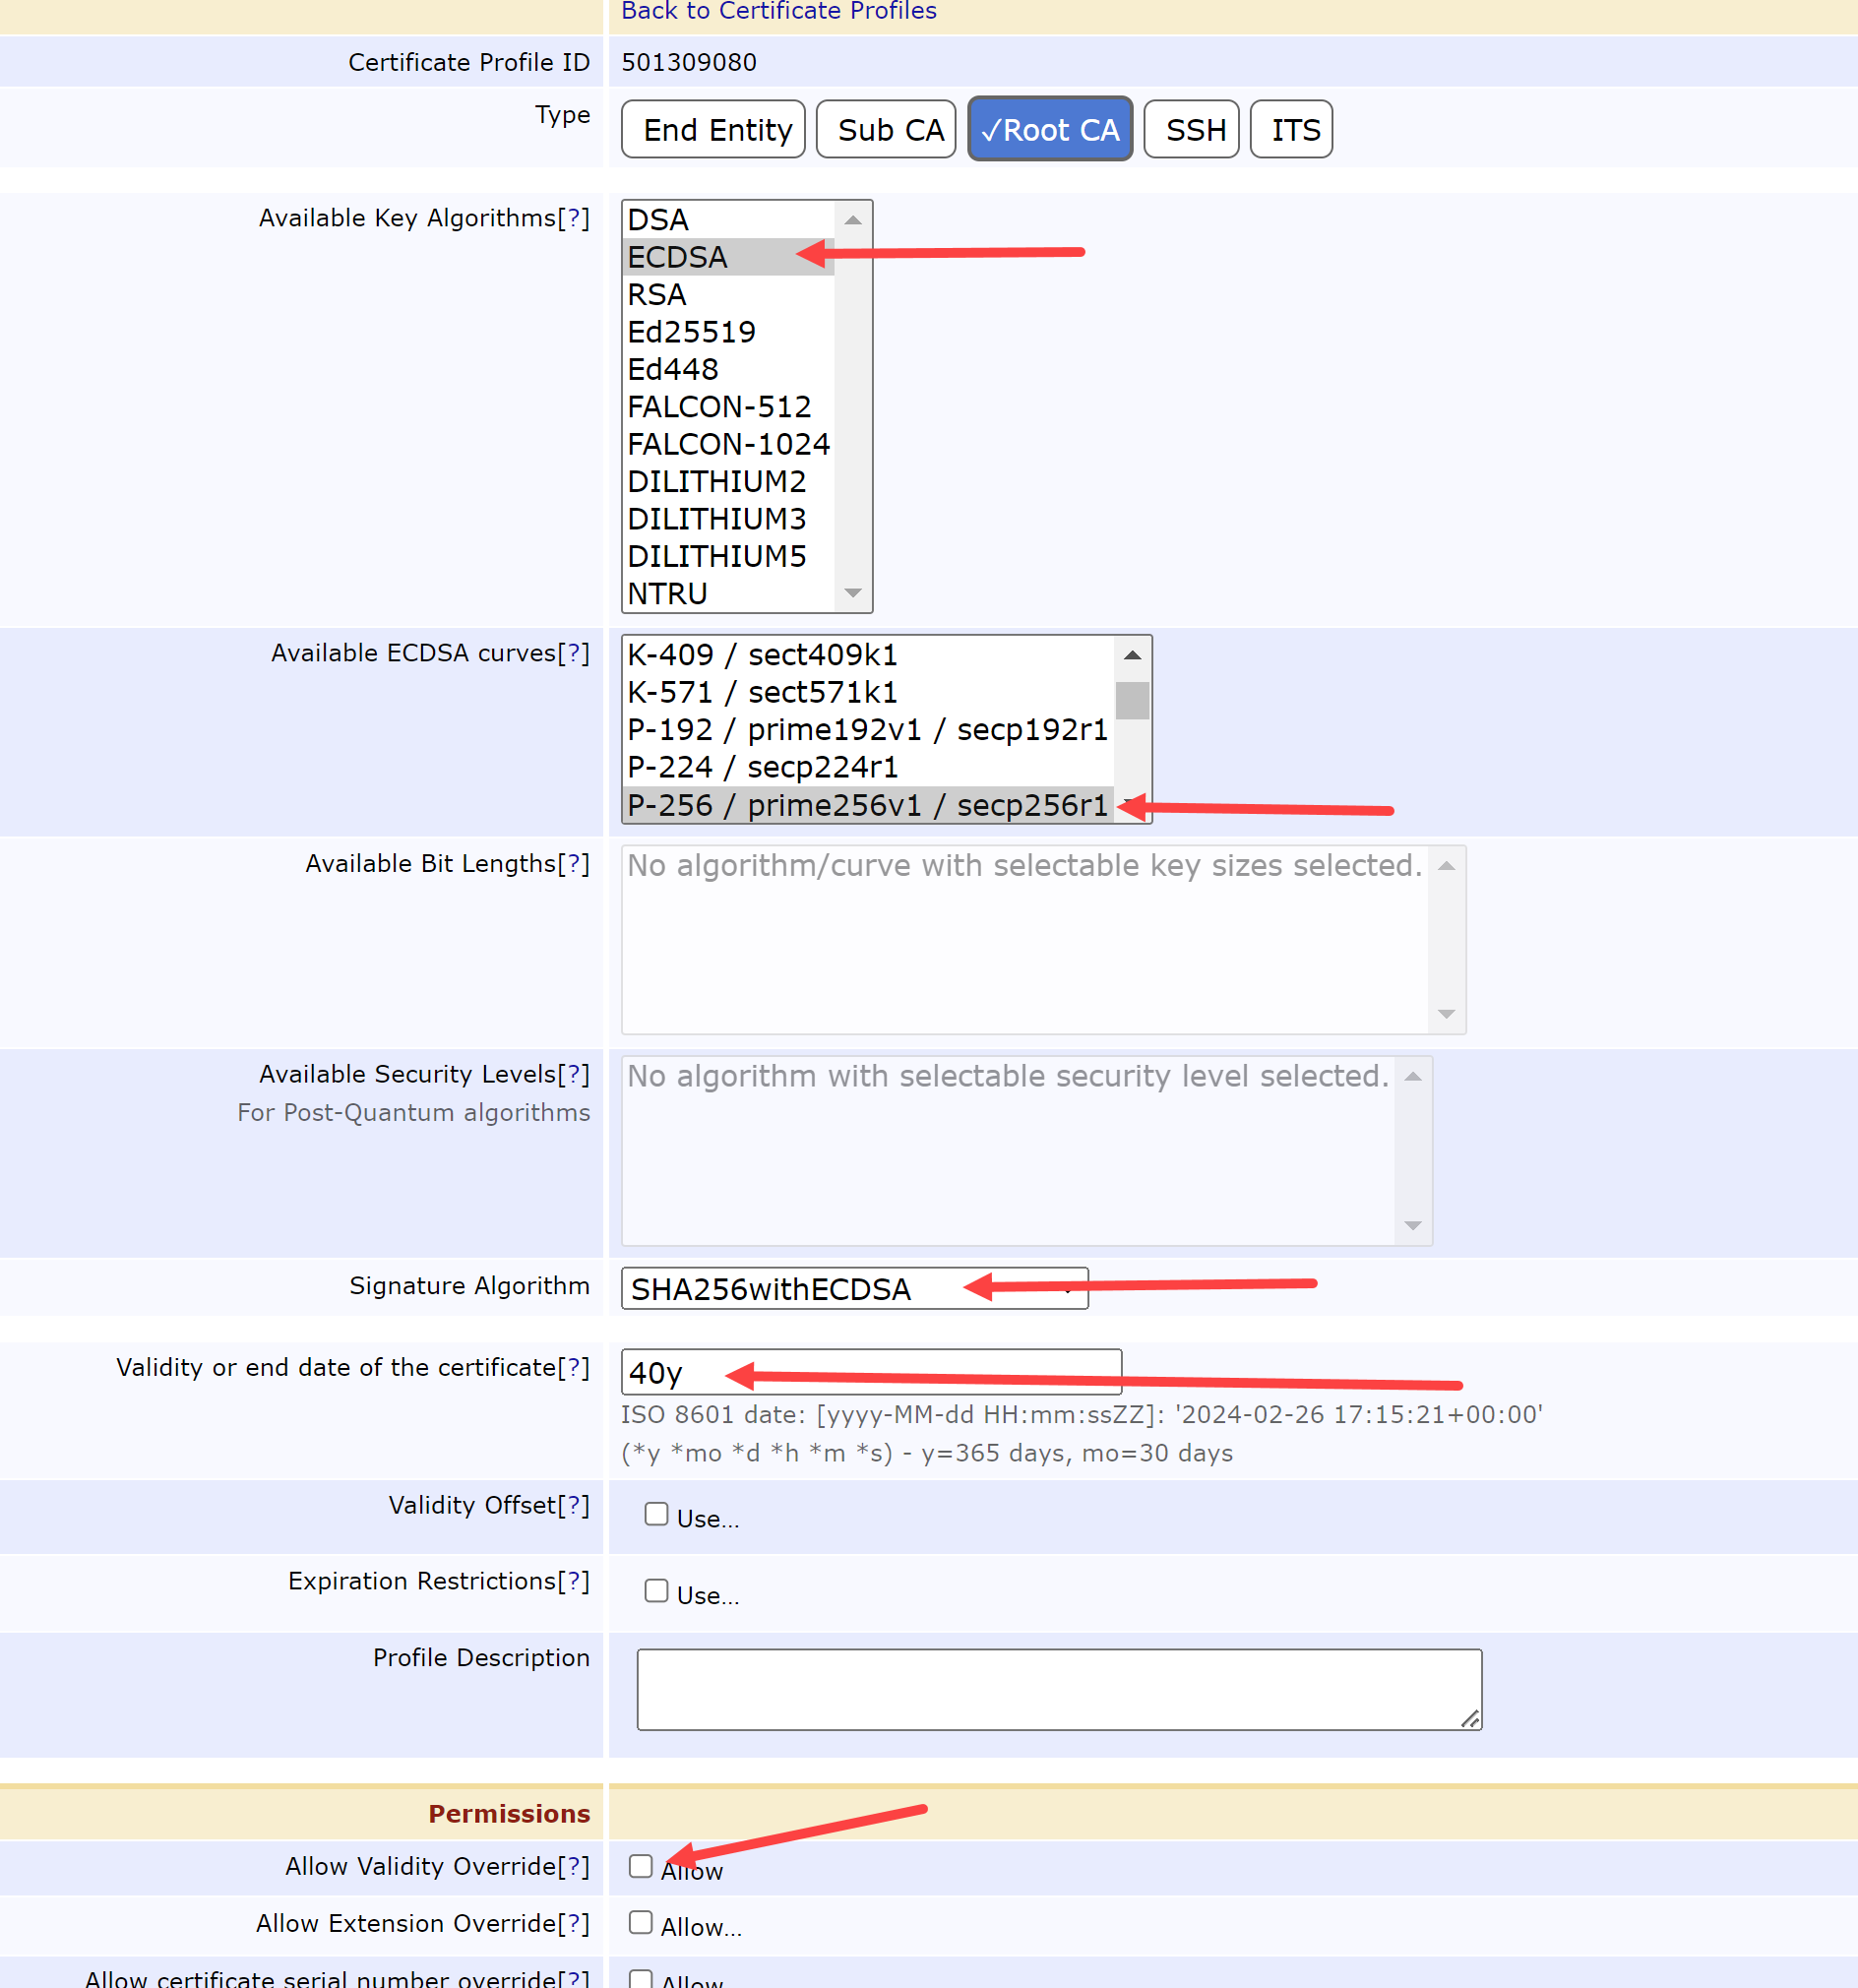
On the following screen, change the following fields:
Available Key Algorithms = ECDSA
Available ECDSA curves = P-256 / prime256v1 / secp256r1
Signature Algorithm = SHA256withEDCSA
Validity or end date of the certificate = 40y
Allow Validity Override = Unchecked
CERTIFICATE PROFILE BASIC SETTINGS
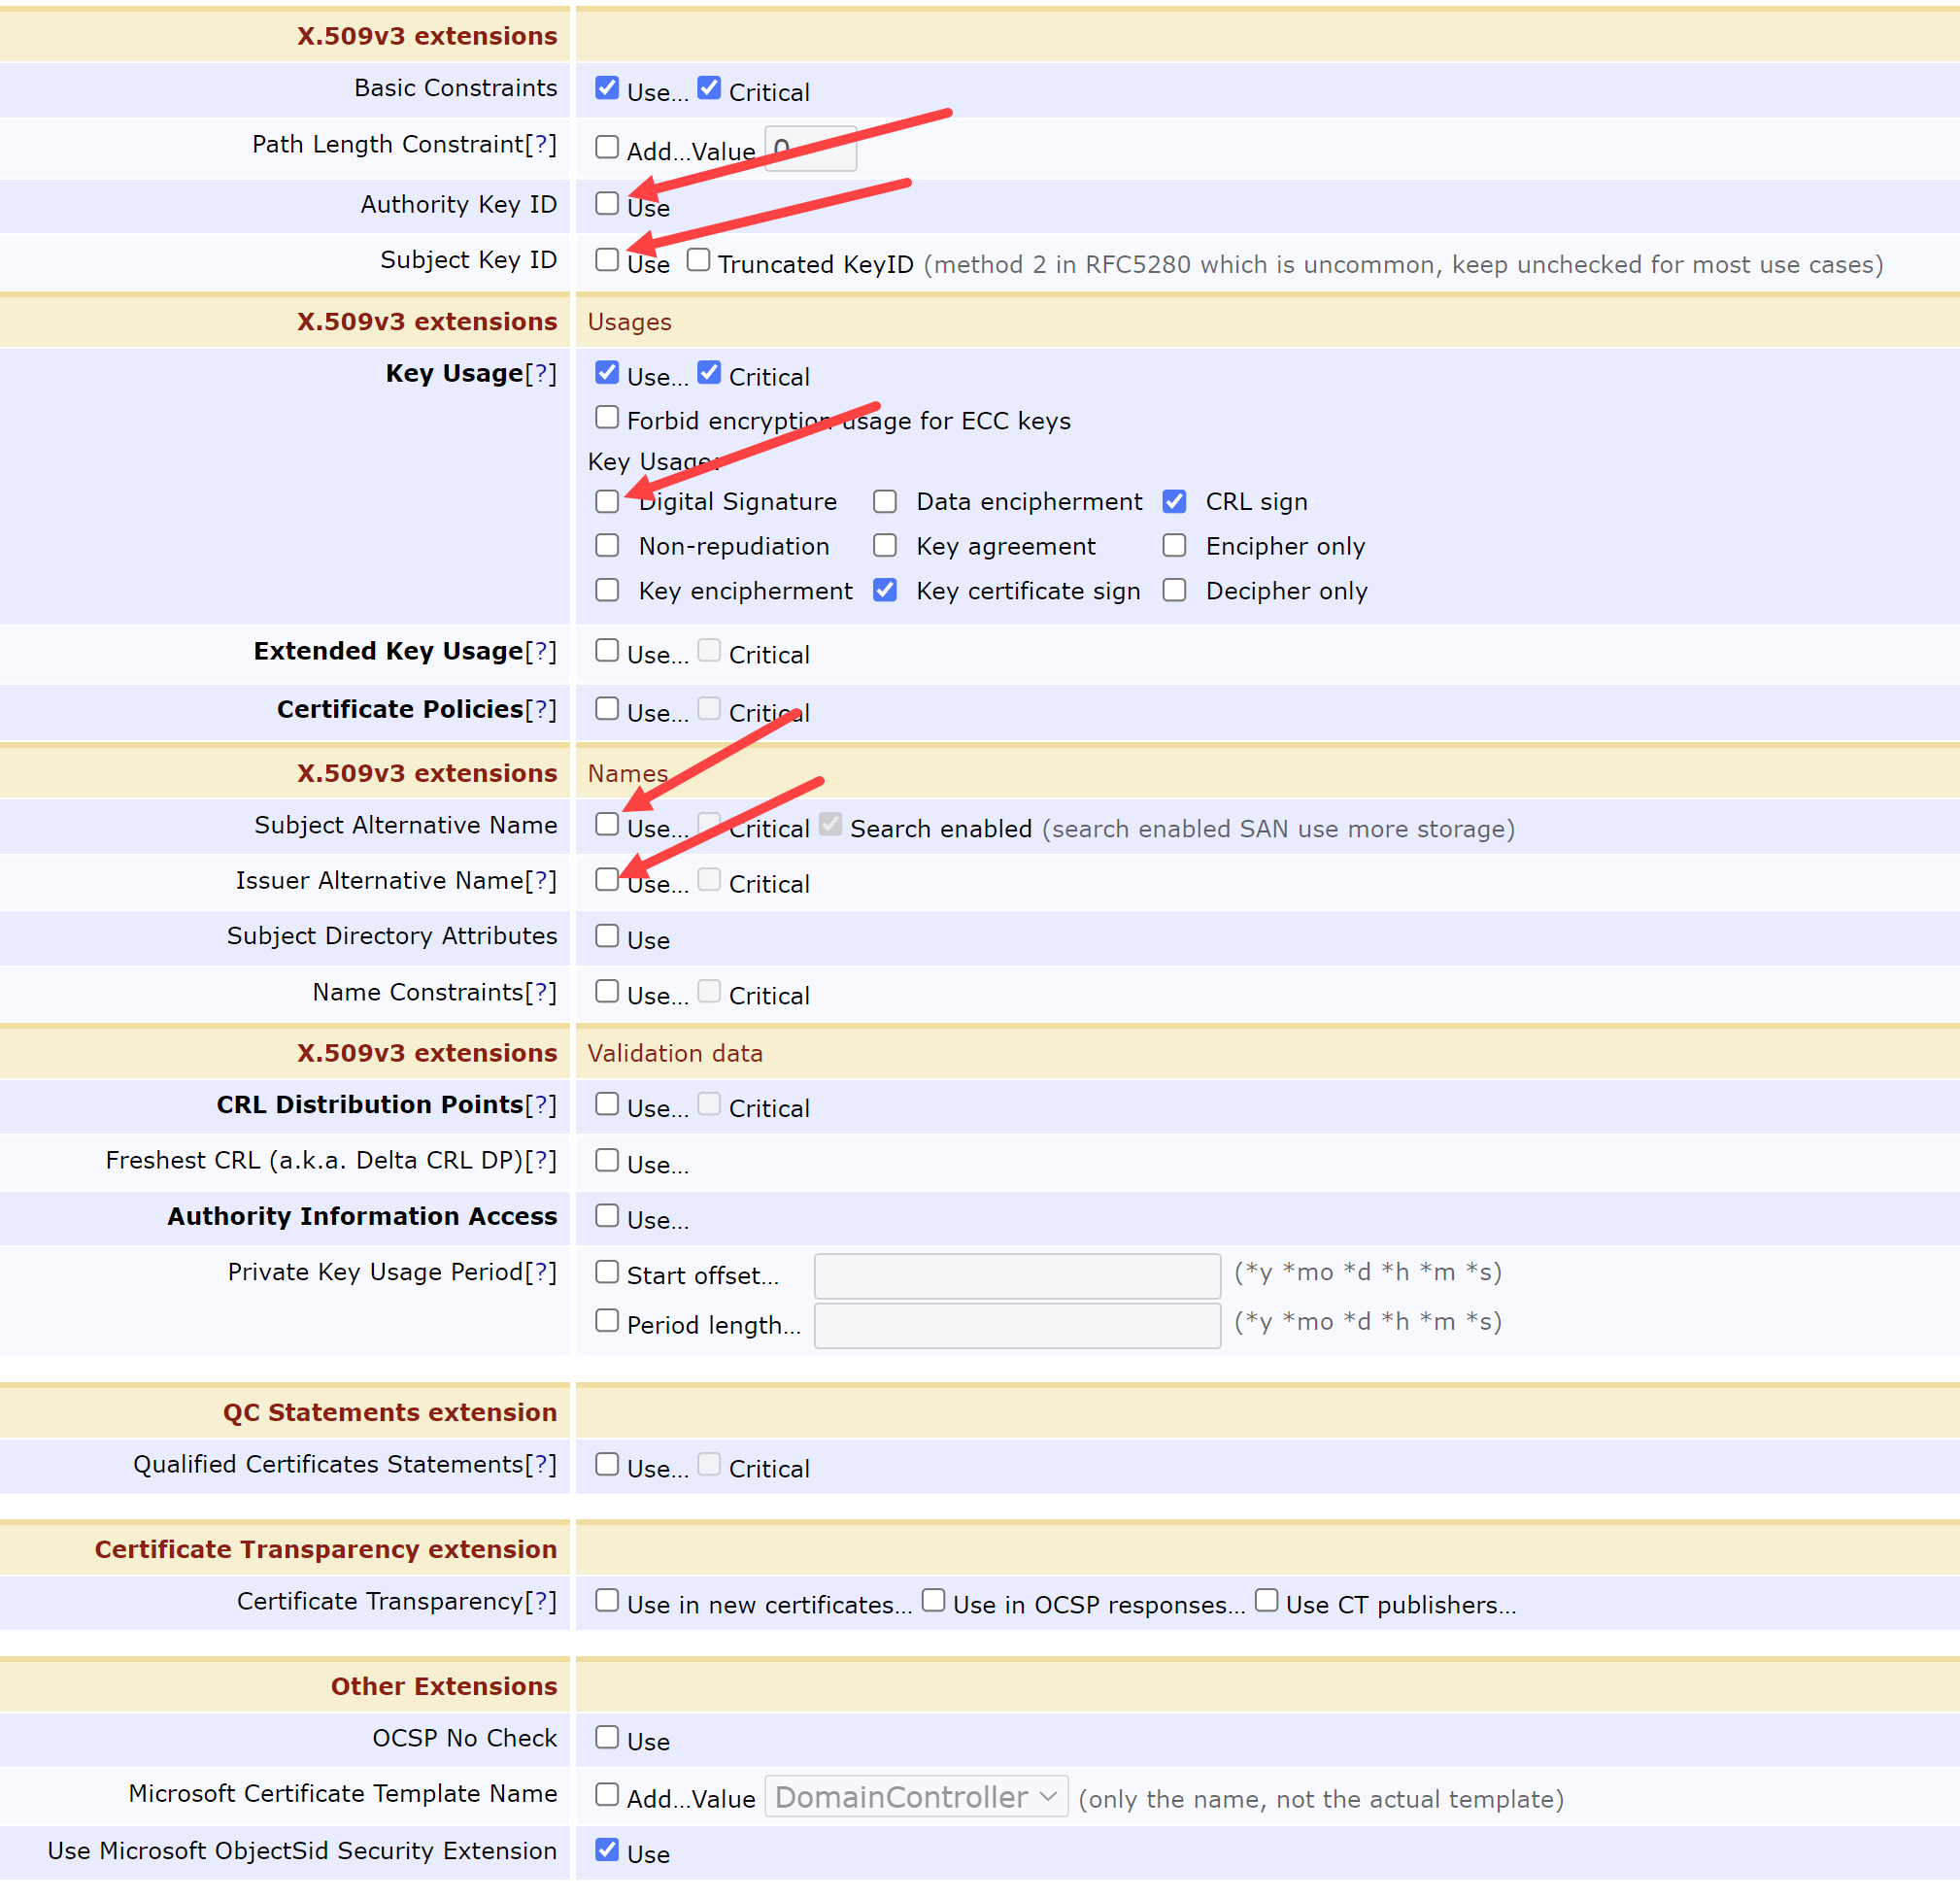
Scroll down to view the X.509v3 extensions sections. Change the following fields:
Authority Key ID = Unchecked
Subject Key ID = Unchecked
Key Usage:
Digital Signature = Unchecked
Subject Alternative Name = Unchecked
Issuer Alternative Name = Unchecked
Scroll down to Other Data and change the following fields:
LDAP DN order = Unchecked
Save
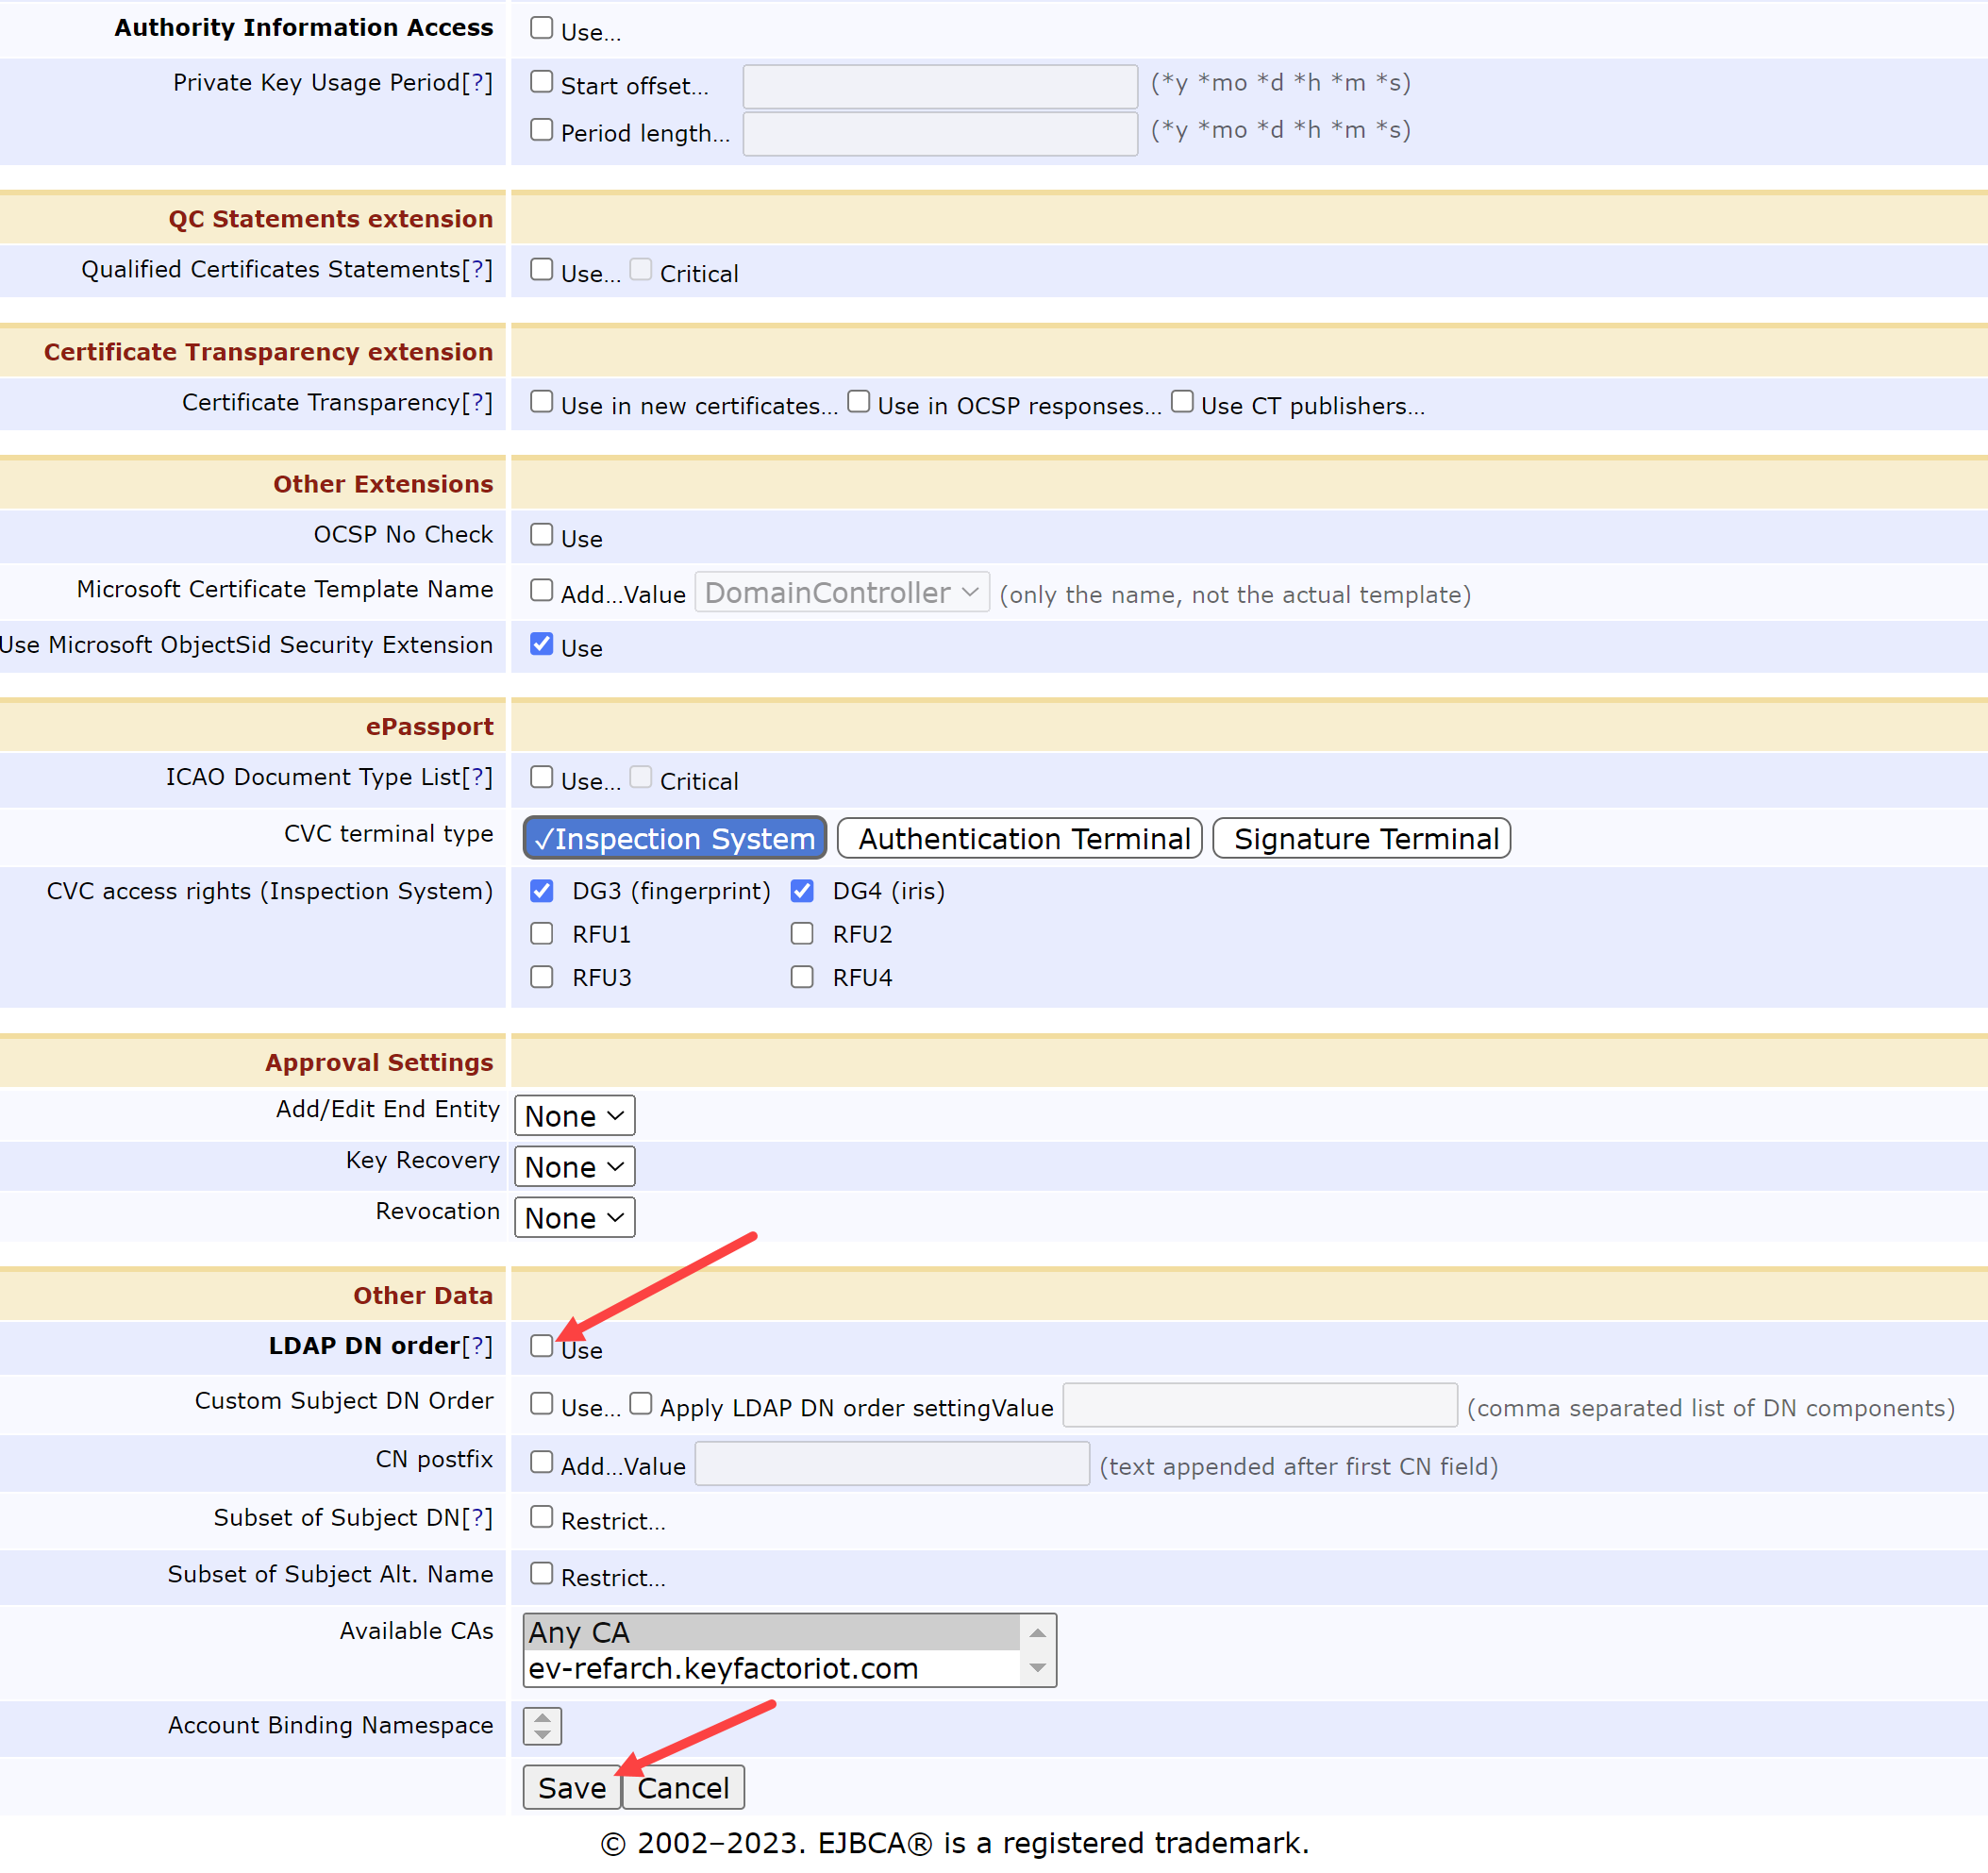
CERTIFICATE PROFILE OTHER DATA
The profile for the Root CA is now complete. The configuration continues with the next Sub CA policies
Configure Sub CA 1 Certificate Profile
Back on the List of Certificate Profiles, we need to Clone the SUBCA Certificate Profile:
Name this profile Sub1PE_CP and select Create from template (as seen in section 4.3 step 3)
Similar to section 4.3 step 4, select the Edit button on the Sub1PE_CP row.
In the next screen, modify these fields:
Available Key Algorithms = ECDSA
Available ECDSA curves = P-256 / prime256v1 / secp256r1
NOTE: Leave the Signature Algorithm to be “Inherit from issuing CA”
Validity or end date of the certificate = 10y
Allow Validity Override = Unchecked
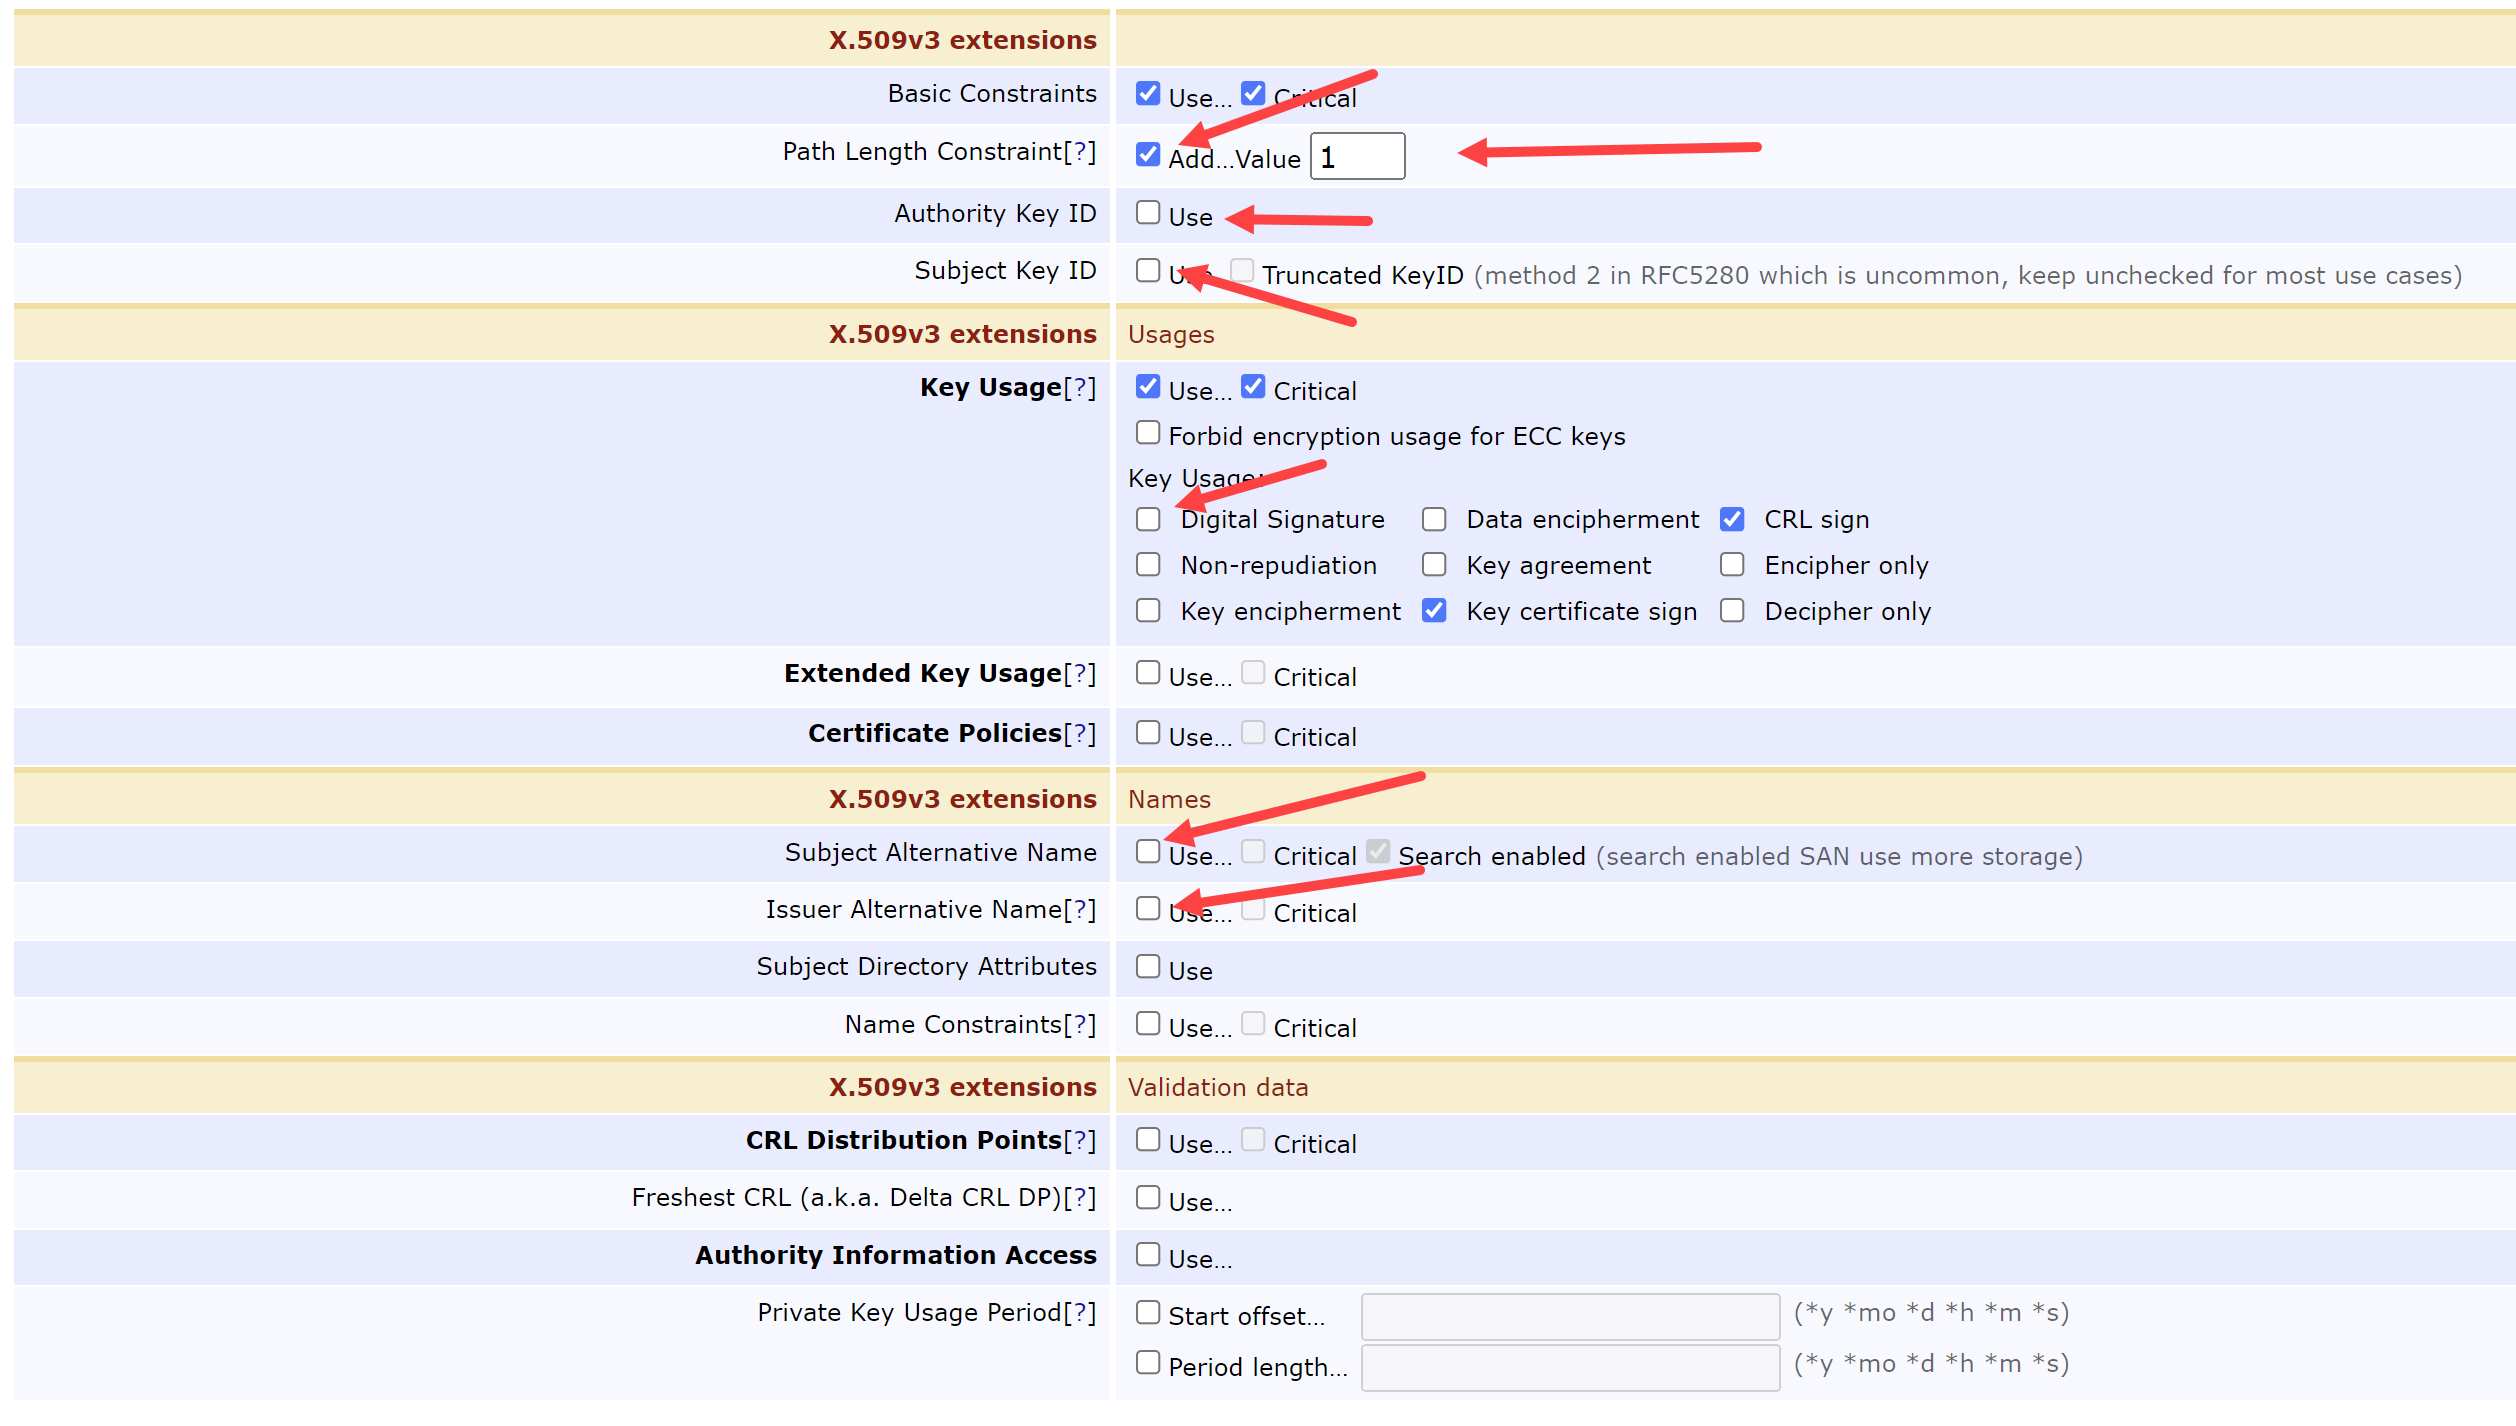
Under the X.509v3 extensions sections, modify these fields:
Path Length Constraint = 1
Authority Key ID = Unchecked
Subject Key ID = Unchecked
Key Usage:
Digital Signature = Unchecked
Subject Alternative Name = Unchecked
Issuer Alternative Name = Unchecked
Under the Other Data, modify these fields:
LDAP DN order = Unchecked
Save
We have now created the certificate profile for the first Subordinate CA, let us do almost the same thing for the second CA.
Configure Sub CA 2 Certificate Profile
This Certificate Profile is exactly the same as above, but is configured for a 4 year lifetime instead of a 10 year lifetime.
Back on the List of Certificate Profiles, we need to Clone the SUBCA Certificate Profile:
Name this profile Sub2PE_CP and select Create from template (as seen in section 4.3 step 3)
Similar to section 4.3 step 4, select the Edit button on the Sub2PE_CP row.
In the next screen, modify these fields:
Available Key Algorithms = ECDSA
Available ECDSA curves = P-256 / prime256v1 / secp256r1
NOTE: Leave the Signature Algorithm to be “Inherit from issuing CA”
Validity or end date of the certificate = 4y
Allow Validity Override = Unchecked
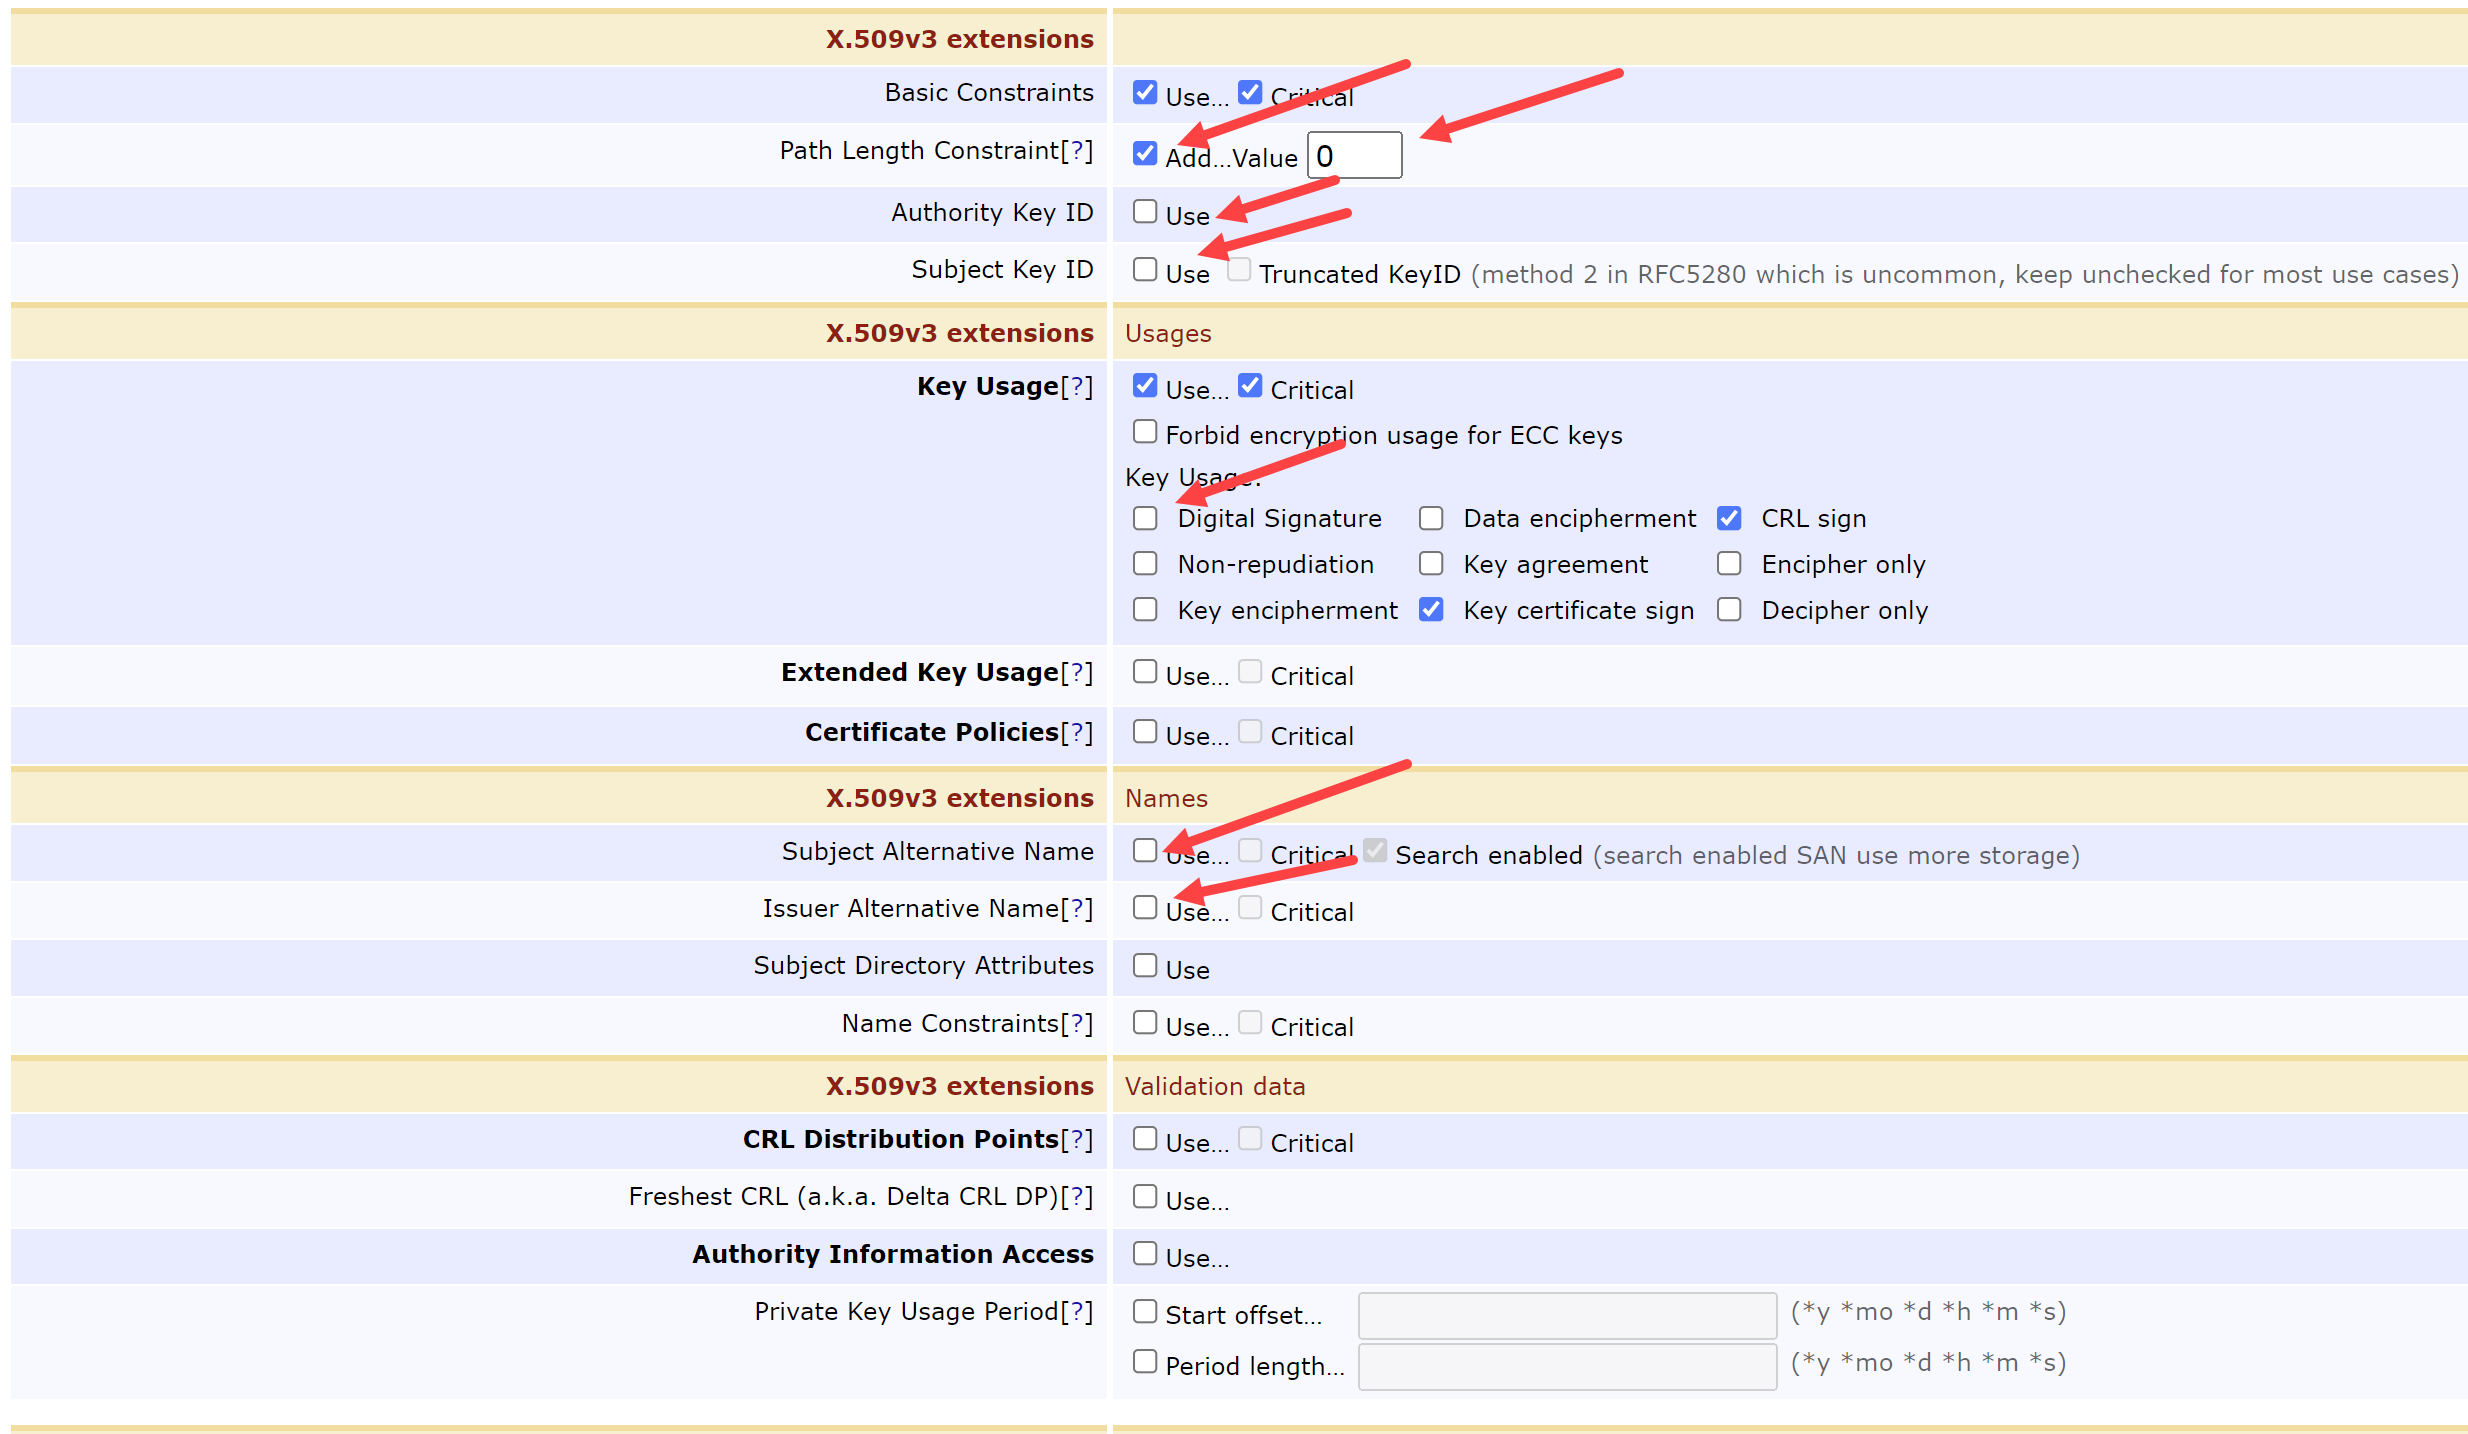
Under the X.509v3 extensions sections, modify these fields:
Path Length Constraint = Checked & 0
Authority Key ID = Unchecked
Subject Key ID = Unchecked
Key Usage:
Digital Signature = Unchecked
Subject Alternative Name = Unchecked
Issuer Alternative Name = Unchecked
Under the Other Data, modify these fields:
LDAP DN order = Unchecked
Save
Now that we have our certificate profiles created, let us create our Certificate Authorities themselves.
Create Root CA
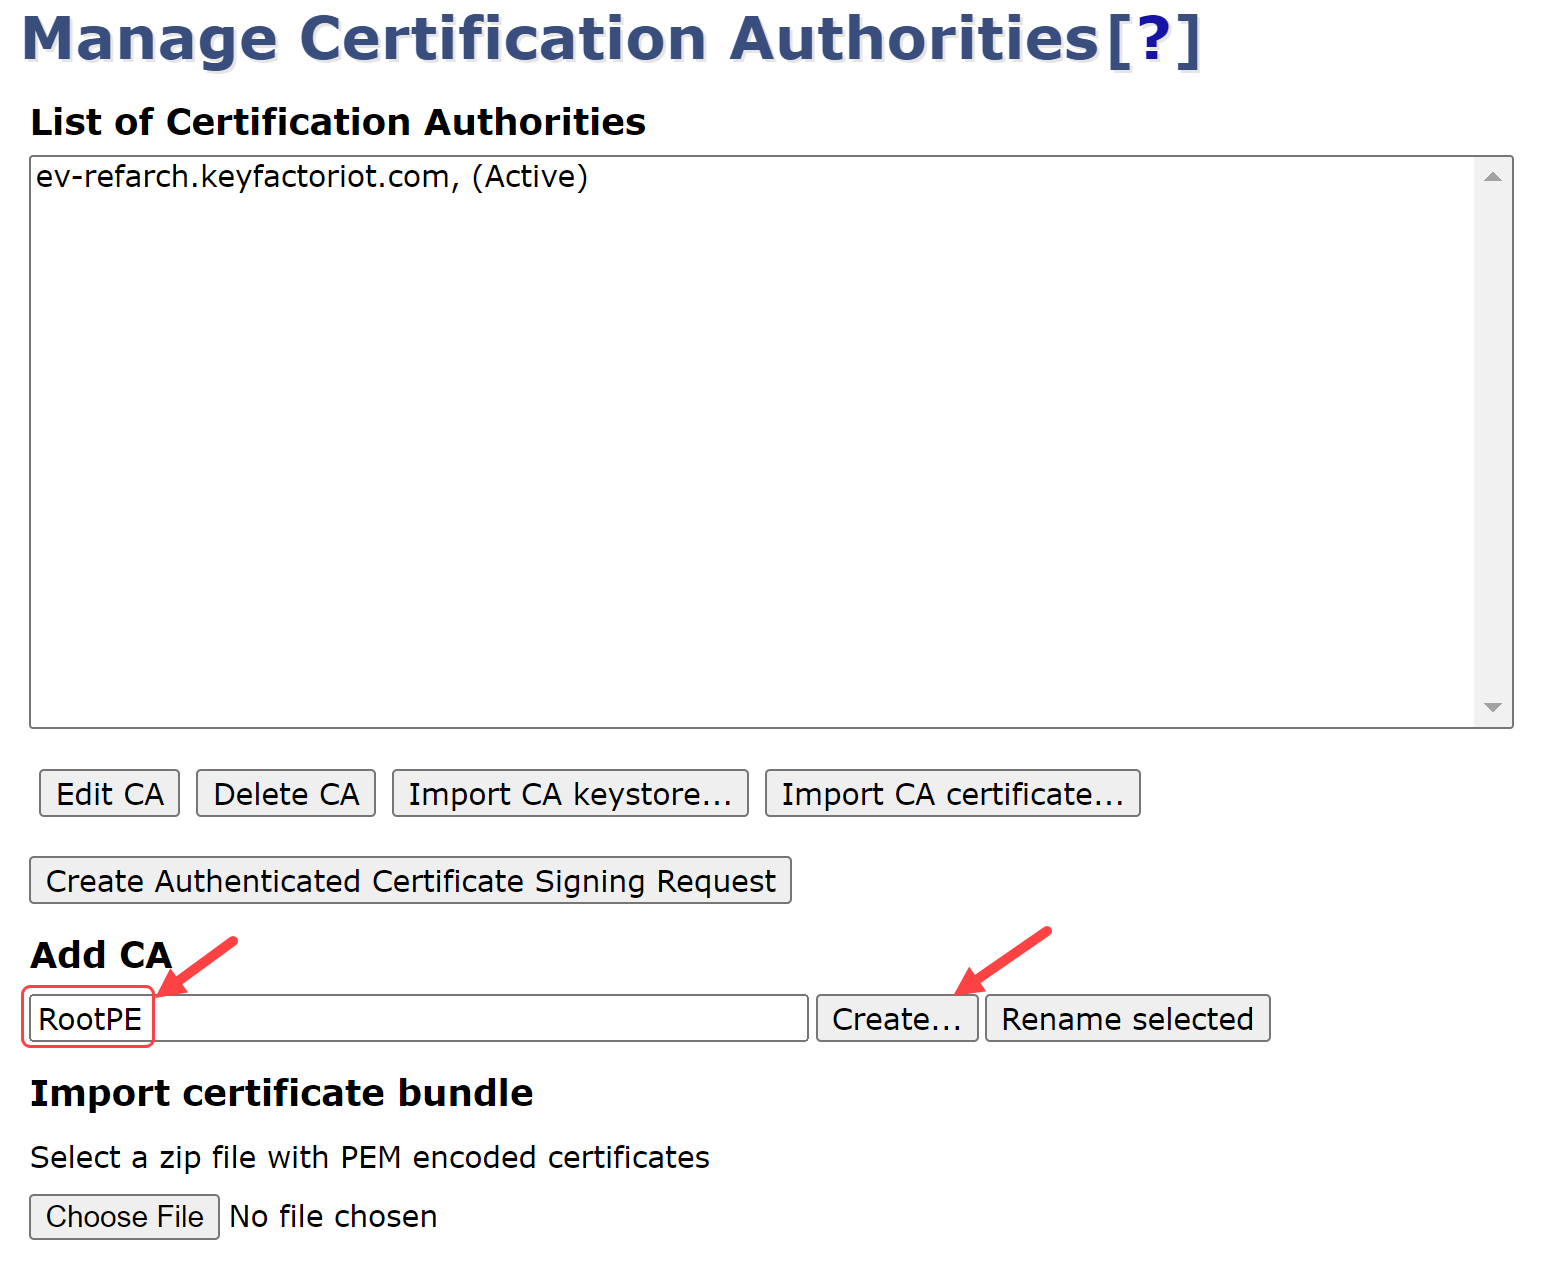
Select Certification Authorities from under the CA Functions tab
Under Add CA type RootPE and select Create…
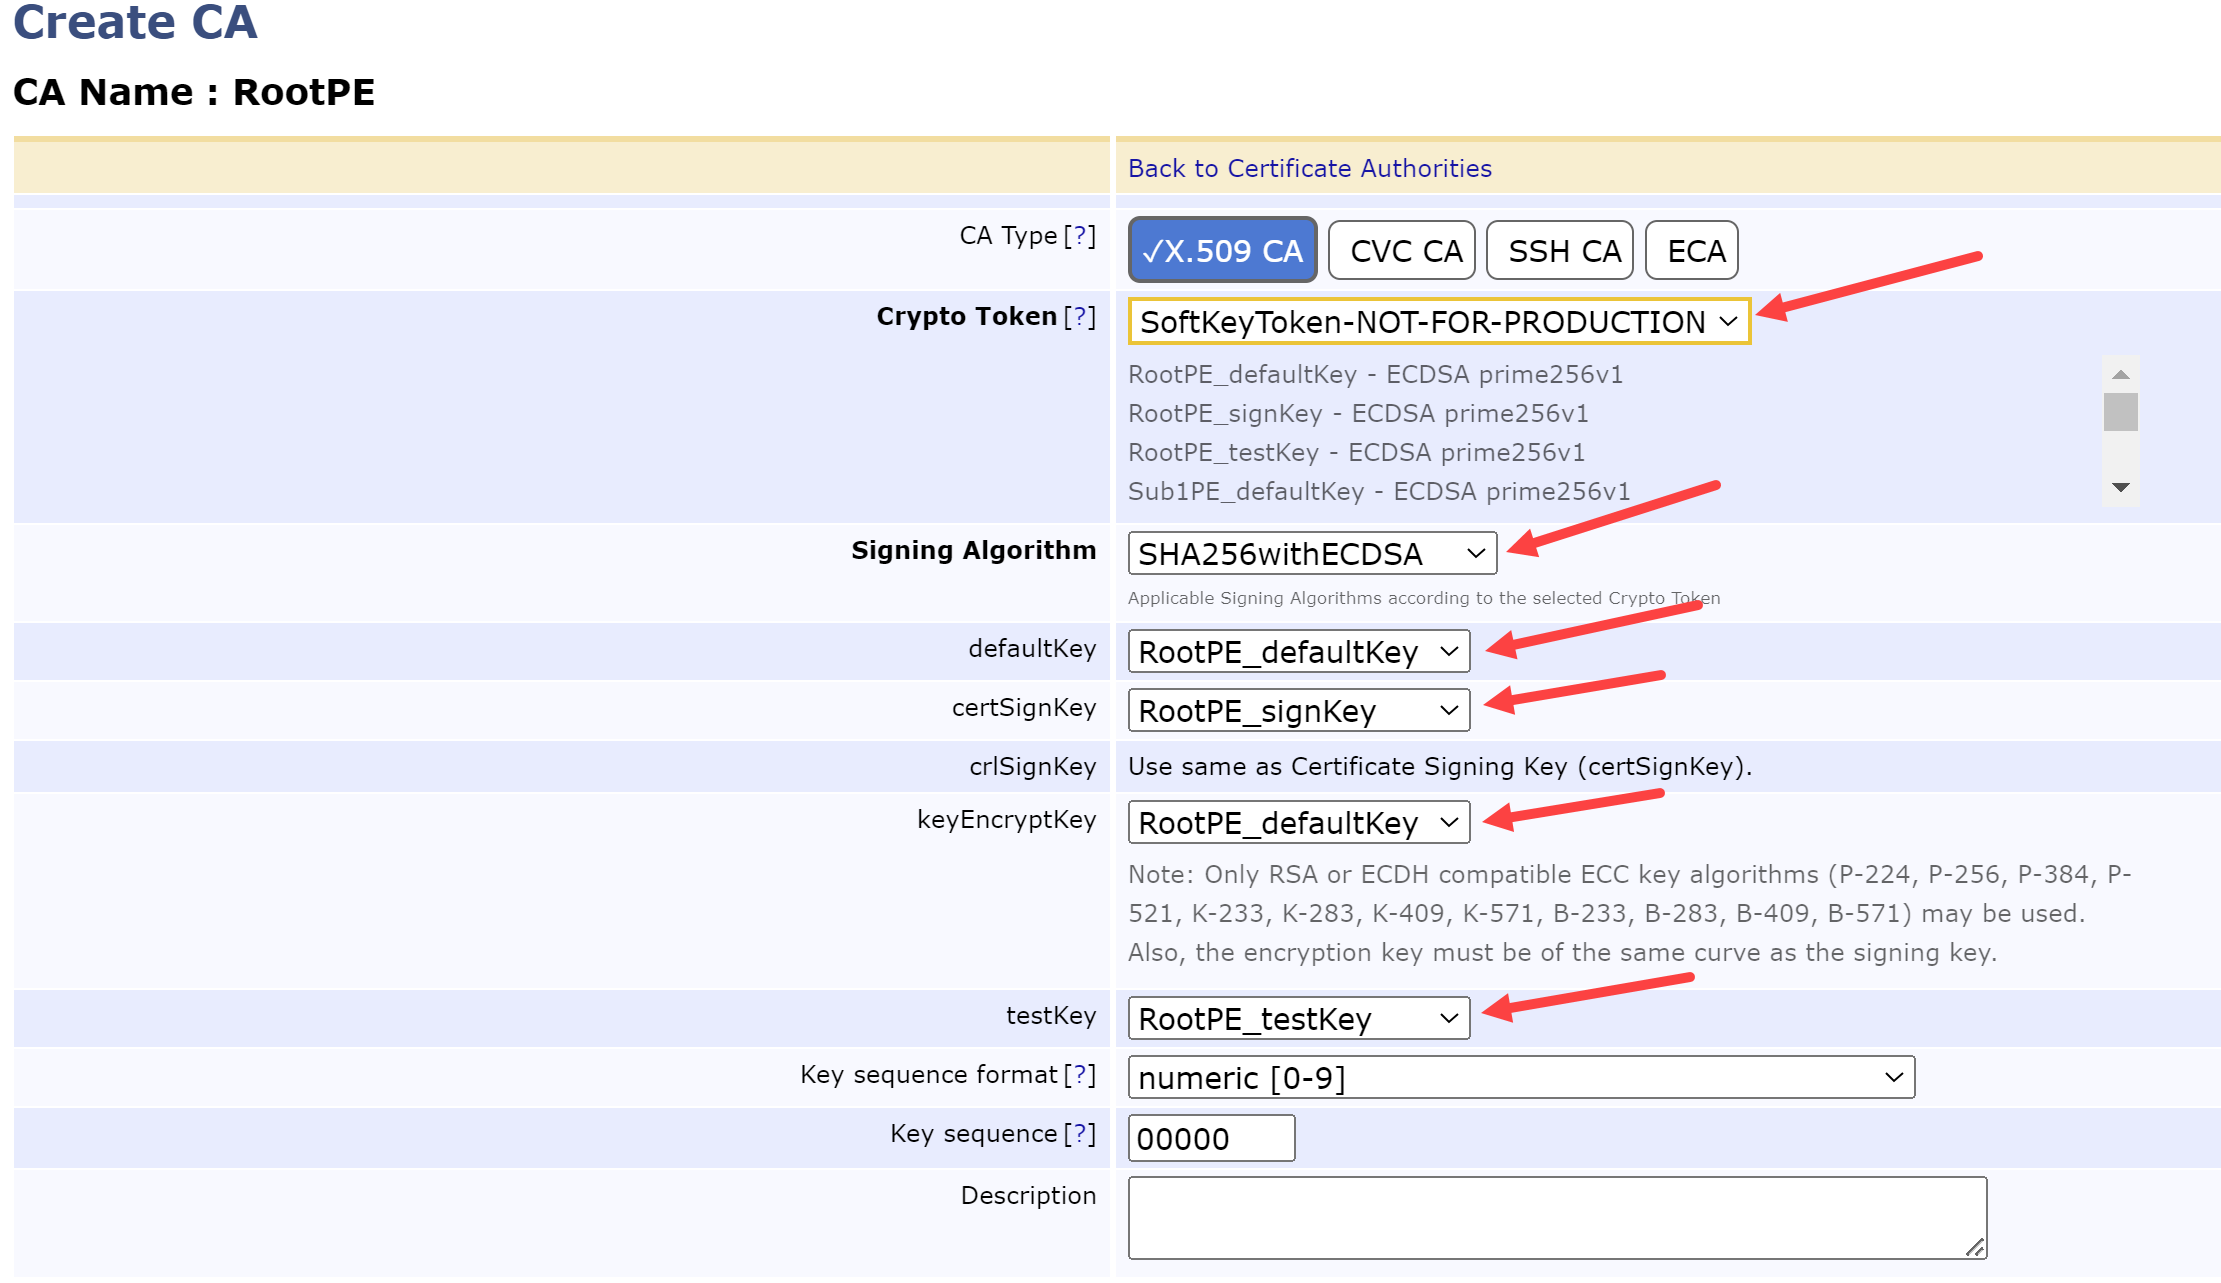
On the following page, change the following fields:
Crypto Token = <token name from above> e.g., SoftKeyToken-NOT-FOR-PRODUCTION
Signing Algorithm = SHA256withECDSA
defaultKey = RootPE_defaultKey
certSignKey = RootPE_signKey
keyEncryptKey = RootPE_defaultKey
testKey = RootPE_testKey
ROOT CA KEY CONFIGURATION
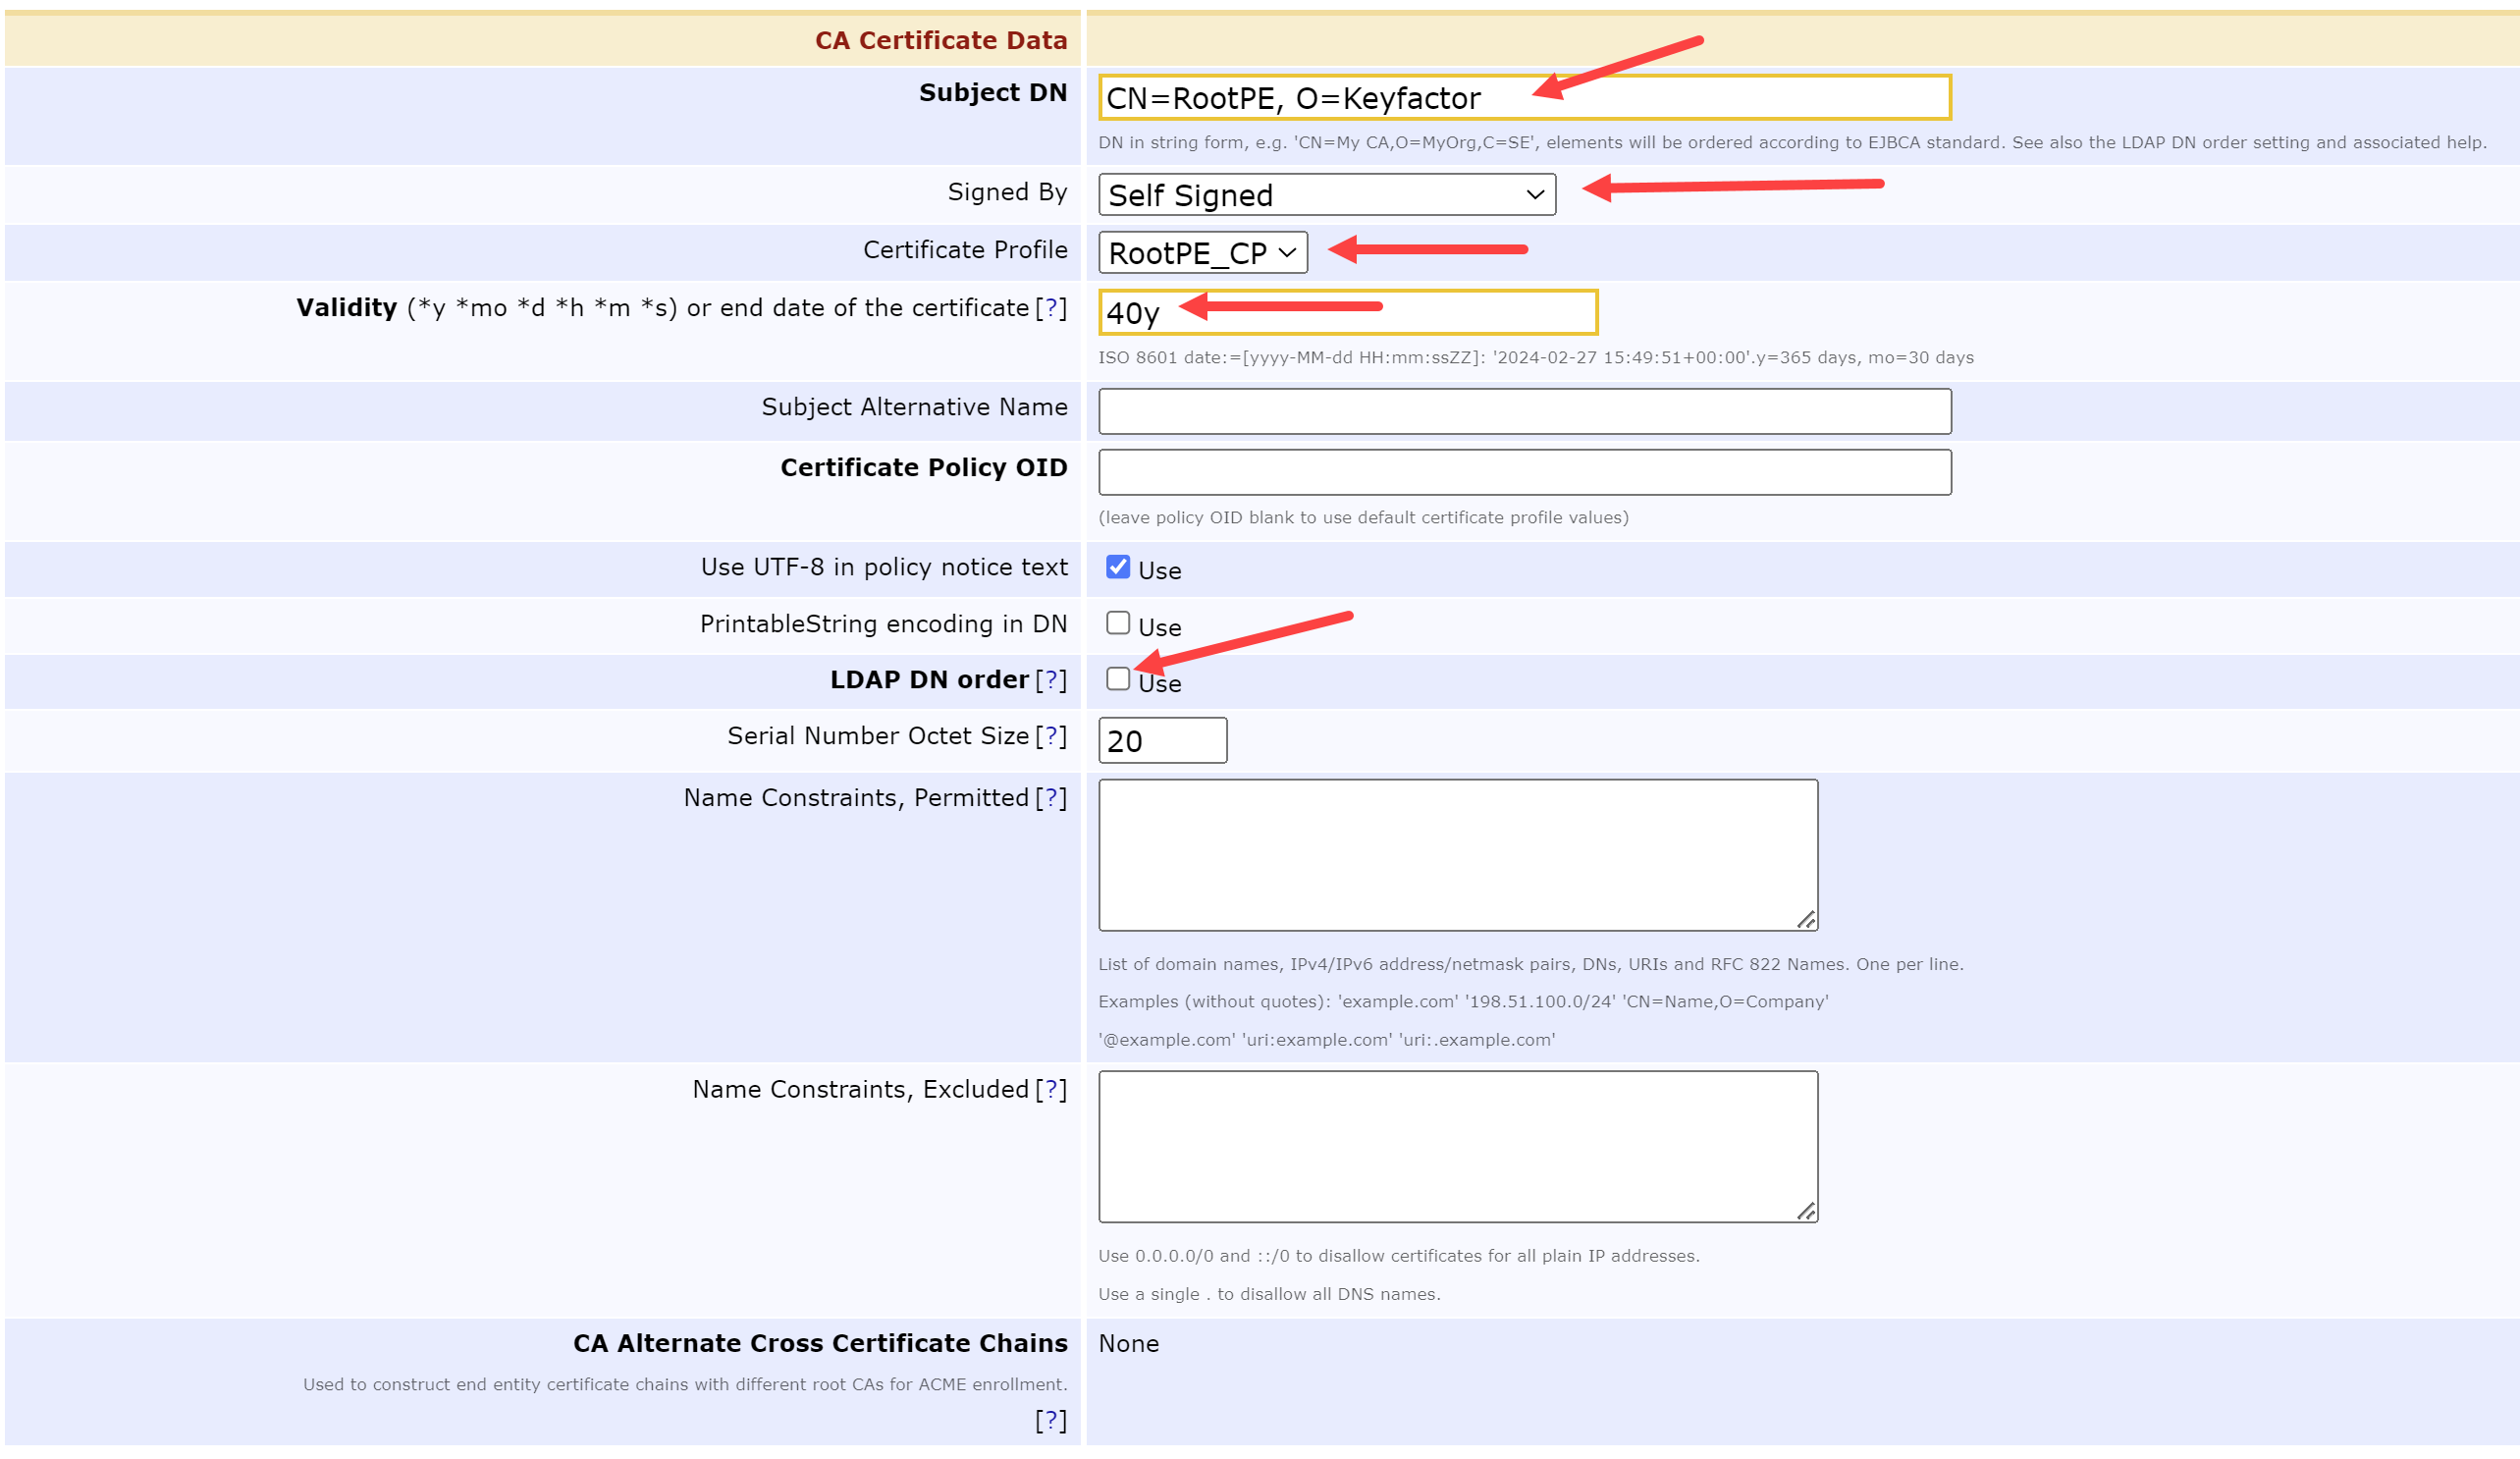
Skip the Directives Section and update the CA Certificate Data by modifying the following fields:
SubjectDN = CN=RootPE, O=Keyfactor
Signed By = Self Signed
Certificate Profile = RootPE_CP
Validity = 40y
LDAP DN order = Unchecked
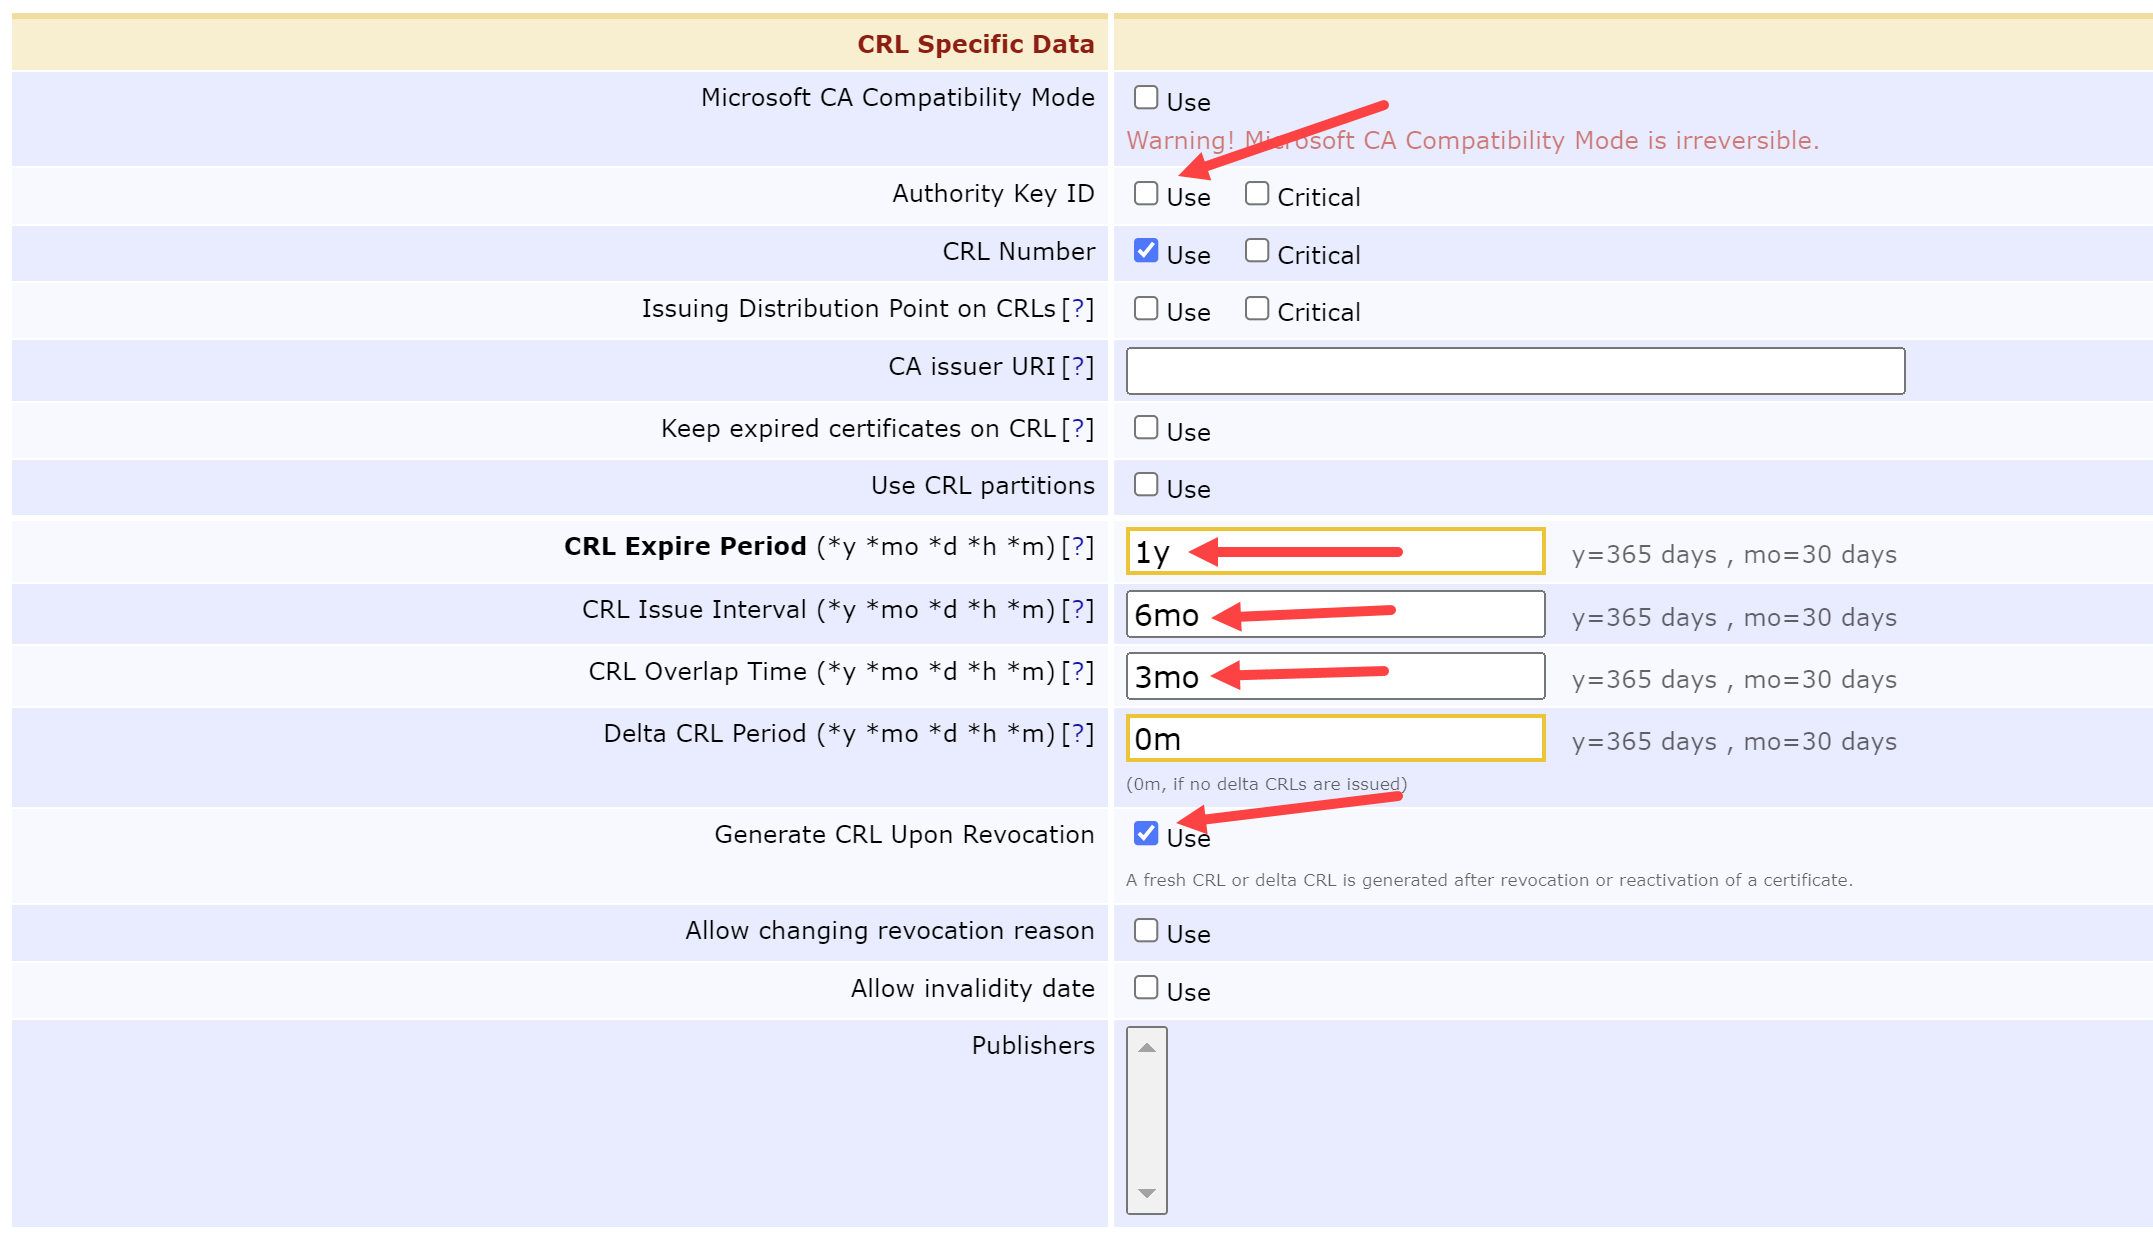
Update the CRL Specific Data by modifying the following fields:
Authority Key ID = Unchecked
CRL Expire Period = 1y
CRL Issue Interval = 6mo
CRL Overlap Time = 3mo
Generate CRL Upon Revocation = Checked
Scroll down to the Default CA defined validation data and select the following buttons:
Default CRL Distribution Point = Generate
Default CRL Issuer = Generate
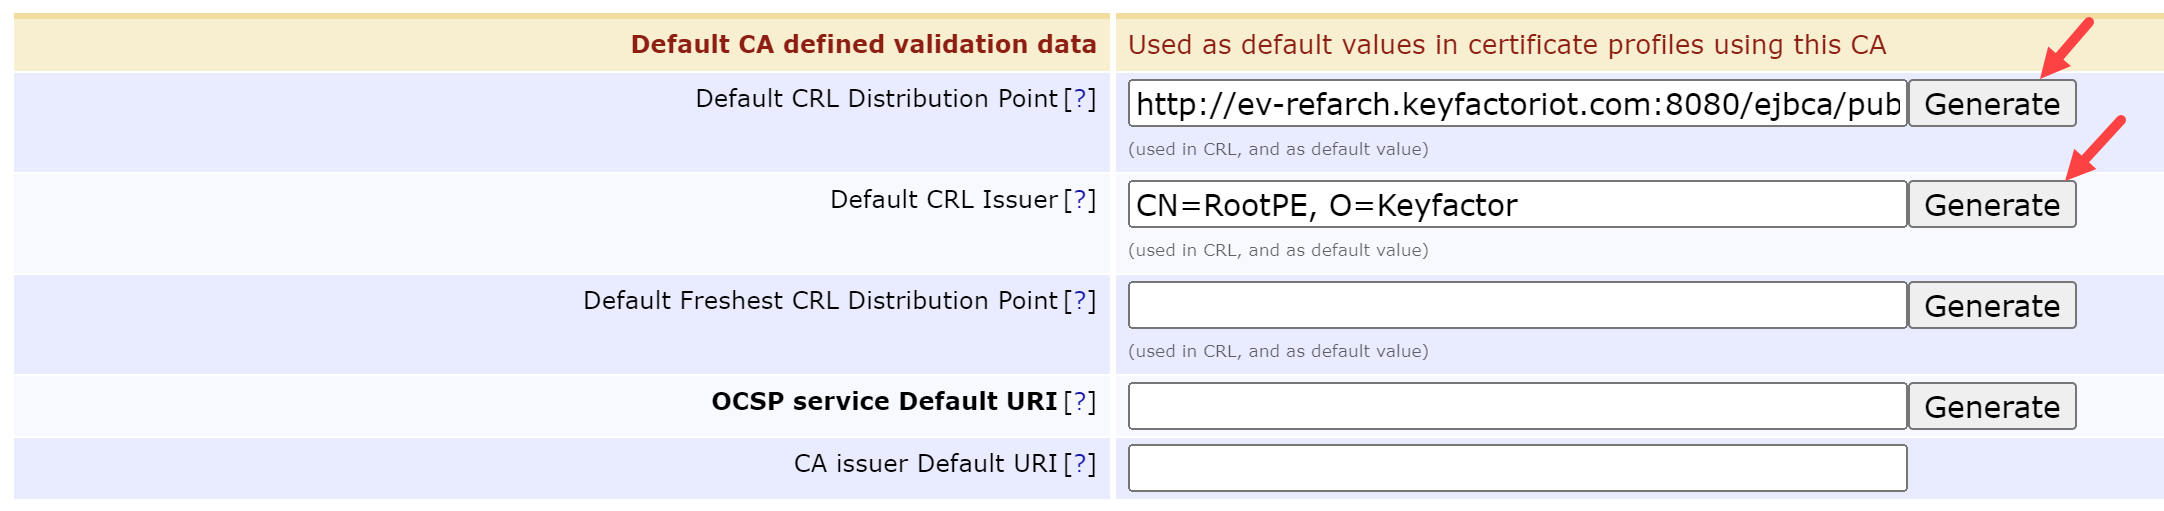
Scroll down and select Create
This generates the Root CA For the Private Environment, the next step is to create Sub CA 1.
Create Sub CA 1
Back on the Manage Certificate Authorities page, under Add CA type Sub1PE and select Create…
On the following page, change the following fields:
Crypto Token = <token name from above> e.g., SoftKeyToken-NOT-FOR-PRODUCTION
Signing Algorithm = SHA256withECDSA
defaultKey = Sub1PE_defaultKey
certSignKey = Sub1PE_signKey
keyEncryptKey = Sub1PE_defaultKey
testKey = Sub1PE_testKey
Skip the Directives Section and update the CA Certificate Data by modifying the following fields:
SubjectDN = CN=Sub1PE, O=Keyfactor
Signed By = RootPE
Certificate Profile = Sub1PE_CP
Validity = 10y
LDAP DN order = Unchecked
Update the CRL Specific Data by modifying the following fields:
Authority Key ID = Unchecked
CRL Expire Period = 1d
CRL Issue Interval = 12h
CRL Overlap Time = 12h
Generate CRL Upon Revocation = Checked

Scroll down to the Default CA defined validation data and select the following buttons:
Default CRL Distribution Point = Generate
Default CRL Issuer = Generate
Scroll down and select Create
This generates the Sub CA 1 For the Private Environment, the next step is to create Sub CA 2.
Create Sub CA 2
Back on the Manage Certificate Authorities page, under Add CA type Sub2PE and select Create…
On the following page, change the following fields:
Crypto Token = <token name from above> e.g., SoftKeyToken-NOT-FOR-PRODUCTION
Signing Algorithm = SHA256withECDSA
defaultKey = Sub2PE_defaultKey
certSignKey = Sub2PE_signKey
keyEncryptKey = Sub2PE_defaultKey
testKey = Sub2PE_testKey
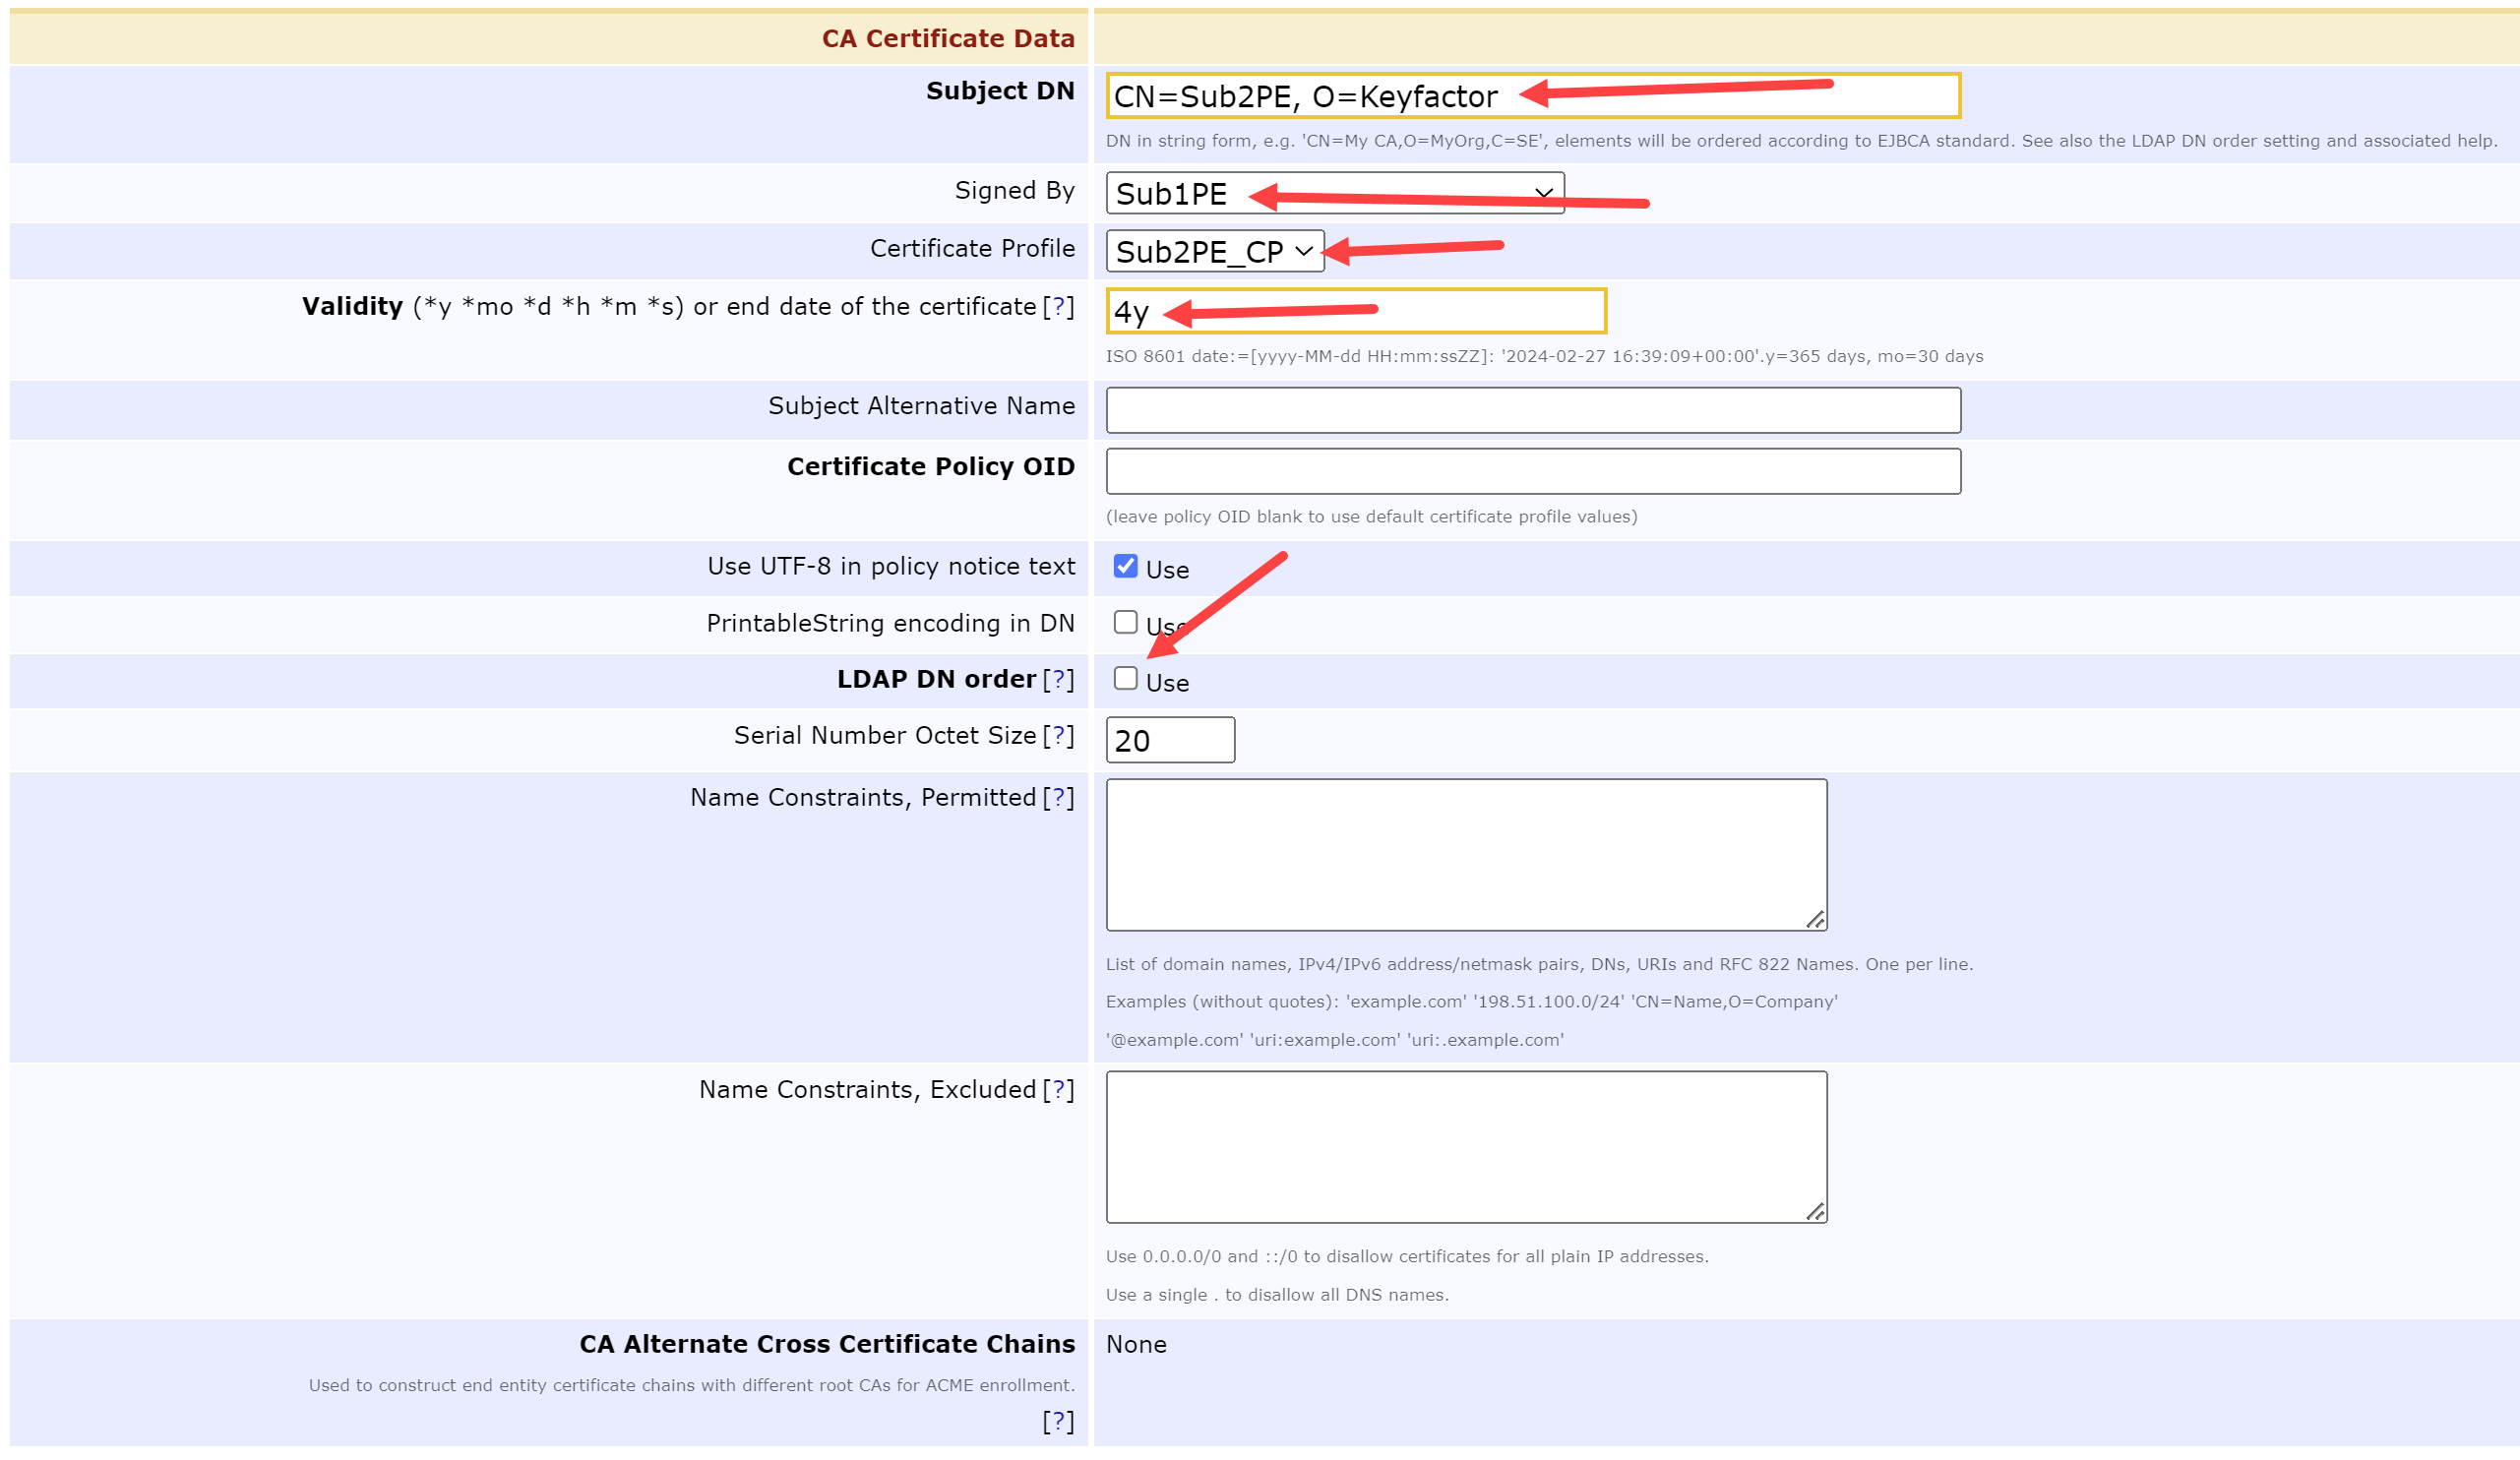
Skip the Directives Section and update the CA Certificate Data by modifying the following fields:
SubjectDN = CN=Sub2PE, O=Keyfactor
Signed By = Sub1PE
Certificate Profile = Sub2PE_CP
Validity = 4y
LDAP DN order = Unchecked
Update the CRL Specific Data by modifying the following fields:
Authority Key ID = Unchecked
CRL Expire Period = 1d
CRL Issue Interval = 12h
CRL Overlap Time = 12h
Generate CRL Upon Revocation = Checked
Scroll down to the Default CA defined validation data and select the following buttons:
Default CRL Distribution Point = Generate
Default CRL Issuer = Generate
Scroll down and select Create
This generates the Sub CA 1 For the Private Environment, the next step is to create the SECC Leaf Certificate Profile.
Create SECC Leaf Certificate Profile
Move back to the Certificate Profiles tab
Select Clone on the SERVER row
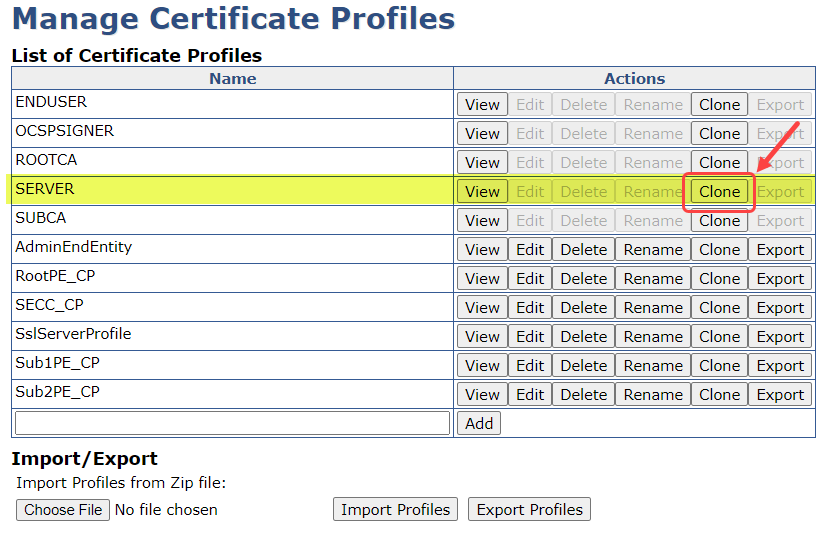
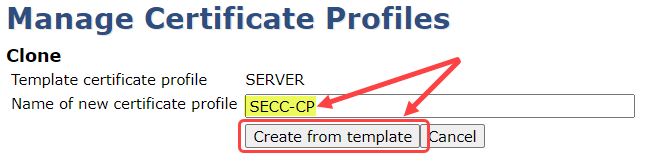
Name the certificate profile (e.g., SECC-CP) and select Create from template
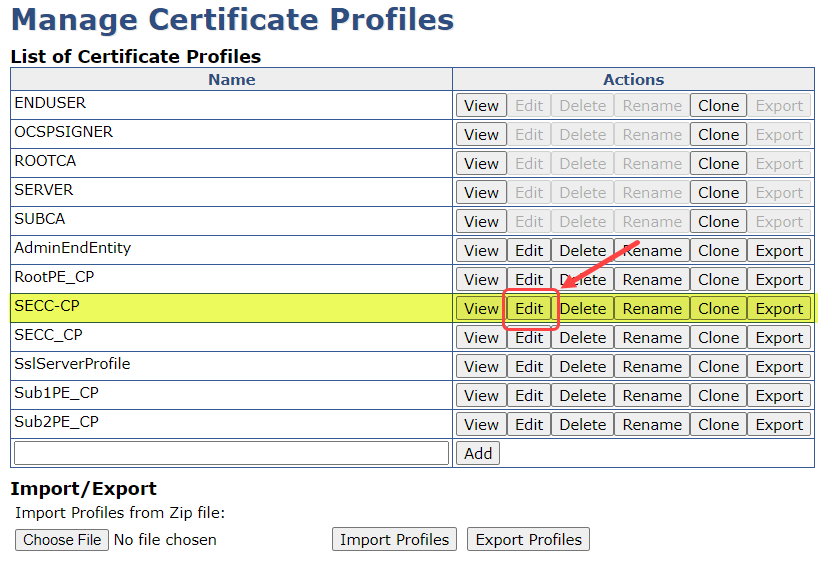
Back on the Manage Certificate Profiles page select Edit from the SECC-CP row
On the following page, make these changes:
Available Key Algorithms = ECDSA (only)
Available ECDSA curves = P-256 / prime256v1 / secp256r1
Signature Algorithm = SHA256WithRSA
Validity or end date of the certificate = 2y
Under the x.509v3 extensions - Usages modify make sure these items are selected:
Key Usage = Use… & Critical both checked
Digital Signature = checked
Non-repudiation = checked
Key encipherment = checked
Key agreement = checked
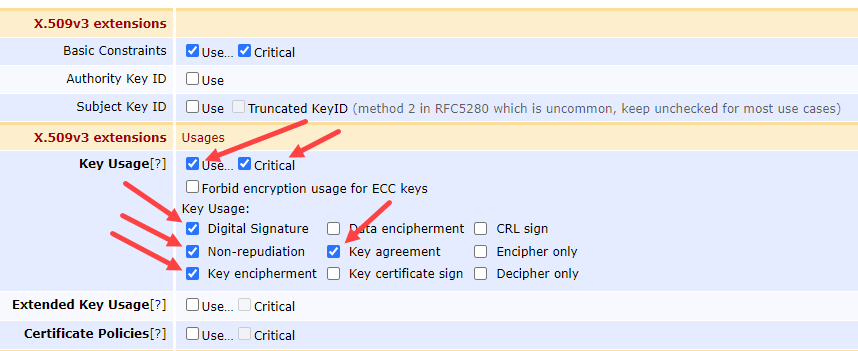
x.509v3 extensions & Usages
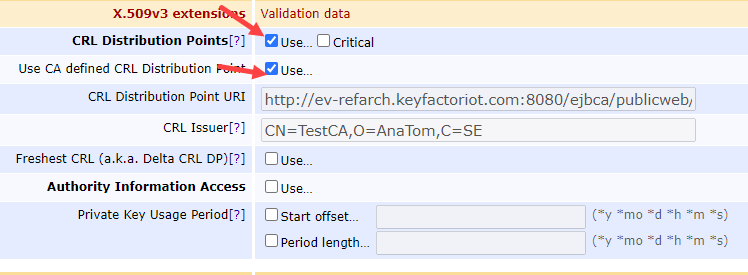
Under the X.509v3 extensions - Validation data make sure these items are checked
CRL Distribution Points - Use… = Checked
Use CA defined CRL Distribution Point - Use… = Checked
Scroll down to the Other Data section, and make sure to select these:
LDAP DN order = unchecked
Available CAs = Sub2PE
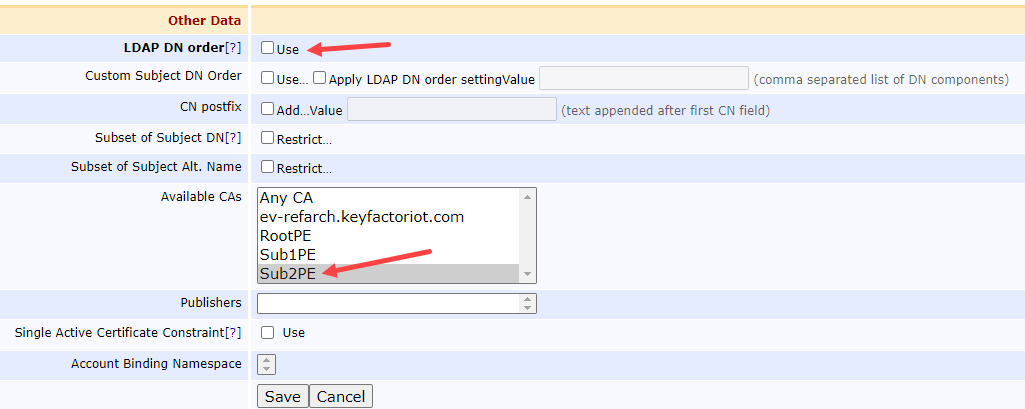
Select Save
Now that we have defined the Certificate Profile for a SECC in a PE, let’s define the required End Entity information.
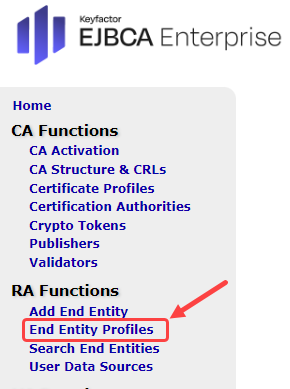
Create SECC End Entity Profile
Select End Entity Profiles on the left hand tab
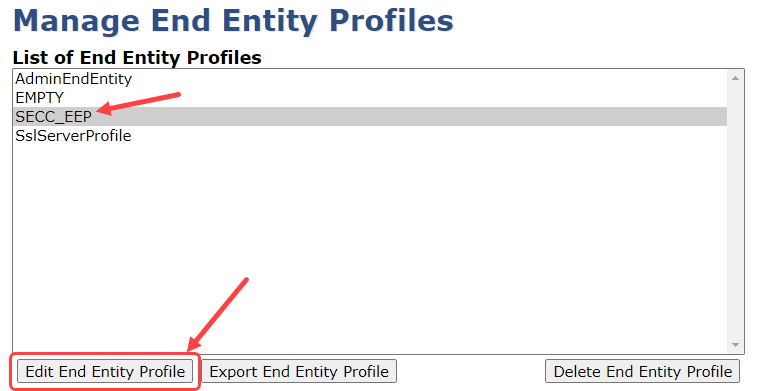
Under Add End Entity Profile type in a name and select Add Profile

Back on Manage End Entity Profiles, select the profile we just created and select Edit End Entity Profile
In the first section
End Entity E-mail = Unchecked
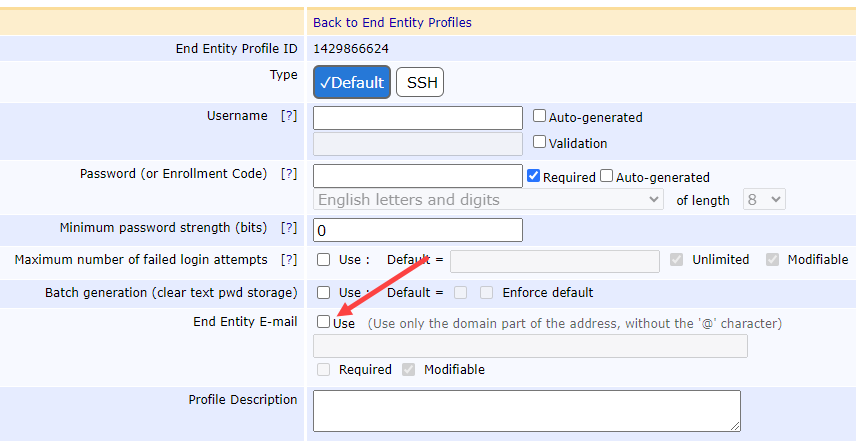
In the Subject DN Attributes Section
Select O, Organization from the pulldown
Select Add
Enter an organizational Name (e.g., Keyfactor)
Modifiable = unchecked
Required = checked
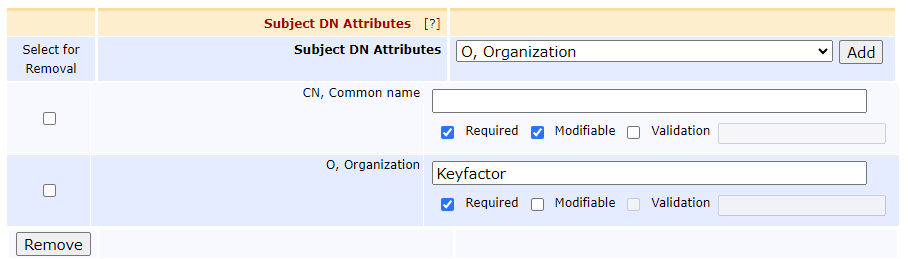
This forces us to only issue certificates that have a CSR with an O=Keyfactor in them. If the CSR does not have this in it, EJBCA will reject the request.
Under the Main Certificate Data section
Default Certificate Profile = SECC-CP
Available Certificate Profiles = SECC-CP
Default CA = Sub2PE
Available CAs = Sub2PE
Default Token = User Generated
Available Tokens = User Generated
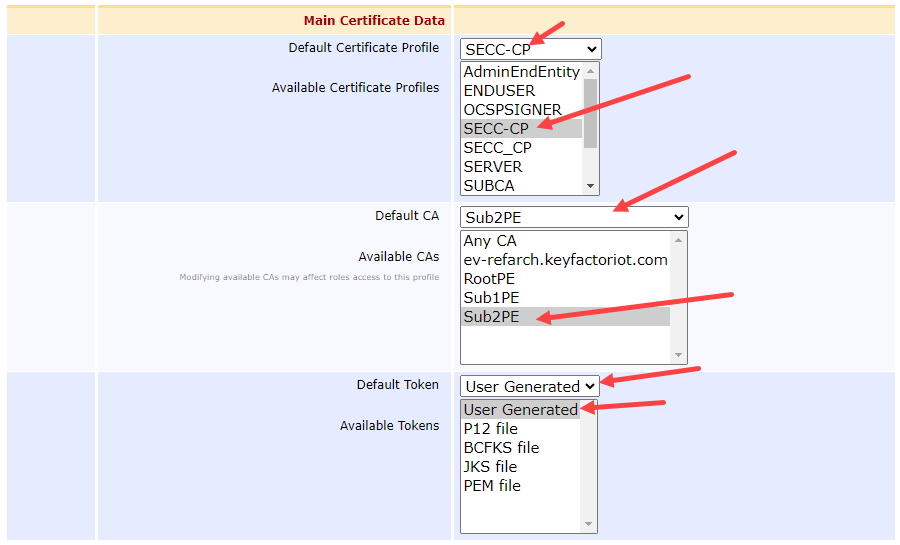
NOTE: This configuration only accepts CSRs (i.e., User Generated).
Select Save
Now that we have configured the certificate profile and end entity profile for a PE SECC, let’s get a certificate from EJBCA!
Configure an Ubuntu VM to simulate the SECC
Create and install an Ubuntu VM using Azure, AWS, Digital Ocean, VMWare,https://ubuntu.com/tutorials/how-to-run-ubuntu-desktop-on-a-virtual-machine-using-virtualbox#1-overview
Update the VM and install the pre-requisites:
sudo apt update && sudo apt upgrade -y
sudo apt install -y openssl
Create keypairs and CSR on simulated SECC
Create a private key & then encrypt it
openssl ecparam -name prime256v1 -genkey | openssl pkey -out secc-encrypted-priv-key.pem -aes-256-cbcWhen prompted, enter a passphrase for the private key

Example Output and catted encrypted key
Create a CSR using the encrypted private key
openssl req -new -key secc-encrypted-priv-key.pem -out secc.csr -subj "/O=Keyfactor/CN=F012A3E456789ABCDEF01234567890AB" NOTE: The CN is the PEID of the SECC. This is a 16-byte binary value that uniquely identifies the PEID.
Here is an example output with catted result & decrypted CSR:

Example output and resulting CSR decryption
Issue certificate from EJBCA to the SECC using the UI
Copy the contents of the secc.csr into the clipboard
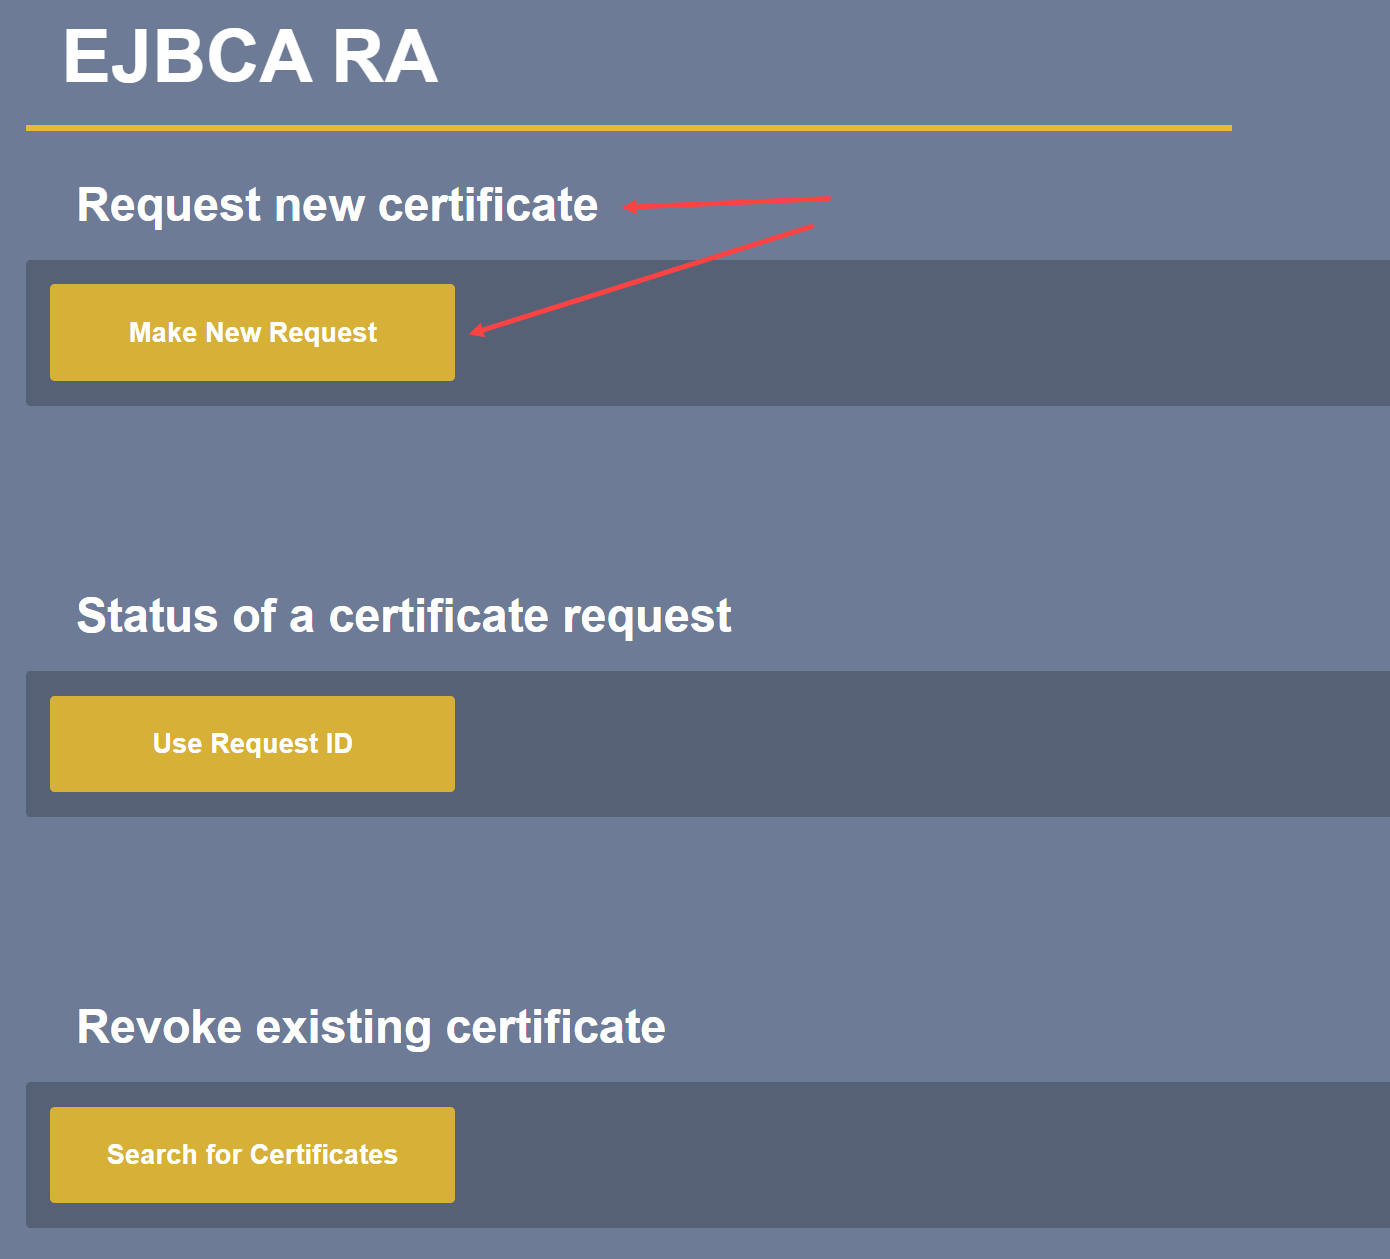
Back in EJBCA, select RA Web from the left hand tab
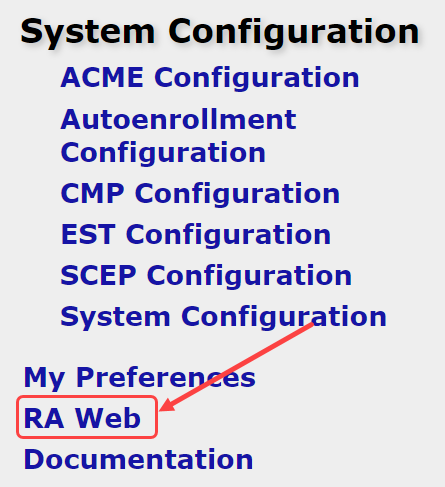
Under Request new certificate select Make New Request
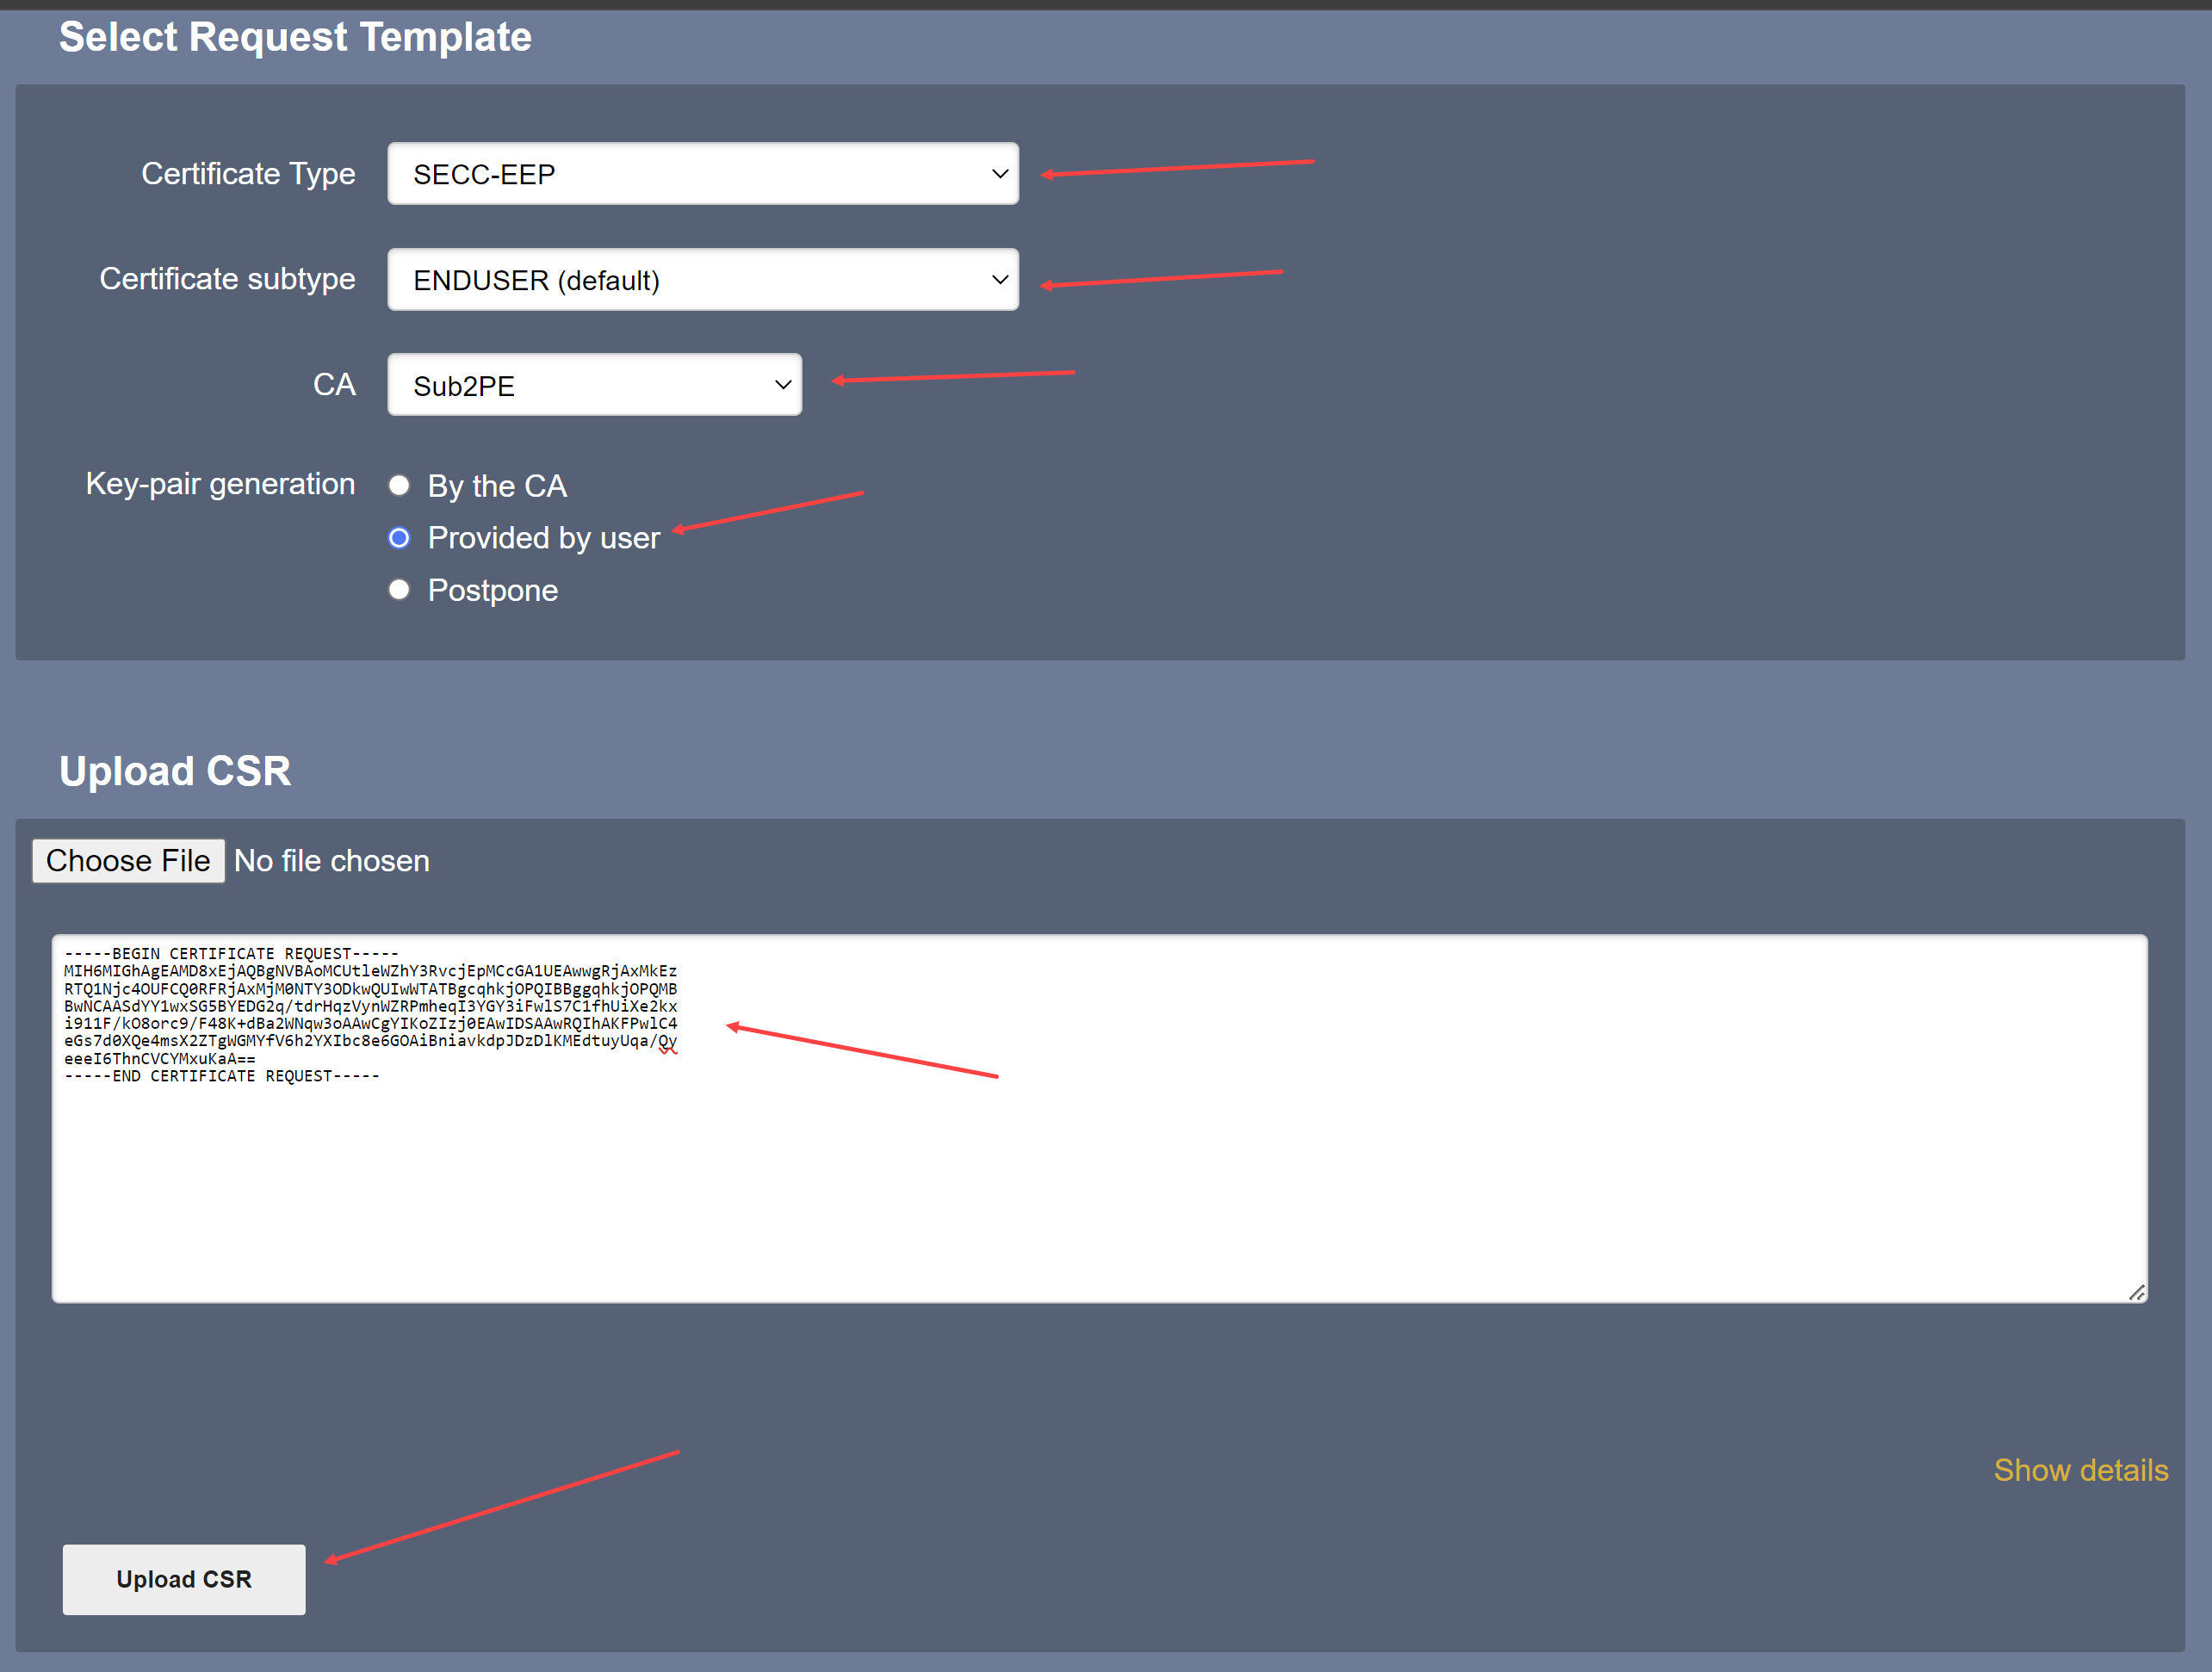
For Certificate Type select SECC-EEP from the pulldown
For Certificate subtype select ENDUSER (default)
From CA select Sub2PE
For Key-pair generation select Provided by user
Paste the CSR into the box provided
Select Upload CSR
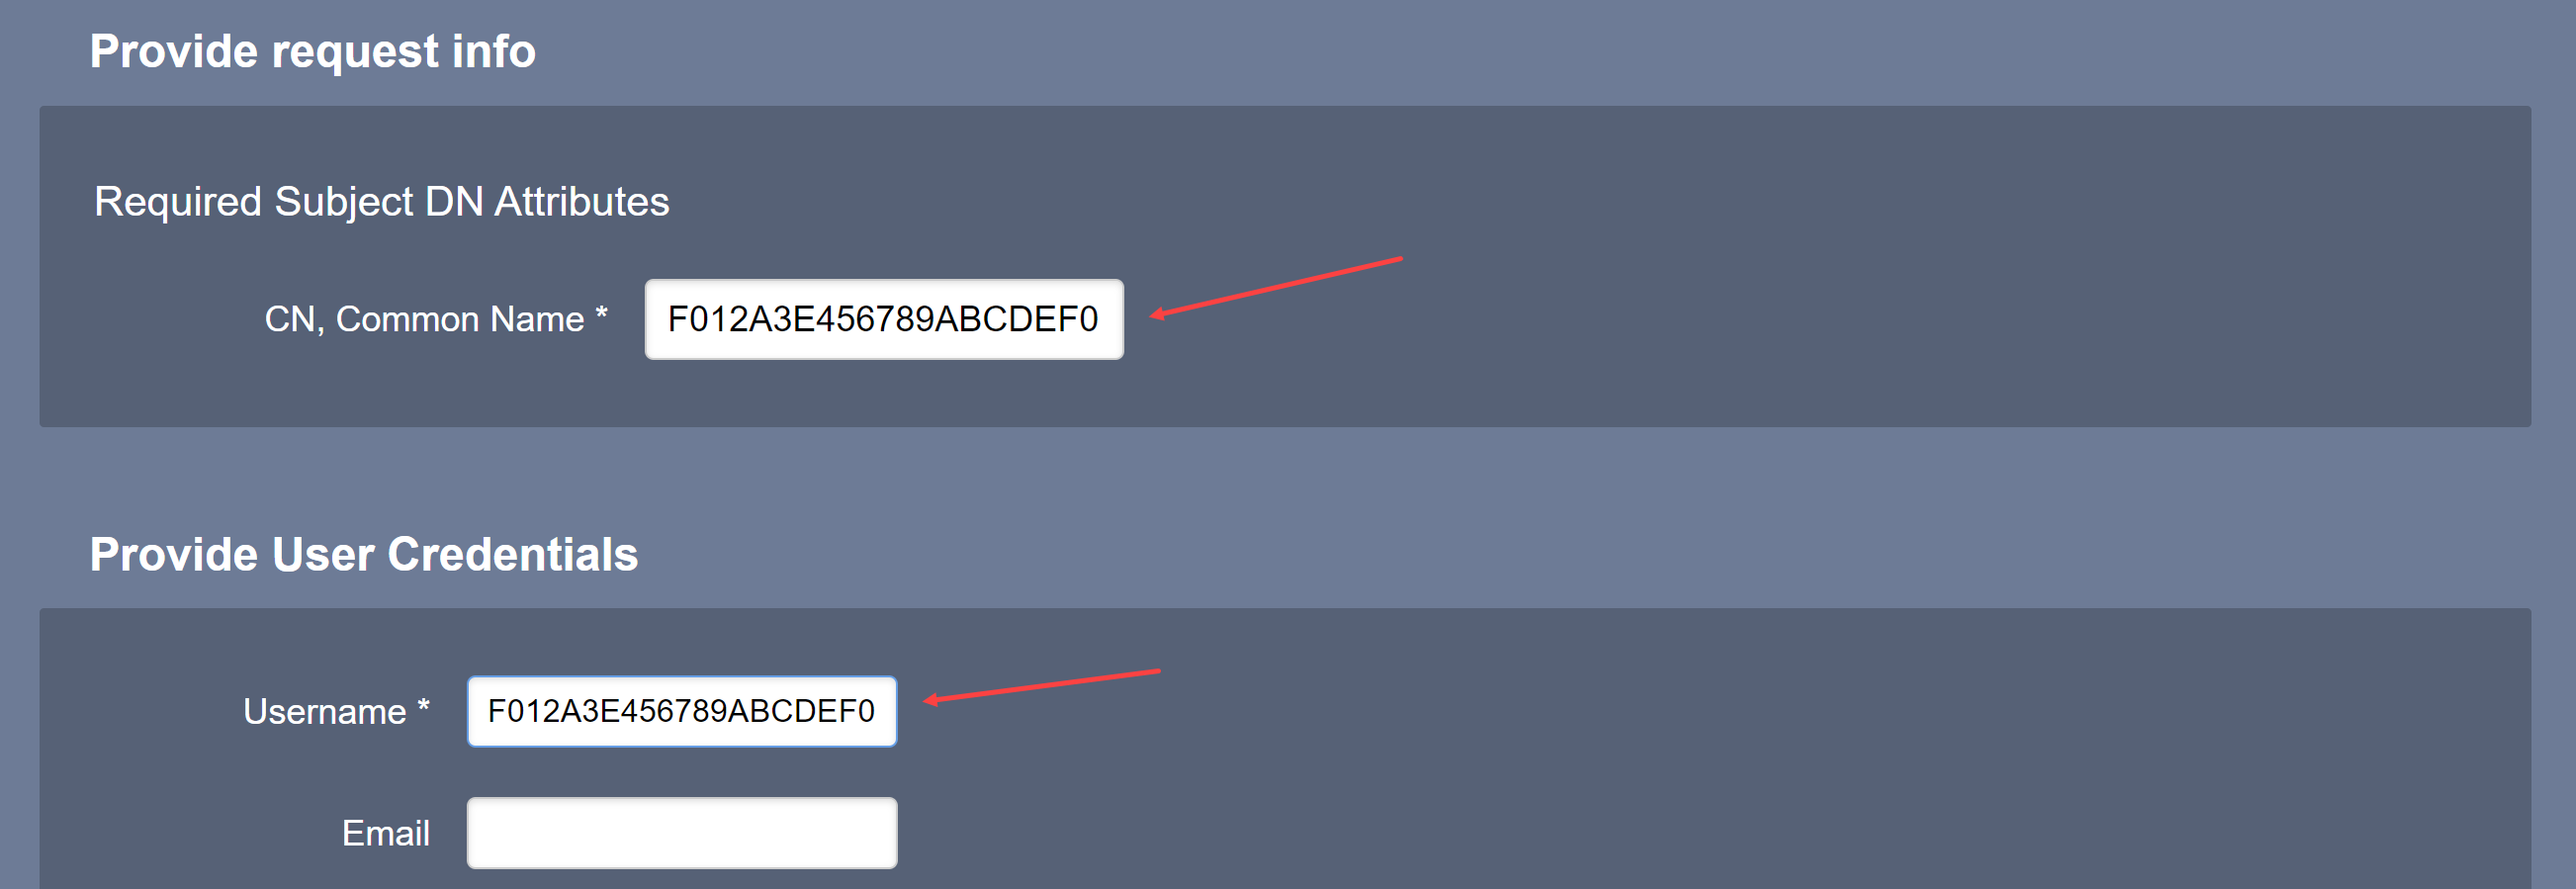
Verify the Common Name is the SECC’s PEID
Type in a Username (typically, the PEID will suffice)
Leave Email blank
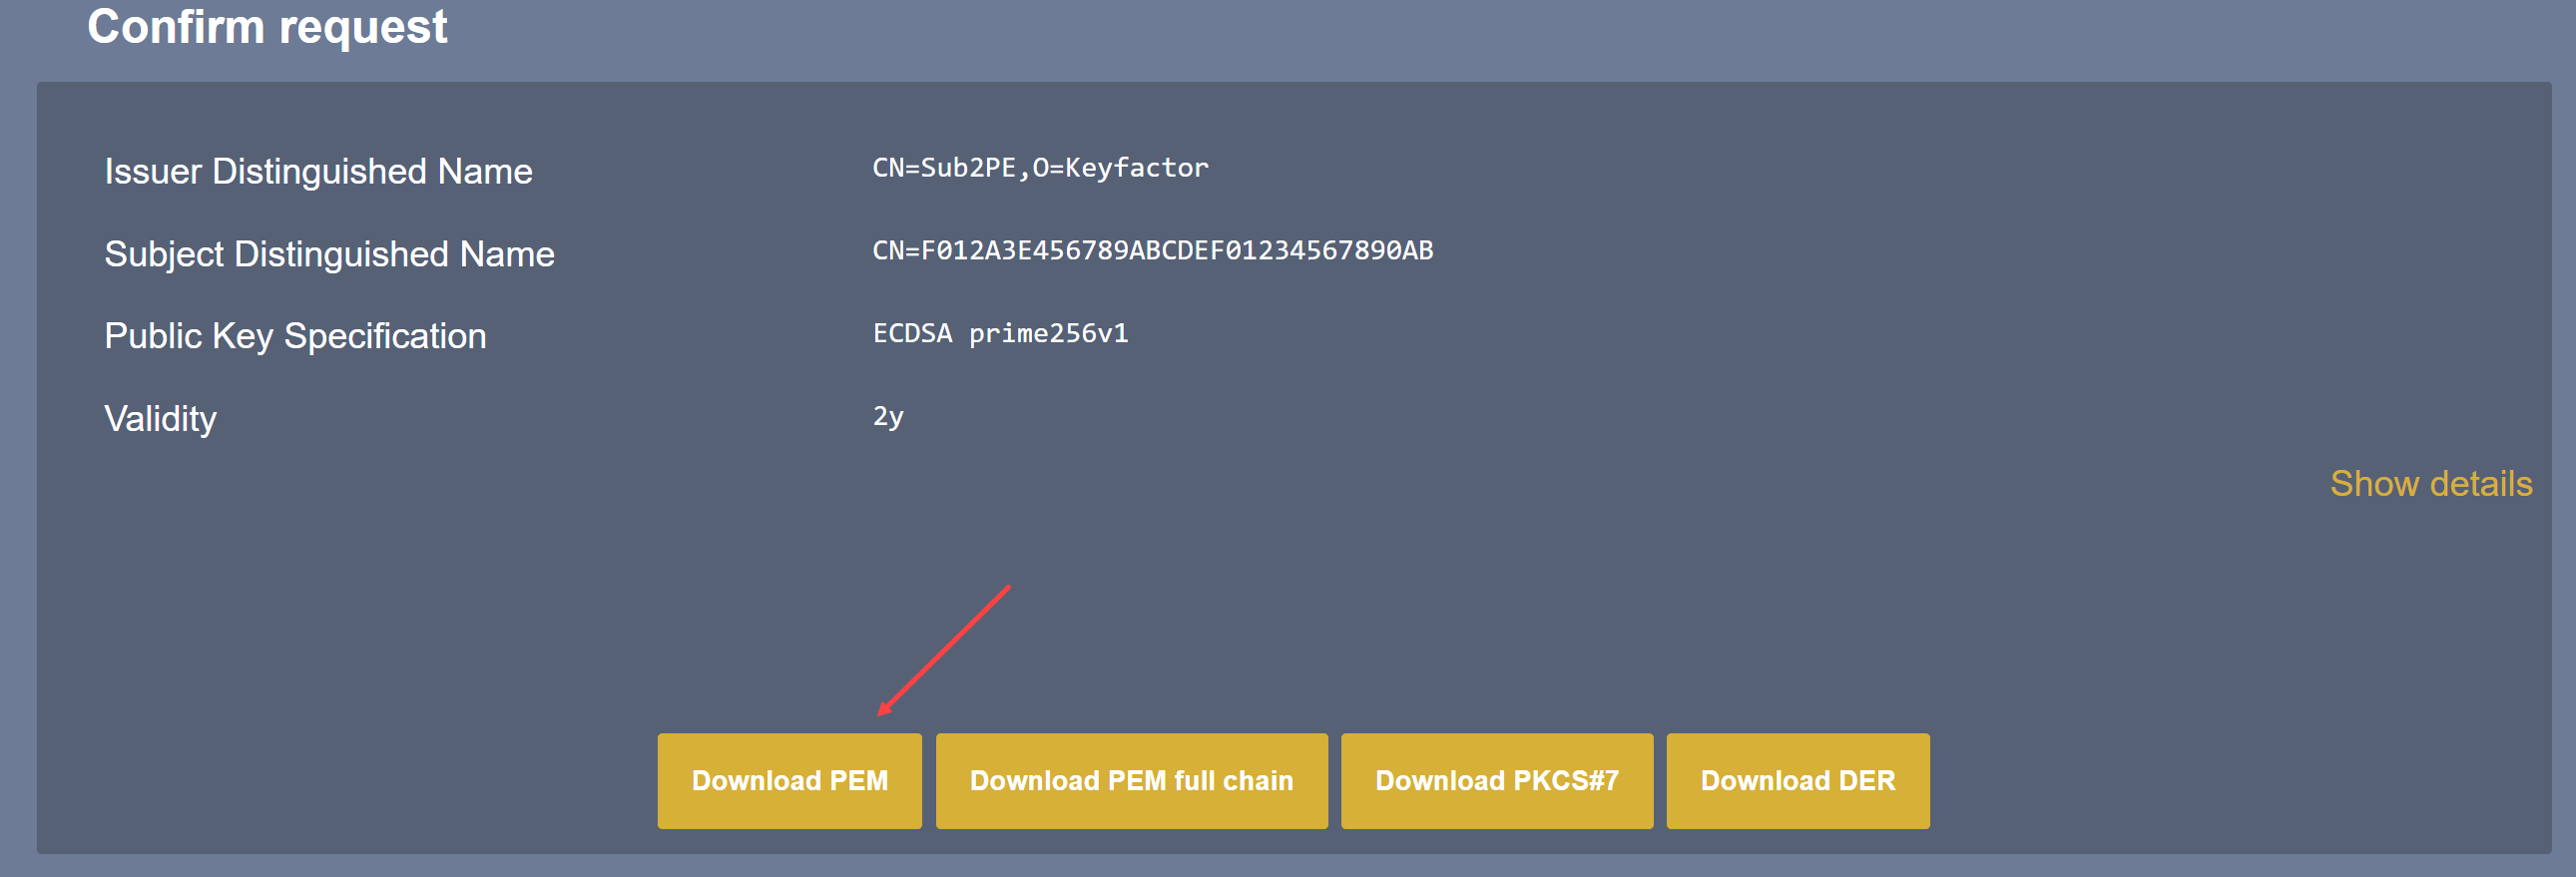
Select Download PEM
Copy the PEM file to your Ubuntu machine
Use openssl to view the certificate’s contents
openssl x509 -noout -text -inform PEM -in <pemfilename>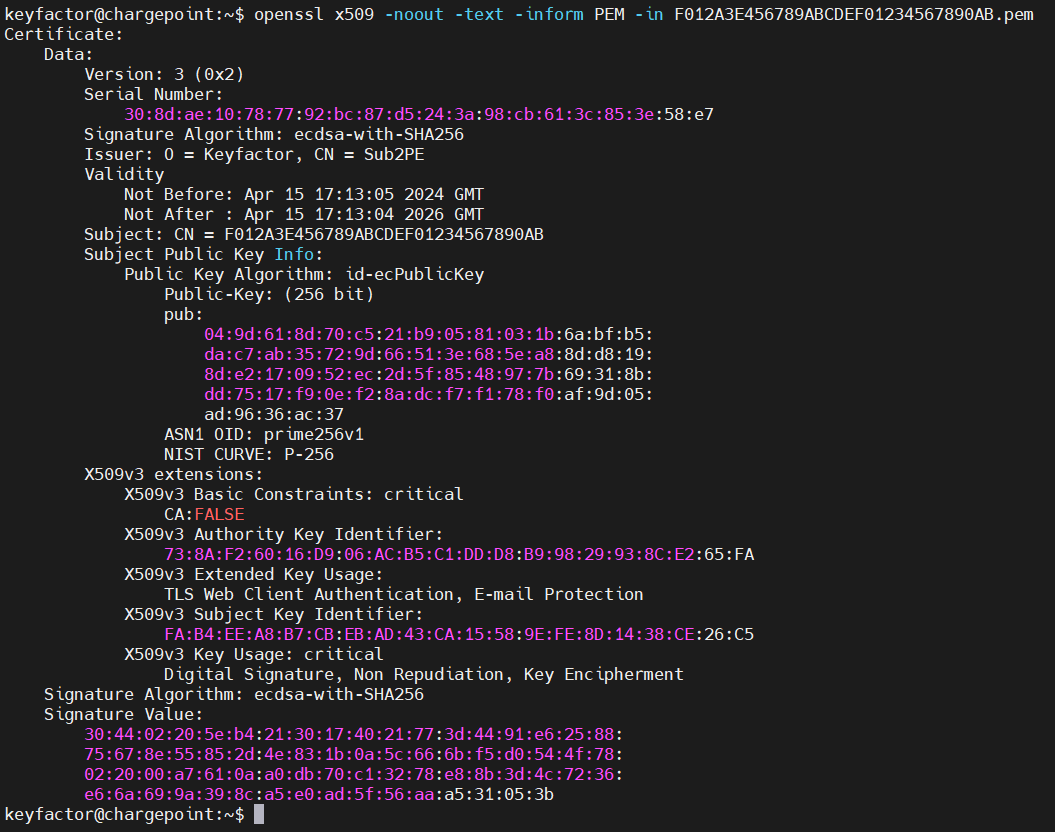
Example PEM output
This file is larger than the accepted 800 bytes. To provide a condensed version of the PEM file, we should convert this format to DER (a binary representation).
Convert PEM to DER on SECC
openssl x509 -inform PEM -in <pemfile> -out <derfilename> -outform DERHere is an example that shows the file size of the above certificate is now 468 bytes

Verification
You can use this certificate and private key in establishing an mTLS session with a server that trusts the PE root. However, you can also perform a manual verification by doing the following.
Extract the public key from the private key
CODEopenssl pkey -in -inform PEM -pubout -out secc-public-key.pem -in secc-encrypted-priv-key.pemExtract the public key from the certificate
CODEopenssl x509 -pubkey -noout -out cert-public-key.pem -in F012A3E456789ABCDEF01234567890AB.pemCompare the two files
CODEdiff secc-public-key.pem cert-public-key.pem
Any difference in the keys is noted in the files. If the last command returns a blank line, then the keys match.

Example Verification of Public Keys